Disciple: A comprehensive guide to securing Cisco IOS
Cisco equipment is widely used in production networks. This is a comprehensive article on how to protect Cisco IOS.

Cisco equipment is widely used in production networks. This is a comprehensive article on how to protect Cisco IOS.
Caster - Disciple

Genre: Defensive
Label: exploit.org
Release Date: 24 April 2024

Performed by: Caster
Written by: Magama Bazarov
Mastered by: Magama Bazarov
Cover Man: Magama Bazarov (Sony ILCE-7M3, f/9.0, 1.6 sec)
"Nihilist"
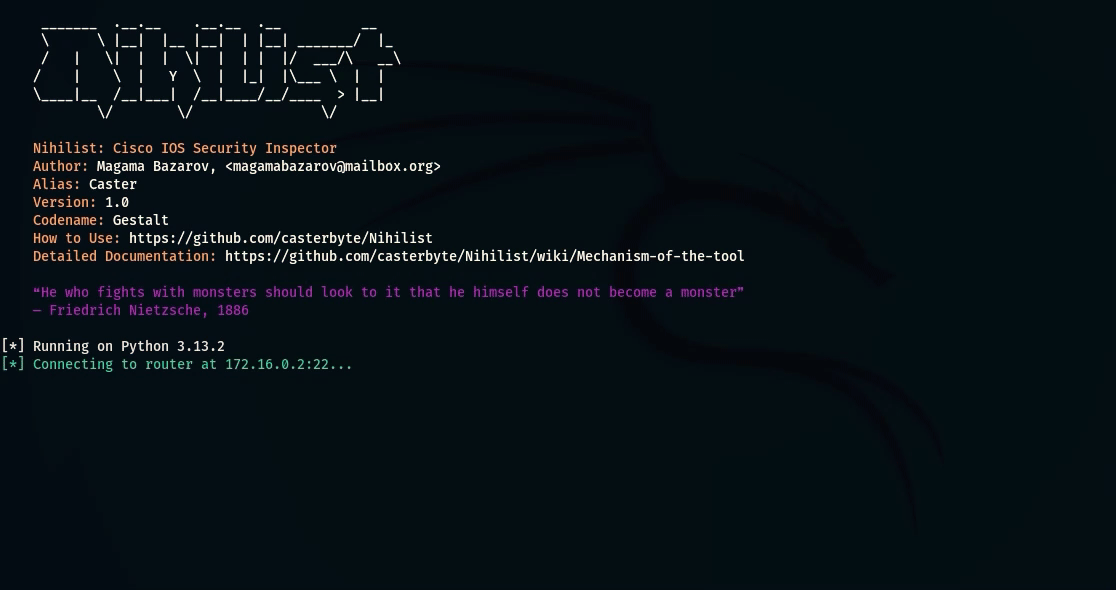
There is a solution that allows you to automate Cisco IOS security audits.
I have released a tool called “Nihilist” that identifies security issues based on Cisco IOS configuration analysis.
This is a very interesting tool that supports L2 and L3 devices testing, including system checks, hashing, and more.
Nihilist's work is described in more detail here
TACACS+ Security
This protocol is analogous to RADIUS and is used in the Cisco ecosystem to control access to equipment using an AAA server.
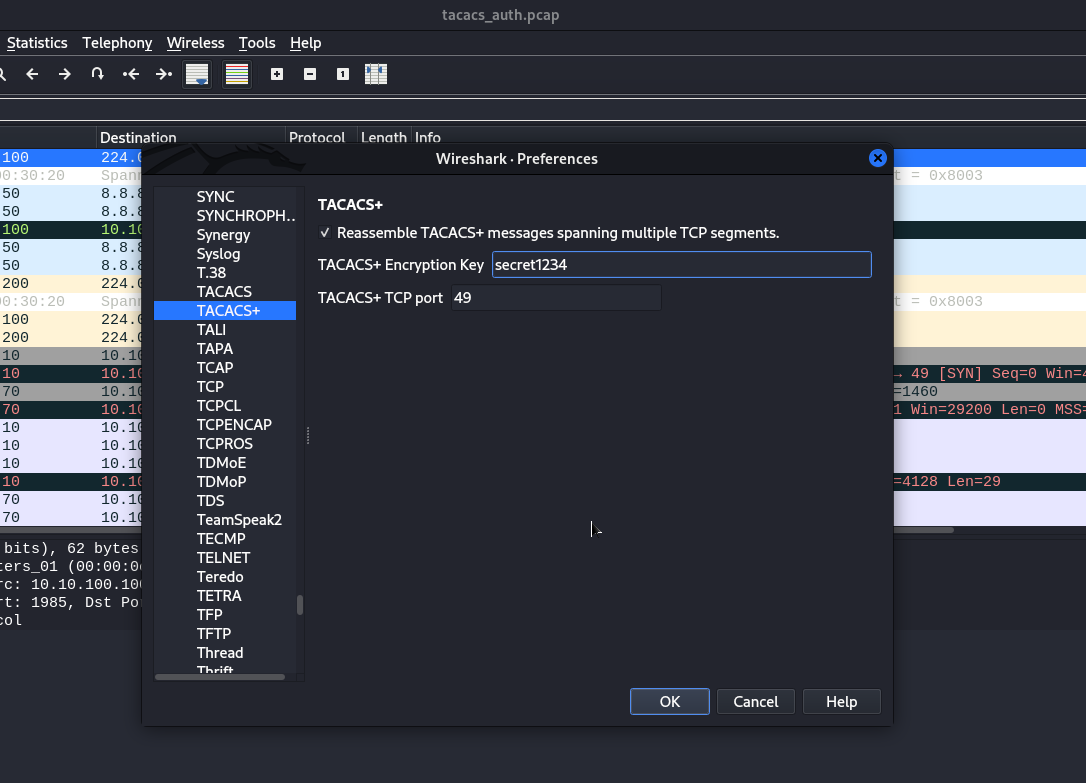
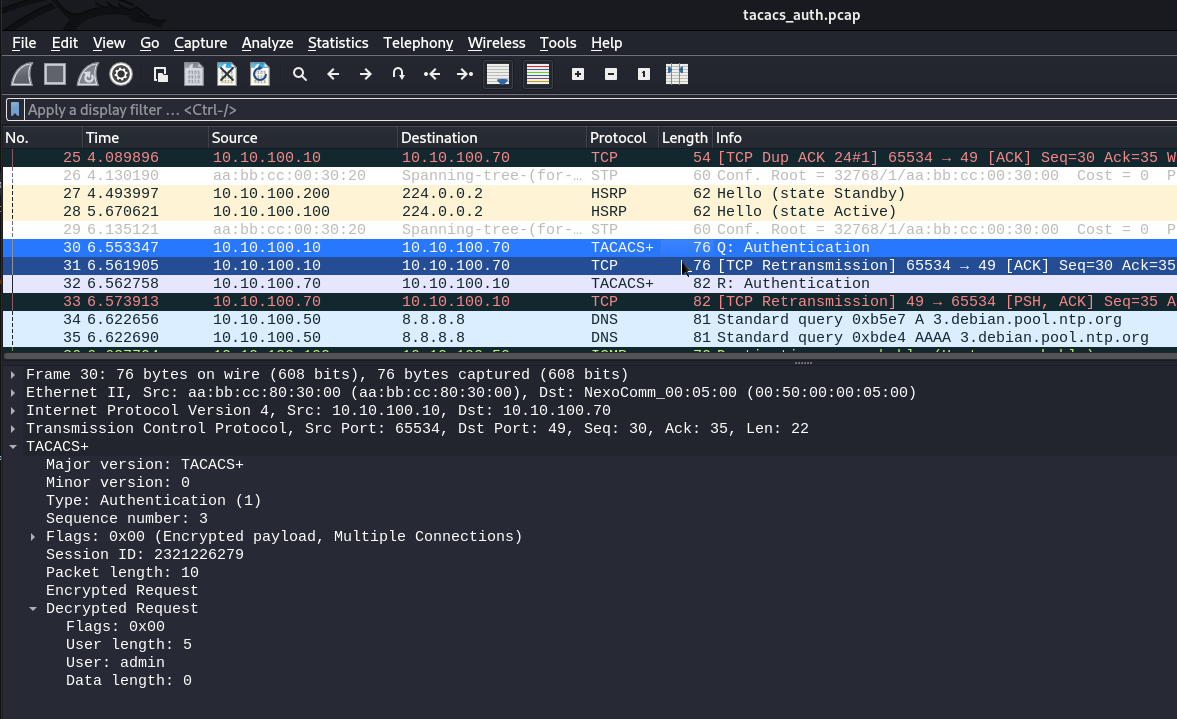
However, there is a risk of intercepting TACACS+ traffic and bruteforcing the key, so you need to work on the persistence of the TACACS+ key.
If an attacker performs a MITM attack and intercepts TACACS+ traffic - he will have the ability to brute force the key. For interception and bruteforce, the attacker uses Loki
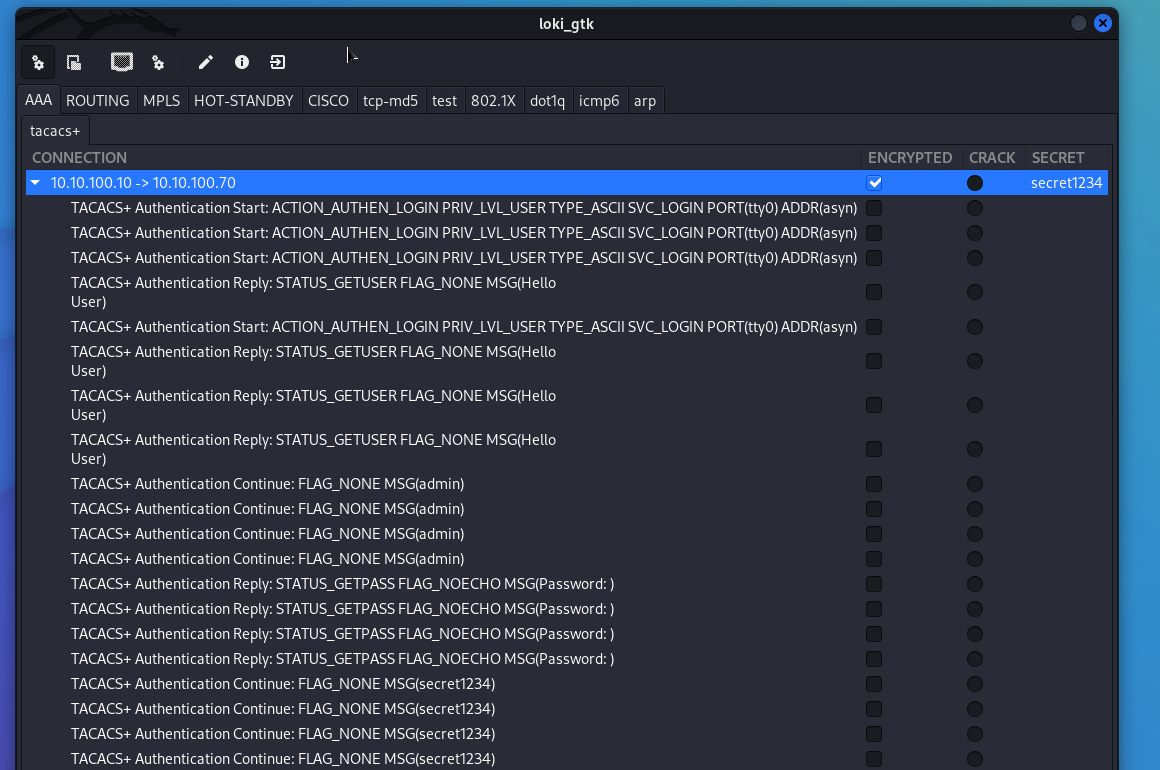
If you use TACACS+, make sure that the passphrase is strong.
Protection of control interfaces (RMI)
Cisco equipment can be managed remotely using VTY lines, which must be protected from unauthorized access
Filtering
One of the most effective methods. Access to the equipment only from a specific subnet, such as the network administrators segment.
It is quite simple: create an ACL, specify the subnet and bind to terminal lines. And binding is a very key point. If you create an ACL but do not bind to VTY, the ACL will have no effect.
Suppose the administrators network is 10.10.240.0/24, we will allow it to access the hardware. The other subnets are banned because of deny any.
Disciple(config)# access-list 10 permit 10.10.240.0 0.0.0.255
Disciple(config)# access-list 10 deny any
Disciple(config)# line vty 0 15
Disciple(config-line)# access-class 10 in
Disciple(config-line)# end
Disciple# write memory
Sticking RMIs out towards the Internet
Make sure that the Cisco IOS hardware management interfaces do not stick out toward the Internet.
The management interfaces should only be accessible from the internal infrastructure or private VPN network.
RBAC
Adhere to the principle of giving out the least possible privileges to accounts. I mean, don't give everyone the maximum administrative (15) access. Manage account capabilities wisely.
Limit number of sessions
You can limit the number of administrators on the equipment at the same time. Only for three engineers.
Disciple# enable
Disciple# configure terminal
Disciple(config)# line vty 0 15
Disciple(config-line)# session-limit 3
Disciple(config-line)# end
Disciple# write memory
Login Blocking
Block access if you have made unsuccessful login attempts within a certain period of time. This would be especially useful if the administrator segment, specifically the administrator's computer, was infected with a trojan attempting to bruteforce against SSH, for example
This command configures the device so that after three failed login attempts within 60 seconds, access will be blocked for 60 seconds. This will help to prevent quick password guessing (bruteforce) attempts.
Disciple#enable
Disciple#configure terminal
Disciple(config)#login block-for 60 attempts 3 within 60
Disciple(config)# end
Disciple# write memory
But you can also configure a setting that determines which IP addresses are allowed to attempt to connect to the device even while blocked. This is usually done for potential emergency network events.
IP addresses are taken from the ACL number you configured earlier. Instead of XX is your ACL number.
Disciple(config)#login quiet-mode access-class XXTelnet
Refuse to use Telnet. The traffic of this protocol is not encrypted and all commands, passwords, logins are transmitted in the clear. In modern networks, Telnet should be absent on network equipment.
SSH Public
You can also set up SSH authentication by public key, this option is much more robust than the passwords we are used to.
Disciple(config)#username caster privilege 15
Disciple(config)#ip ssh pubkey-chain
Disciple(config-pubkey-chain)#username caster
Disciple(config-pubkey-key)#key-string
Disciple(conf-ssh-pubkey-data)# <your_public_key>
Disciple(conf-ssh-pubkey-data)#exit
Disciple(conf-ssh-pubkey-user)#end
Disciple# write memory
However, make sure there is a login local command on the terminal lines, it affects the public key when trying to authenticate with it.
Disciple(config-line)# login localResult:
:~$ ssh [email protected]
The authenticity of host '192.168.0.75 (192.168.0.75)' can't be established.
RSA key fingerprint is SHA256:S3RpLNDLpVZA+/1Xd+hs667V4XJJuuFpX5FIBwWJDck.
Are you sure you want to continue connecting (yes/no/[fingerprint])? yes
Warning: Permanently added '192.168.0.75' (RSA) to the list of known hosts.


Disciple#
Control Plane
Separating the Control Plane can further enhance the security of the control panel.
Some Example:
Disciple(config)#control-plane host
Disciple(config-cp-host)#management-interface gX/X allow ssh https snmp
Disciple(config-cp-host)#end
Disciple# write memory
management-interface gX/X allow ssh https snmp specifies that only certain management protocols - SSH, HTTPS, and SNMP - are allowed on interface gX/X This means that all other management and system communication that does not use these protocols will be blocked on this interface. This is useful for reducing the attack surface by limiting the channels through which the device can be accessed.
Danger of SNMP RW on a Router
If an attacker brute-forces the SNMP RW string on a Cisco router, it allows the attacker to read the settings from the router and learn highly sensitive infrastructure information (IP addressing, interfaces configuration, hashed passwords). With this information, the attacker has a good chance of penetrating the infrastructure and continuing to advance through the network.
Setting up a more complex community string
Set up a persistent RW string that will be extremely hard to bruteforce
To bruteforce a string, an attacker can use onesixtyone
Disciple(config)# snmp-server community <complex_string> RW
Disciple(config)# end
Disciple# write memory
SNMP Traffic Filtering
Here is an example of such an ACL, only one SNMP server address is allowed here. In this case, only the SNMP server itself can access the switch where SNMP is active via SNMP.
Disciple(config)# access-list 101 permit udp host <snmp_server_ip_address> any eq 161
Disciple(config)# access-list 101 permit udp host <snmp_server_ip_address> any eq 162
Disciple(config)# access-list 101 deny udp any any eq 161
Disciple(config)# access-list 101 deny udp any any eq 162
Disciple(config)# access-list 101 permit ip any any
Disciple(config)# end
Disciple# write memory
Adapt this ACL list to your infrastructure if you need to.
Unusable Interfaces
A classic of the security genre. Disable unused ports, this is a common practice for switches. Disabling unused ports will reduce the likelihood of unauthorized connections to the internal network.
For example, we don't have ports in the G0/1-20 range in use, let's turn them off.
It will also be useful to create a separate VLAN 999 SHUTDOWN and move them there.
Disciple(config)#vlan 999
Disciple(config-vlan)#name SHUTDOWN
Disciple(config-vlan)#exit
Disciple(config)#interface range g0/1 - 20
Disciple(config-if-range)#switchport mode access
Disciple(config-if-range)#switchport access vlan 999
Disciple(config-if-range)#shutdown
Disciple(config-if-range)#exit
Disciple(config)#end
Disciple#write memory
Such a simple step, and cuts off unauthorized connections to the network.
Passwords Hashing
Cisco IOS has security issues with storing passwords within the operating system.
Vulnerable types
The problem lies in certain hashes (types) that have very weak protection against bruteforcing, here they are:
- TYPE 4: Appeared in 2013, it uses the PBKDF2 and was originally designed to reduce vulnerability to brute force attacks. However, due to an implementation issue, the Type 4 algorithm only performs one SHA-256 iteration (without using salt) over the entered plaintext password, making it less secure than Type 5 and more vulnerable to brute force attacks. Passwords are stored as hashes in a configuration file
Example of TYPE 4:
username myths secret 4 g1rTD89b38NIXbGJse.zLc7Cega1TBTlKQNvYDh9Qo6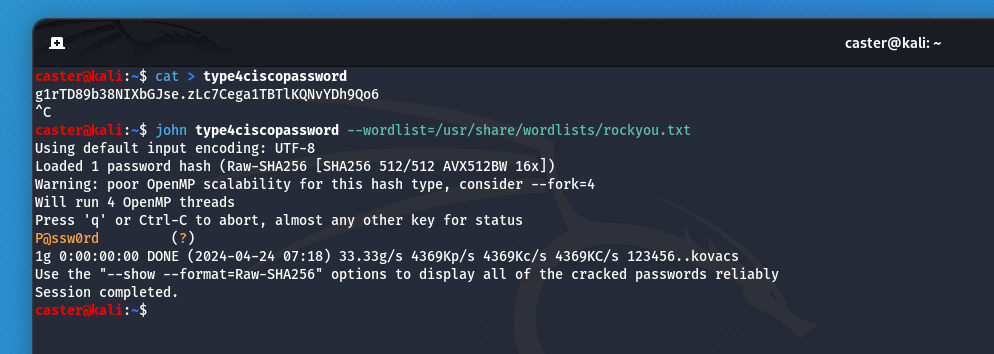
- TYPE 5: It uses a very simple MD5 hashing algorithm - 1000 iterations of MD5 with a 32-bit salt. Type 5 passwords are relatively easy to crack by brute force using modern computers and available tools. Passwords are stored as hashes in a configuration file.
Example of TYPE 5:
username drift secret 5 $1$TlXl$FlGAzr9Hn8VqowimPu.TD/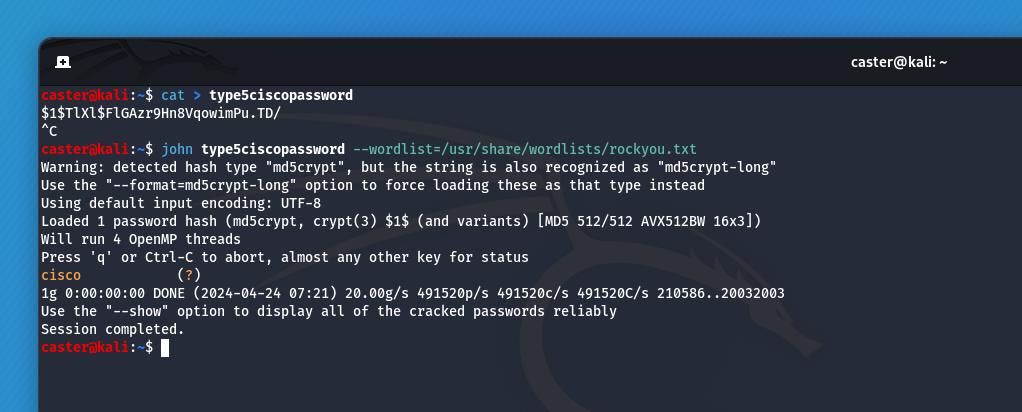
- TYPE 7: Uses a simple Vigenère replacement cipher with a sharded key that is publicly known. This cipher can be immediately decrypted to source code using a tool such as cisco7crack. Passwords are stored as encoded strings in the configuration file.
Example of TYPE 7:
username enchant password 7 055A545C7519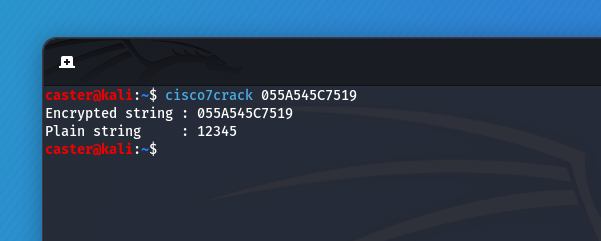
The best types for passwords protection
- TYPE 8: Type 8 passwords are hashed using PBKDF2, SHA-256, with the addition of an 80-bit salt and 20,000 iterations, making them more secure than the previously listed password types. Password hashes are stored in a configuration file
How to use TYPE 8:
Disciple(config)#username turn algorithm-type sha256 secret n3B^&*(W#$QDd
Disciple(config)#end
Disciple#write memory
username turn secret 8 $8$vcfi1XZEdBXzFk$.8sIQd6l9B.VmDOOs4aoJIukC35SHf2S.wBDq5xJ4w2- TYPE 9: Type 9 was implemented using the SCRYPT hashing algorithm, an 80-bit salt and 16,384 iterations. This type is designed to make password cracking more difficult as it requires a significant amount of hardware resources, increasing the cost of bruteforce attacks for attackers. This type is more resilient than TYPE 8, but that does not make TYPE 8 a bad type of password protection. Passwords are stored as hashes in a configuration file.
How to use TYPE 9:
Disciple(config)#username fade algorithm-type scrypt secret B(#@#(*SD372842SA&QB#@E
Disciple(config)#end
Disciple#write memory
username fade secret 9 $9$GfLbXHAxgV3mIk$zZ/IgQLKetuXH/uKcecpWHCzszw3/2zhIa6zkCsEYvwWith TYPE 8 and TYPE 9, local passwords can be securely protected against bruteforcing locally on the equipment
First Hop Redundancy
FHRP (First Hop Redundancy Protocol) - is a family of network protocols that allow multiple physical routers to serve a single virtual IP address, in order to improve the fault tolerance of a local network. This virtual address will be assigned as the default gateway address for the end hosts.
All of this is configured to provide fault tolerance at the routing level so that the gateway is always available. This is also called a hot standby system, because with FHRP the redundant elements are active in operation.
Cisco equipment offers two protocols from the FHRP class for use - Hot Standby Redundancy Protocol and Gateway Load Balancing Protocol (HSRP and GLBP)
Vulnerability
FHRP domains are vulnerable to a spoofing attack if the leading ACTIVE or AVG does not have a maximum priority value with respect to its configuration. If an attacker injects an HSRP or GLBP packet with maximum priority values, he can intercept traffic within the network by becoming an ACTIVE or AVG router (depending on which protocol is under attack, HSRP or GLBP)
By the way, in the event of an attack on GLBP. The attacker generates a packet not only with the maximum priority value, but also with the maximum weight value, which will indicate the degree of interface load. The maximum weight value will indicate that the attacker's interface will receive a significant amount of traffic, if not all of it.
HSRP Terminology
- HSRP Active Router - A router in an HSRP group that handles, routes legitimate traffic;
- HSRP Standby Router - a router in the HSRP group that is in standby mode, waiting for the active router to fail. After the primary Active router goes down, the Standby router will take over and take care of the Active router's duties;
- HSRP Group - A group of devices in the same HSRP group that provide the operation and fault tolerance of the logical router;
- HSRP MAC Address - the virtual MAC address of the logical router in the HSRP domain;
- HSRP Virtual IP Address - is a dedicated virtual IP address in the HSRP group. This IP address will be the default gateway for the end hosts, used on the logical router itself;
- HSRP Preempt mode - is an option that allows a downed ACTIVE device (after it is resurrected) to reclaim its ACTIVE role after it has been replaced by one of the STANDBY routers (a situation where a downed ACTIVE device has been replaced). By default, Preempt mode in HSRP is disabled.
GLBP Terminology
- AVG (Active Virtual Gateway) - A router in a GLBP group that is the master router in a logical GLBP domain. AVG tells the other routers how to handle legitimate traffic. Distributes MAC-addresses, is responsible for answering ARP-requests. Speaking of which, within a single GLBP group, there can only be one AVG member router;
- AVF (Active Virtual Forwarder) - A router in a GLBP group that handles traffic. There can be more than one;
- GLBP Group - A logical GLBP group that includes physical routers. Each logical GLBP group has its own unique numeric identifier;
- GLBP MAC - The virtual MAC address of the GLBP routers, distributed by an existing AVG router;
- GLBP Virtual IP Address - The IP address for which the AVG router is responsible;
- GLBP Preempt Mode - An option that allows a resurrected AVG device to reclaim its role after being supplanted by the AVF, based on priority values. By default, preempt mode is disabled for AVGs when preempt mode is enabled for AVF members (with a delay of up to 30 seconds, but this value can be manually configured);
- GLBP Weight - A metric indicating the degree of load on the device interface. The larger this metric is, the higher the load on the router interface.
Maximized priority
For security reasons, it is recommended to set the Master or Active router to the highest priority. In this case, if an intruder sends a malicious packet with priority 255, it will not be able to become the “master” because it already has one.
For HSRP:
Disciple(config-if)#standby <hsrp_group_number> priority 255
Disciple(config-if)#end
Disciple#write memory
For GLBP:
Disciple(config-if)#glbp <glbp_group_number> priority 255
Disciple(config-if)#end
Disciple#write memory
Authentication
Authentication prevents unauthorized routers from entering fault tolerance domains. HSRP and GLBP domains on Cisco equipment can be secured using MD5:
For HSRP:
Disciple(config-if)# standby <hsrp_group_number> authentication md5 key-string <password_for_hsrp_domain>
Disciple(config-if)#end
Disciple#write memory
For GLBP:
Disciple(config-if)# glbp <hsrp_group_number> authentication md5 key-string <password_for_glbp_domain>
Disciple(config-if)#end
Disciple#write memory
Authentication Attacks
However, don't be too quick to rejoice. An attacker can listen to the air, write HSRP packets into memory, pull hashes from there, brute force them, and still attack the domain. So if you are going to configure authentication, take care of passphrase strength.
I will show an example of such an authentication attack on the HSRP protocol.
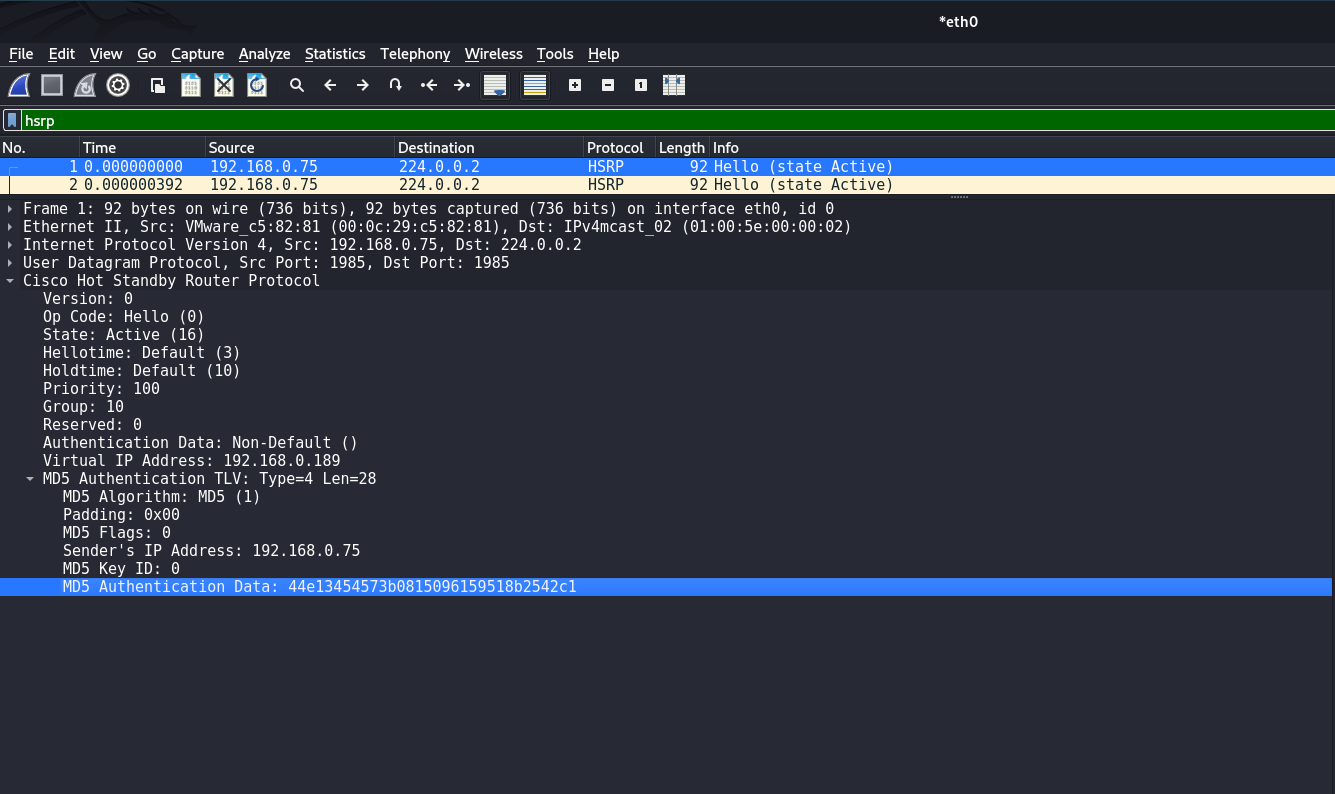
Exfiltration of hash from traffic dump:
caster@kali:~$ python2 pcap2john.py hsrp-traffic.pcap
$hsrp$000010030a640a000000000000000000c0a800bd041c01000000c0a8004b0000000000000000000000000000000000000000$44e13454573b0815096159518b2542c1
$hsrp$000010030a640a000000000000000000c0a800bd041c01000000c0a8004b0000000000000000000000000000000000000000$44e13454573b0815096159518b2542c1
$hsrp$000010030a640a000000000000000000c0a800bd041c01000000c0a8004b0000000000000000000000000000000000000000$44e13454573b0815096159518b2542c1
$hsrp$000010030a640a000000000000000000c0a800bd041c01000000c0a8004b0000000000000000000000000000000000000000$44e13454573b0815096159518b2542c1
$hsrp$000010030a640a000000000000000000c0a800bd041c01000000c0a8004b0000000000000000000000000000000000000000$44e13454573b0815096159518b2542c1
$hsrp$000010030a640a000000000000000000c0a800bd041c01000000c0a8004b0000000000000000000000000000000000000000$44e13454573b0815096159518b2542c1
$hsrp$000010030a640a000000000000000000c0a800bd041c01000000c0a8004b0000000000000000000000000000000000000000$44e13454573b0815096159518b2542c1
$hsrp$000010030a640a000000000000000000c0a800bd041c01000000c0a8004b0000000000000000000000000000000000000000$44e13454573b0815096159518b2542c1
$hsrp$000010030a640a000000000000000000c0a800bd041c01000000c0a8004b0000000000000000000000000000000000000000$44e13454573b0815096159518b2542c1
$hsrp$000010030a640a000000000000000000c0a800bd041c01000000c0a8004b0000000000000000000000000000000000000000$44e13454573b0815096159518b2542c1
$hsrp$000010030a640a000000000000000000c0a800bd041c01000000c0a8004b0000000000000000000000000000000000000000$44e13454573b0815096159518b2542c1
$hsrp$000010030a640a000000000000000000c0a800bd041c01000000c0a8004b0000000000000000000000000000000000000000$44e13454573b0815096159518b2542c1
$hsrp$000010030a640a000000000000000000c0a800bd041c01000000c0a8004b0000000000000000000000000000000000000000$44e13454573b0815096159518b2542c1
$hsrp$000010030a640a000000000000000000c0a800bd041c01000000c0a8004b0000000000000000000000000000000000000000$44e13454573b0815096159518b2542c1
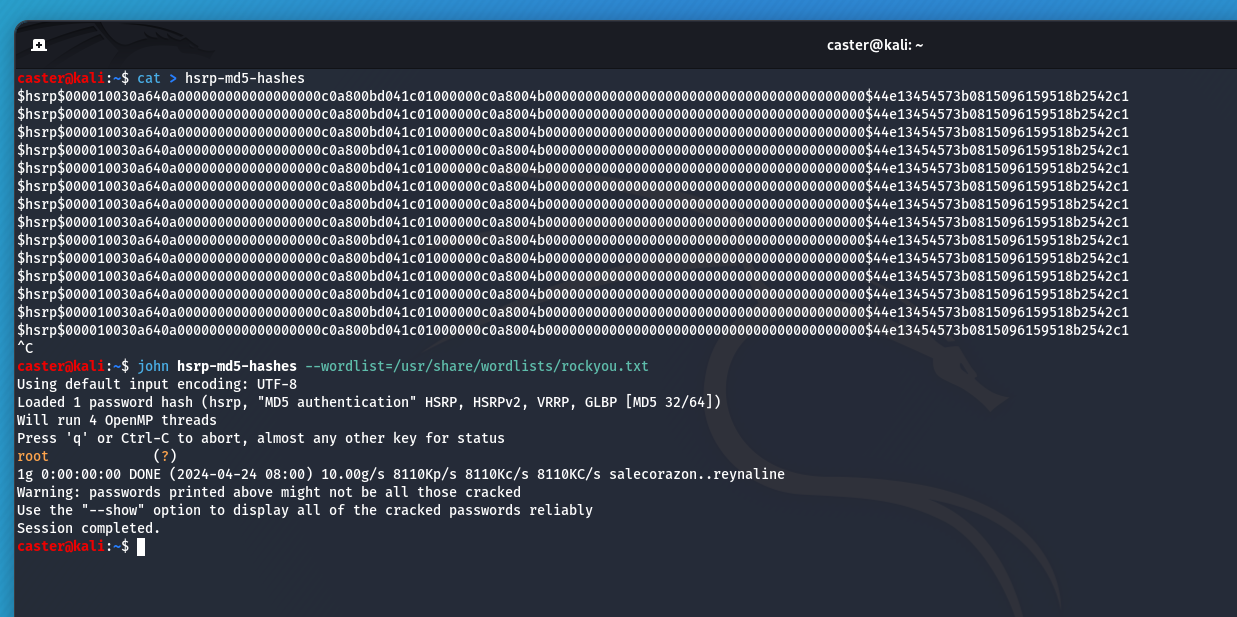
It is in this way that an attacker can attack authentication.
HSRP Load Balancing Issue
The problem is that the HSRP protocol has no load balancing mechanism. When you use it, only one device is actually running while the others are resting and idle.
However, you can simply spread your VLANs across HSRP logical routers at the distribution level (L3 switches) or at the routers. This is done on virtual VLAN interfaces.
Here is an example configuration for HSRP, for VLAN 10, VLAN 30, VLAN 90, VLAN 150 networks
The first HSRP router (Disciple1) will work for VLAN 10 and VLAN 30, and will be the backup device for VLAN 90 and VLAN 150.
On the second HSRP router (Disciple2), it is exactly the opposite.
Disciple1(config)# interface vlan 10
Disciple1(config-if)# standby 10 ip 10.10.10.254
Disciple1(config-if)# standby 10 priority 150
Disciple1(config-if)# standby 10 preempt

Disciple1(config)# interface vlan 30
Disciple1(config-if)# standby 30 ip 10.10.30.254
Disciple1(config-if)# standby 30 priority 150
Disciple1(config-if)# standby 30 preempt

Disciple1(config)# interface vlan 90
Disciple1(config-if)# standby 90 ip 10.10.90.254
Disciple1(config-if)# standby 90 priority 90

Disciple1(config)# interface vlan 150
Disciple1(config-if)# standby 150 ip 10.10.150.254
Disciple1(config-if)# standby 150 priority 90
Disciple2(config)# interface vlan 10
Disciple2(config-if)# standby 10 ip 10.10.10.254
Disciple2(config-if)# standby 10 priority 90
Disciple2(config)# interface vlan 30
Disciple2(config-if)# standby 30 ip 10.10.30.254
Disciple2(config-if)# standby 30 priority 90
Disciple2(config)# interface vlan 90
Disciple2(config-if)# standby 90 ip 10.10.90.254
Disciple2(config-if)# standby 90 priority 150
Disciple2(config-if)# standby 90 preempt
Disciple2(config)# interface vlan 150
Disciple2(config-if)# standby 150 ip 10.10.150.254
Disciple2(config-if)# standby 150 priority 150
Disciple2(config-if)# standby 150 preemptIn this way we will do, let's say, a pseudo-balancing.
Dynamic Routing
Dynamic routing is used in most large corporate networks. In such networks, routers automatically exchange routing information, eliminating the need for network administrators to manually configure them. Often, administrators also do not make changes to the settings of security mechanisms, which can lead to vulnerabilities and facilitate exploitation. In this paper, I will focus on the IGP protocols: OSPF and EIGRP.
Routing Detection
If an attacker sees traffic of these protocols on the air, the following attack vectors are open to him:
- Information Gathering: With virtual FRR, an attacker will be able to connect to a routing domain and automatically obtain information about existing subnets in the infrastructure. Probably the most practical attack vector against dynamic routing
- Mocking Attack: An attacker can perform route injection, wrapping traffic for legitimate servers in their direction, and then host a fake legitimate service. But this is a rather complex and experimental vector
- Routing Table Overflow: An attacker can flood the router's routing table by flooding
LSU/EIGRP Updatepackets. This will result in a DoS.
caster@kali:~$ sudo above --interface eth0 --timer 250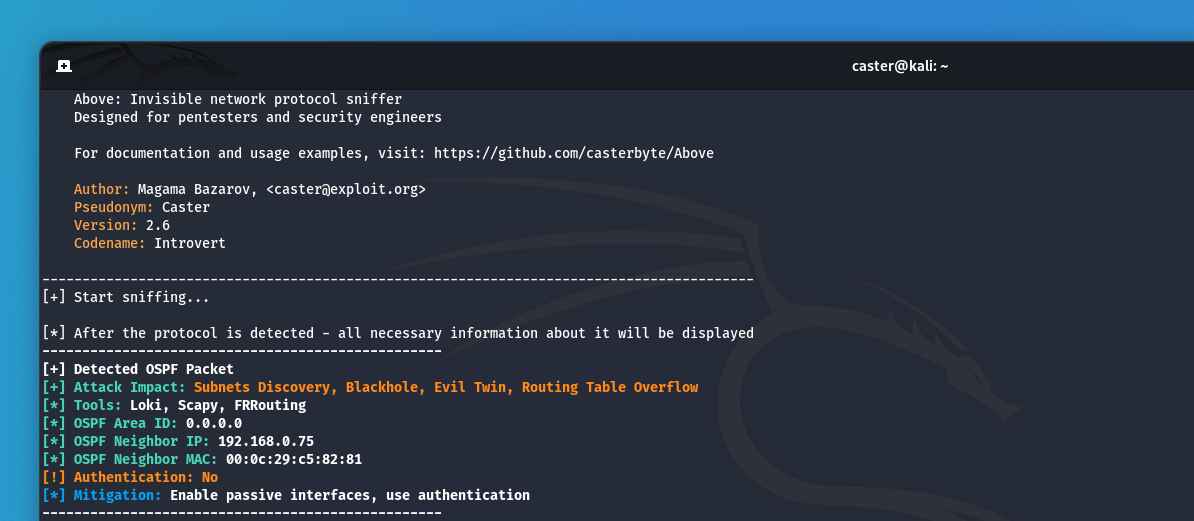
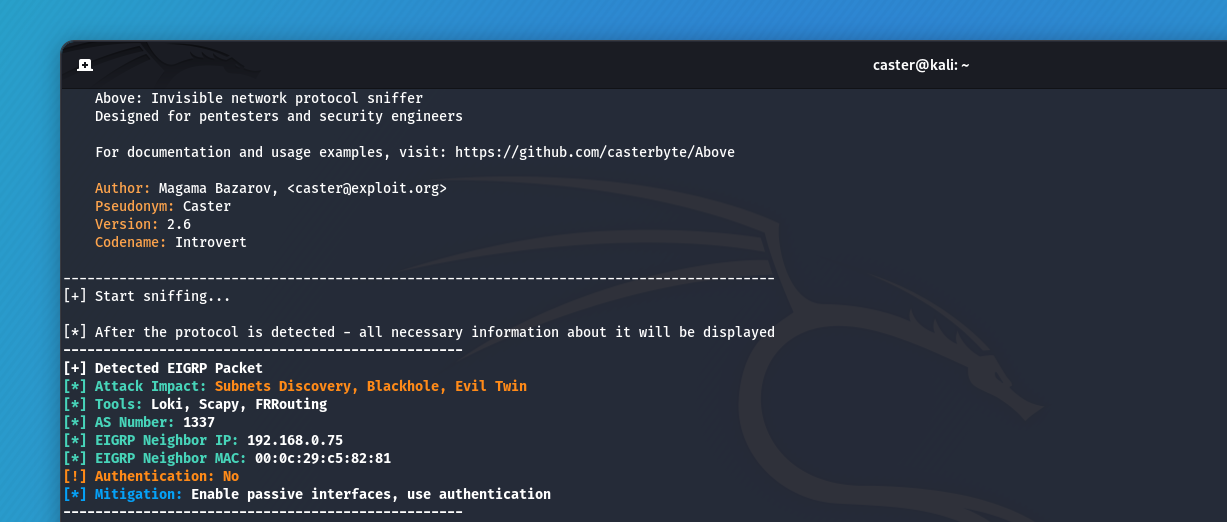
Without doing any scanning, just by listening to the traffic - the attacker already knows about the existence of dynamic routing in the network.
Passive Interfaces
It is recommended to configure passive interfaces on those router interfaces that face internal network segments. This configuration prevents the transmission of dynamic routing protocol packets through these interfaces. This provides an additional layer of security, as a potential attacker inside the network will not be able to intercept or see these route announcements.
For OSPF:
Disciple(config)#router ospf <PROCESS_ID>
Disciple(config-router)#passive-interface G0/3
Disciple(config-router)#exit
Disciple(config-router)#end
Disciple#write memory
For EIGRP
Disciple(config)#router eigrp <AS_NUMBER>
Disciple(config-router)#passive-interface G0/3
Disciple(config-router)#exit
Disciple(config-router)#end
Disciple#write memory
Thus, the use of passive interfaces makes it much more difficult to conduct attacks on the routing domain. G0/3 - In this example, this is the interface that looks inside the network segment.
Authentication
The use of authentication in routing domains allows only verified and authorized routers to be allowed to operate. Authentication is typically configured with passwords that must be protected. If you plan to secure your routing domain through authentication, pay special attention to the strength of your passwords.
Example of configuring MD5 authentication for OSPF. Authentication is configured exactly on the interfaces:
Disciple(config)#interface <INTERFACE>
Disciple(config-if)#ip ospf authentication message-digest
Disciple(config-if)#ip ospf message-digest-key 10 md5 <PASSWORD>
Disciple(config-if)#end
Disciple#write memory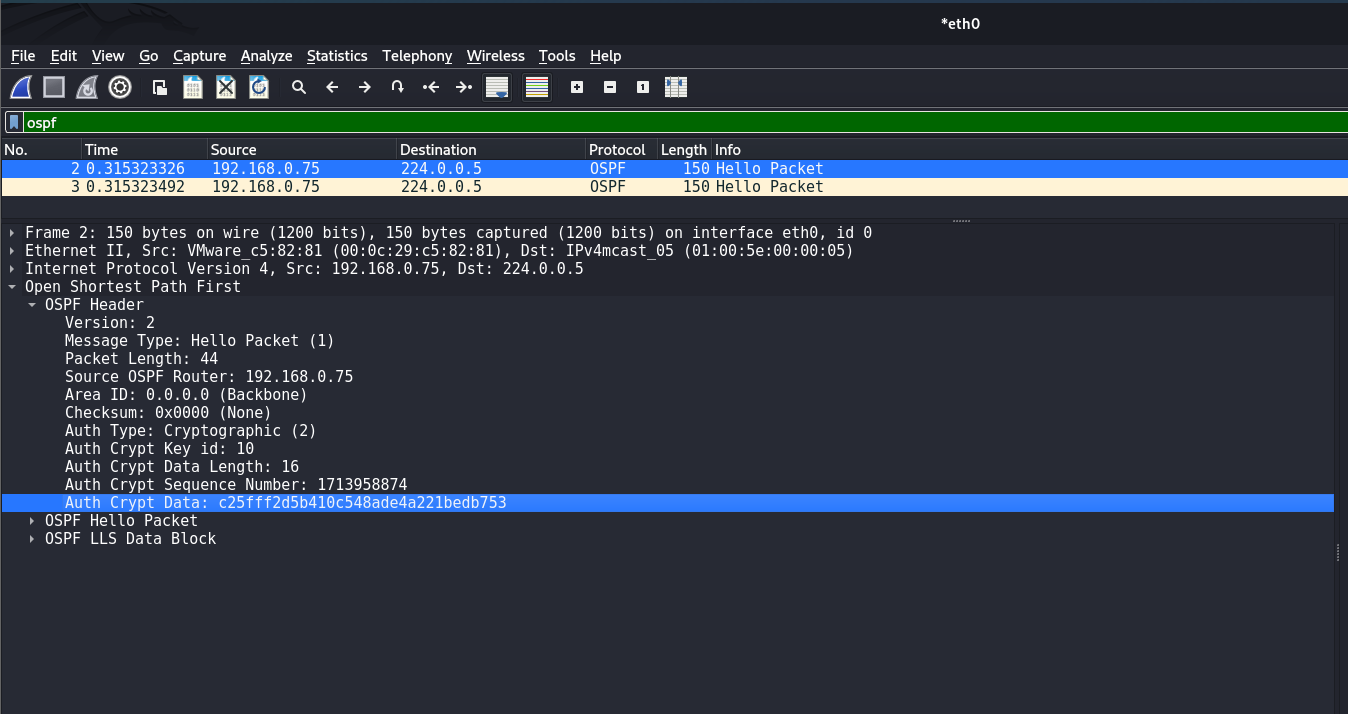
Example of configuring MD5 authentication for EIGRP. By the way, you can use Key-Chain authentication here and use multiple keys for stronger EIGRP domain protection:
Disciple(config)#key chain CHAINFOREIGRP
Disciple(config-keychain)#key 1
Disciple(config-keychain-key)#key-string <PASSWORD1>
Disciple(config-keychain-key)#exit
Disciple(config-keychain)#key 2
Disciple(config-keychain-key)#key-string <PASSWORD2>
Disciple(config-keychain-key)#exit
Disciple(config-keychain)#exit

Disciple(config)#interface <INTERFACE>
Disciple(config-if)#ip authentication mode eigrp <AS_NUMBER> md5
Disciple(config-if)#ip authentication key-chain eigrp <AS_NUMBER> CHAINFOREIGRP
Disciple(config-if)#end
Disciple#write memory
By the way, Key-Chain authentication in Cisco IOS can be used not only for EIGRP, but for other protocols as well
Authentication Attacks
However, don't rush to rejoice. If you are going to protect the routing domain using authentication, make sure that these passwords are strong enough. They are hashed using cryptographic hash functions, and an attacker will be able to read the hash values from a traffic dump and brute force the password. With the resulting password, he can easily connect to the routing domain.
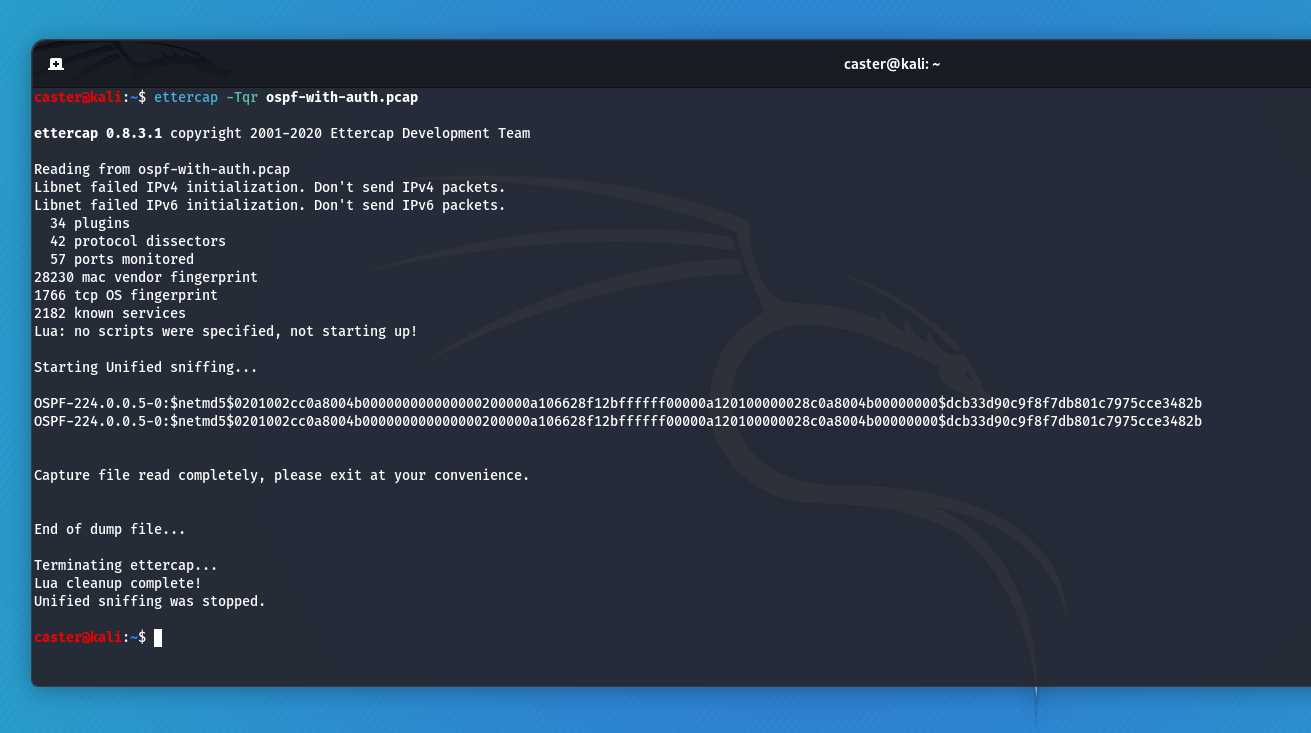
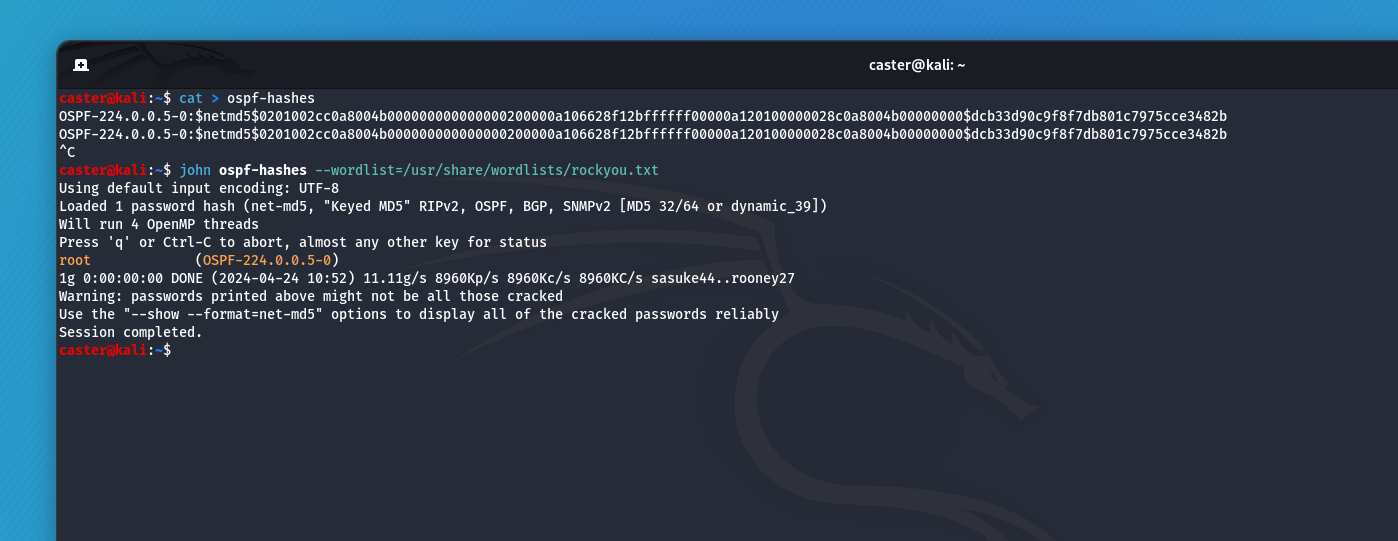
This is how an OSPF domain password can be compromised: Traffic capture, exfiltration with Ettercap and bruteforce with JTR:
caster@kali:~$ ettercap -Tqr ospf-with-auth.pcap

ettercap 0.8.3.1 copyright 2001-2020 Ettercap Development Team

Reading from ospf-with-auth.pcap
Libnet failed IPv4 initialization. Don't send IPv4 packets.
Libnet failed IPv6 initialization. Don't send IPv6 packets.
  34 plugins
  42 protocol dissectors
  57 ports monitored
28230 mac vendor fingerprint
1766 tcp OS fingerprint
2182 known services
Lua: no scripts were specified, not starting up!

Starting Unified sniffing...

OSPF-224.0.0.5-0:$netmd5$0201002cc0a8004b000000000000000200000a106628f12bffffff00000a120100000028c0a8004b00000000$dcb33d90c9f8f7db801c7975cce3482b
OSPF-224.0.0.5-0:$netmd5$0201002cc0a8004b000000000000000200000a106628f12bffffff00000a120100000028c0a8004b00000000$dcb33d90c9f8f7db801c7975cce3482b


Capture file read completely, please exit at your convenience.


End of dump file...

Terminating ettercap...
Lua cleanup complete!
Unified sniffing was stopped.
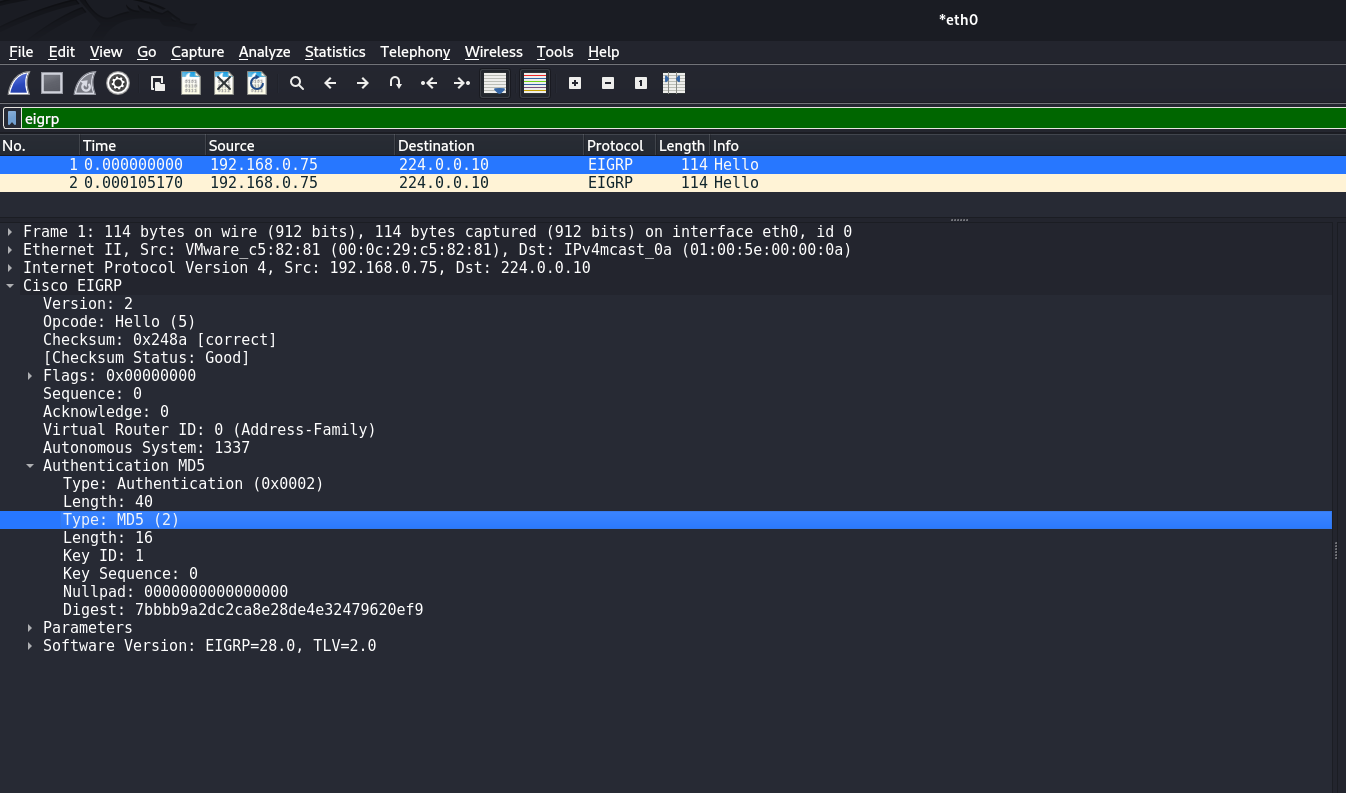
Now an attack on EIGRP authentication: Traffic recording, hash exfiltration and bruteforce with JTR
caster@kali:~$ python2 pcap2john.py eigrp-with-auth.pcap
1:$eigrp$2$0205000000000000000000000000000000000539000200280002001000000001000000000000000000000000$0$no-extra-salt$1$192.168.0.75$7bbbb9a2dc2ca8e28de4e32479620ef9
2:$eigrp$2$0205000000000000000000000000000000000539000200280002001000000001000000000000000000000000$0$no-extra-salt$1$192.168.0.75$7bbbb9a2dc2ca8e28de4e32479620ef9
3:$eigrp$2$0205000000000000000000000000000000000539000200280002001000000001000000000000000000000000$0$no-extra-salt$1$192.168.0.75$7bbbb9a2dc2ca8e28de4e32479620ef9
4:$eigrp$2$0205000000000000000000000000000000000539000200280002001000000001000000000000000000000000$0$no-extra-salt$1$192.168.0.75$7bbbb9a2dc2ca8e28de4e32479620ef9
11:$eigrp$2$0205000000000000000000000000000000000539000200280002001000000001000000000000000000000000$0$no-extra-salt$1$192.168.0.75$7bbbb9a2dc2ca8e28de4e32479620ef9
12:$eigrp$2$0205000000000000000000000000000000000539000200280002001000000001000000000000000000000000$0$no-extra-salt$1$192.168.0.75$7bbbb9a2dc2ca8e28de4e32479620ef9
13:$eigrp$2$0205000000000000000000000000000000000539000200280002001000000001000000000000000000000000$0$no-extra-salt$1$192.168.0.75$7bbbb9a2dc2ca8e28de4e32479620ef9
14:$eigrp$2$0205000000000000000000000000000000000539000200280002001000000001000000000000000000000000$0$no-extra-salt$1$192.168.0.75$7bbbb9a2dc2ca8e28de4e32479620ef9
Hash Exfiltration with pcap2john

This is how an attacker can attack authentication. So make sure that passphrases are strong when setting up authentication.
VoIP VLAN Hopping
This is one of the subgenres of VLAN Hopping attacks. The attacker injects legitimate CDP frames from an IP phone to hop into a voice VLAN and gain access to the network.
He listens to the air on the network, catches a CDP frame of the Cisco IP phone, saves it to .pcap, and then plays it back using tcpreplay.
It then creates a virtual interface with the voice VLAN ID and jumps into that exact VLAN.
The presence of DHCP Snooping, Dynamic ARP Inspection, 802.1X would prevent this attack.
DHCP Snooping
DHCP Snooping - is a switch-level (L2) security feature designed to prevent unwanted or malicious attacks via DHCP. It works by monitoring and filtering DHCP traffic based on trusted and untrusted sources. DHCP Snooping helps protect your network from attacks such as DHCP server spoofing, address exhaustion attacks, and other DHCP-related vulnerabilities
Configuring DHCP Snooping on a Cisco switch involves several steps:
- Enabling the Snooping process
- Assigning trusted ports
- Activating the Snooping process for a specific VLAN
- Limit Rate setting to prevent DHCP Exhaustion
When DHCP Snooping is enabled, the switch considers all ports untrusted by default. Trusted ports are usually ports where switches, routers will connect to. Untrusted ports are end station ports where computers, VoIP, printers, and others are connected.
Disciple(config)# ip dhcp-server <IP ADDRESS>
Disciple(config)#ip dhcp snooping
Disciple(config)#interface <INTERFACE_ID>
Disciple(config-if)#ip dhcp snooping trust
Disciple(config)#ip dhcp snooping vlan <VLAN_ID>
Disciple(config-if)#ip dhcp snooping limit rate <RATE>
Disciple(config-if)#end
Disciple#write memory
If necessary, you can create a static entry in the DHCP Snooping database:
Disciple(config)# ip dhcp snooping binding <MAC> vlan <VLAN ID> <IP ADDRESS> interface <INTERFACE ID> expiry <SECONDS>
The switch will now saturate the DHCP Snooping table by populating the MAC, IP, VLAN ID of the clients that have received an address via DHCP. It will take some time before the DHCP Snooping table is completely populated with all hosts. This is especially important if you will be configuring DAI (Dynamic ARP Inspection)
For reliability, it is necessary to write the contents of the DHCP Snooping table to the switch memory: if the switch suddenly goes into reboot and the DHCP Snooping table is lost. If this happens together with Dynamic ARP Inspection, we will get network paralysis.
Disciple(config)# ip dhcp snooping database flash:/snooping.db
By the way, the Snooping database can be not only stored in the switch memory, but also transferred via FTP, HTTP, RCP, SCP, TFTP services:
Disciple(config)# ip dhcp snooping database ?
  flash:
  ftp:
  https:
  rcp:
  scp:
  tftp:
  timeout:
  write-delay
The write-delay parameter allows you to set the delay (in seconds) between when DHCP snooping database data is written to persistent storage. This can be useful to reduce the load on the storage during frequent data updates.
Disciple(config)#ip dhcp snooping database write-delay <SECONDS>
Commands for debugging and checking DHCP Snooping:
Disciple(config)# show ip dhcp snooping
Disciple(config)# show ip dhcp snooping statistics
Disciple(config)# show ip dhcp snooping binding
This is how DHCP Snooping is configured. When configuring, you need to know the whole picture of the network, what interfaces there are and where they are looking at.
Dynamic ARP Inspection
Dynamic ARP Inspection - is a security feature on network devices that helps prevent certain types of Address Resolution Protocol (ARP)-related attacks. DAI works by inspecting ARP packets to ensure that they do not contain bogus or malicious addresses. This is done by matching the MAC addresses and IP addresses in ARP packets against a trusted data source, typically a DHCP Snooping table, to ensure that ARP responses are coming from legitimate devices.
When configuring DAI, it is important that the DHCP Snooping table contains all hosts in the segment, otherwise the normal network operation of some hosts may be disrupted. This is a very important point that you should consider. DAI cannot work correctly without DHCP Snooping.
DAI configuration relies on the same concept of trusted and untrusted ports. As with DHCP Snooping, all switch ports are untrusted by default. Otherwise, it's the same: trusted ports are ports between switches and routers, untrusted ports are user ports. On untrusted ports, you should enable IP Source Guard (IPSG), which will check the source of requests.
Disciple(config)#interface <INTERFACE_ID>
Disciple(config-if)#ip arp inspection trust
Disciple(config)#interface range <INTERFACE_RANGE>
Disciple(config-if-range)#ip verify source
Disciple(config-if-range)#end
Disciple#write memory
Optional: This helps prevent network congestion due to excessive ARP packets
Disciple(config-if)#ip arp inspection limit rate <RATE>
If necessary, you can create an ARP ACL to avoid checking devices with a static IP. In case there are hosts on your network with a static address:
Disciple(config-if)# arp access-list DAI
Disciple(config-arp-nacl)# permit ip host <IP_ADDRESS> mac host <MAC_ADDRESS>
After finishing the configuration and making sure that the required static addresses are assigned and the DHCP Snooping table is fully saturated, we enable DAI itself. DAI, like DHCP Snooping, is enabled on VLAN segments.
Disciple(config)# ip arp inspection vlan <VLAN ID>
This is how DHCP Snooping and DAI can be used to protect a segment from MITM attacks that exploit weaknesses in the DHCP and ARP protocols.
Discovery Protocols
Discovery protocols are essential tools in network management, designed to facilitate the identification and mapping of devices on a network. These protocols automate the process of detecting devices, allowing network administrators to efficiently manage network inventory, topology, and configuration. Cisco IOS equipment uses two Discovery protocols: CDP and LLDP
However, Discovery protocols can be active by default on all ports of a device, an attacker analyzing the airwaves can catch a Discovery protocol frame and get sensitive information about the hardware.
Here is an example of a captured CDP frame using my Above sniffer:
caster@kali:~$ sudo apt install above
caster@kali:~$ sudo above --interface eth0 --timer 250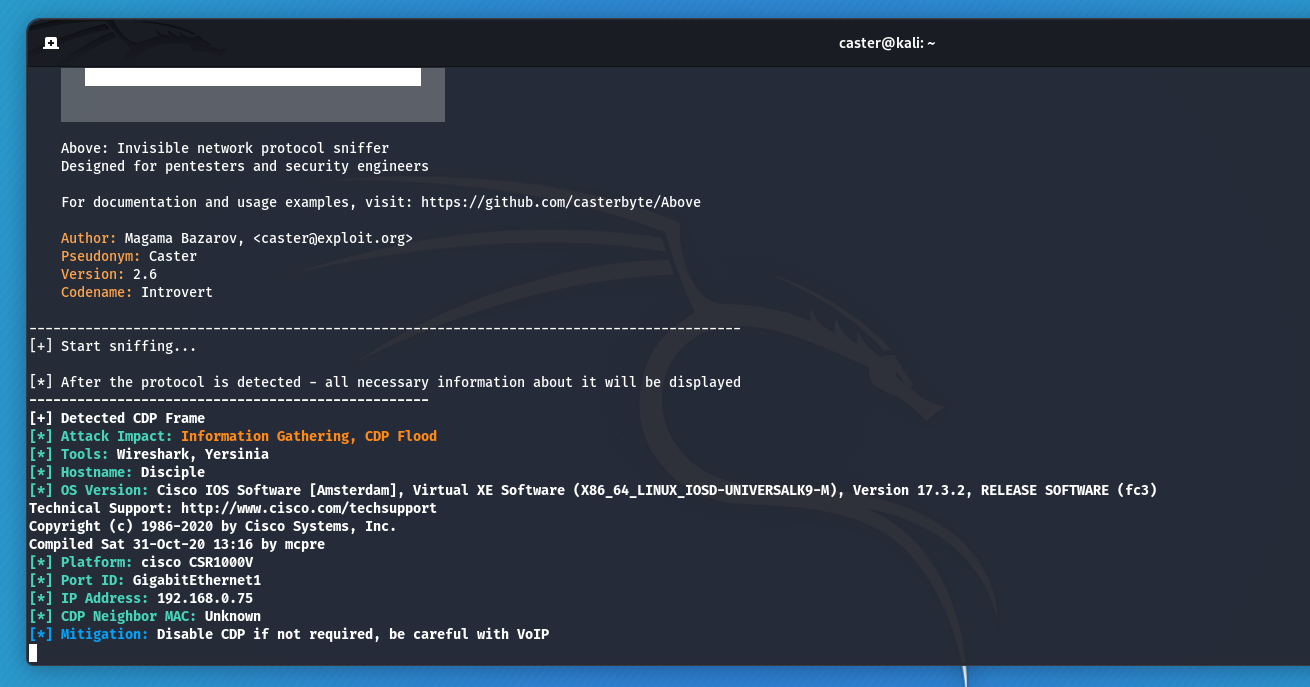
Therefore, it is necessary to disable Discovery protocols on the ports where the end stations connect.
However, you should not disable them on ports where VoIP is active, because VoIP can use Discovery protocols for its operation
And do not disable them on connections between switches and routers.
Using the example of endpoint ports from G0/8 to G0/15, I will turn off the operation of these protocols:
Disciple(config)#interface range g0/8 - 15
Disciple(config-if-range)#no cdp enable
Disciple(config-if-range)#no lldp transmit
Disciple(config-if-range)#no lldp receive
Disciple(config-if-range)#end
Disciple#write memory
In this way, you can increase the security of your equipment and not give an attacker an extra chance to learn sensitive information.
Dynamic Trunking Risk
DTP (Dynamic Trunking Protocol) - is a protocol used on Cisco switches to automatically configure trunk links between devices. But the use of DTP indicates poor network design, because the network engineer has to decide where the trunks should be.
Plus, there can be security issues because of the use of DTP
VLAN Hopping with DTP
The essence of the security issue is that the DTP protocol is enabled by default on all modern Cisco switches. Each switch port is configured in Dynamic Auto mode. That is, a port will wait for a trunk to be initiated by its neighbor. For the attack to be successful, we need to physically connect to the switch and send a specially prepared DTP Desirable frame. The port will switch to trunk mode and the attacker will be able to access all VLANs.
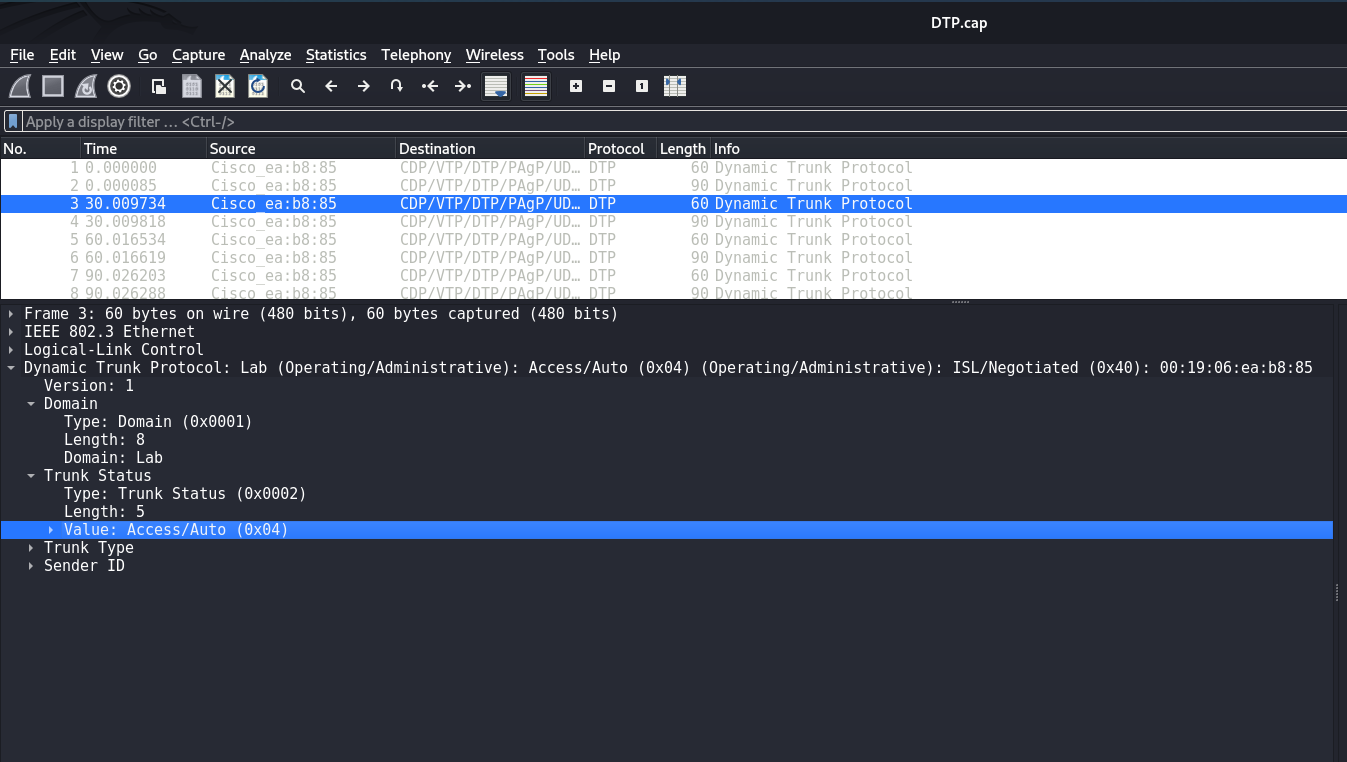
Typically, DTP is rare in pentest scenarios, mostly on forgotten switch ports. But nevertheless...
Disabling DTP
The best way to prevent attacks via DTP is to completely disable this protocol on all ports:
Disciple(config)#interface range <INTERFACE_RANGE>
Disciple(config-if-range)#switchport nonegotiate
Disciple(config-if-range)#end
Disciple# write memory
In this way, it is possible to drop DTP and cut off the VLAN Hopping attack vector using DTP Desirable.
Explicit VLANs on a Trunk channel
It is a good rule of thumb to manually specify the VLAN segments that will be on the trunk link.
VLAN 10, VLAN 20, VLAN 30 for example:
Disciple(config-if)# switchport trunk allowed vlan 10,20,30
Disciple(config-if)#end
Disciple# write memory
This is kind of like hardening.
Be careful with VTP
If a scenario arises in which you need to install a previously used Cisco switch on another network, be sure to check the VTP status of that device. VTP allows for centralized management of the VLAN database, and this database is kept up to date by revision number. If it happens that the VTP revision number is higher on an older Cisco switch, this revision number frame can propagate through the trunk links (and there may be other VLANs on the switch), causing the current switches to update their VLAN DBs and causing network paralysis by overwriting the VLAN information.
To safely incorporate an older Cisco switch into another network infrastructure where VTP (VLAN Trunking Protocol) is active, you must take a number of precautions. This will help avoid accidentally overwriting the VLAN database on other switches in the network due to a higher VTP revision number on the old switch. Here are my recommendations on what to do:
Before connecting the old switch to the network, check the current VTP settings:
Disciple#show vtp status
To safely reset the VTP revision number, you can change the VTP domain name on the switch and then reset it back. This action will reset the revision number to zero:
Disciple(config)#vtp domain TEMPORARY
Disciple(config)#vtp domain <ORIGINAL_DOMAIN>
Disciple(config)#end
Disciple#write memory
Optional: If you want to completely remove all VLAN settings before connecting the switch to another network:
Disciple(config)#no vlan 2-4094
Disciple(config)#end
Disciple#write memory
In general, VTP is a fairly rare protocol to use. If you do not use it, it is better to enable transparent mode on all switches. In this mode, the switch does not participate in VTP processes.
Disciple(config)#vtp mode transparent
Disciple(config)#end
Disciple#write memory
That's it!
Spanning Tree
STP (Spanning Tree Protocol) - is a Layer 2 protocol designed to prevent broadcast storms in networks by blocking unnecessary physical links. Since Ethernet frames do not have a TTL field, broadcast traffic can circulate indefinitely in the event of a switching loop. STP uses special 802.3 BPDU frames for communication and is usually enabled by default on managed switches.
STP Root Role Attack
The attacker can send a BPDU frame with the lowest priority value towards the STP switch, giving it a chance to hijack the role of the root switch. This course of events leads to either a partial MITM attack or a DoS.
BPDU Guard
To enhance security, it is recommended that you enable the BPDU Guard feature. This feature allows the switch to automatically block a port if it receives a BPDU frame. BPDU Guard is typically configured on ports that are intended for endpoint connections.
Disciple(config)# interface range <INTERFACE_RANGE>
Disciple(config-if-range)# spanning-tree bpduguard enable
STP Roles
Explicit role assignments help prioritize the switches in an STP architecture, allowing for more efficient and resilient traffic distribution in the network. Here is how they work and what problem they solve:
root primary- this command configures the switch to become the preferred root bridge in the network. The root bridge is the center point for calculating all paths in an STP topology. Becoming a root bridge makes the switch responsible for relaying traffic between different network segments and determining the best paths for traffic to take. root primary automatically sets the lowest priority for this switch, making it the preferred root bridge;root secondary- this command configures the switch to act as a secondary root bridge. If the primary root bridge fails, the switch configured as root secondary takes over, providing redundancy and improving overall network resiliency. This command sets the priority slightly higher than the primary root bridge, but lower than the other switches that do not participate in this configuration.
Here is an example of such a configuration two switches. The first switch is root primary and the second is root secondary
Disciple1(config)# spanning-tree vlan <VLAN_ID> root primary
Disciple1(config)# end
Disciple1#write memory
Disciple2(config)# spanning-tree vlan <VLAN_ID> root secondary
Disciple2(config)# end
Disciple2#write memory
Distribute switch roles wisely based on your infrastructure.
Cisco Smart Install
Cisco Smart Install - is a network protocol designed to simplify the deployment of Cisco switches. This technology allows network administrators to configure new switches over the network without making any pre-configuration adjustments to these devices. Smart Install does not require client software installed on the switches, making the deployment process fast and efficient.
However, Cisco Smart Install was not without vulnerabilities. The most serious vulnerability found in this technology allowed attackers to remotely execute code and access configurations without authentication. Usually, the SIET tool was used by the attacker for this purpose.
Information from vendor:
https://sec.cloudapps.cisco.com/security/center/content/CiscoSecurityAdvisory/cisco-sa-20170214-smi
If you don't use Smart Install, turn it off:
Disciple(config)#no vstack
Disciple#write memory
IOS Image Security
Protecting the Cisco IOS image in device memory is important to ensure the integrity and security of your network infrastructure. It helps prevent manipulation of the operating system image by malicious users to gain control of the device.
The secure boot-image command protects the Cisco IOS image in the device memory by making it immutable. This means that once this command is enabled, the IOS image cannot be modified or deleted without completely resetting the device to factory defaults. This protects the device from attacks that seek to modify the IOS image, which can introduce malicious code or other vulnerabilities.
Disciple#configure terminal
Disciple(config)#secure boot-image
Disciple(config)#end
Disciple#write memory
With this command, Cisco IOS automatically creates hashed image values and stores them in a special protected NVRAM partition. Each time the device boots up, Cisco IOS verifies that the image hashes match the stored values. If a mismatch is detected, it indicates possible tampering, and the device can take additional actions to prevent or deny downloading the modified image.
Protecting Device Configuration
You can further strengthen the protection of the hardware by also protecting the configuration file.
With secure boot-config, the system stores a hash of the configuration file in a protected memory location, and at each reboot the system checks the hash of the current configuration file against the stored hash. If the hashes do not match, this indicates possible tampering or modification of the file, and the device can take appropriate security measures, such as alerting the administrator or rejecting the boot of the modified configuration.
Disciple(config)# secure boot-config
Disciple(config)# end
Disciple# write memory
This is how you can protect the configuration file of your Cisco device.
Outro
In this article, I have demonstrated many ways to protect Cisco hardware from attack. As you read my article, don't mindlessly copy and retype commands into your console.