Lockdown: A insane guide to securing MikroTik RouterOS
Since MikroTik equipment is widely distributed all over the world, its security is a very pressing issue. This is a massive article on how to protect your MikroTik devices

Since MikroTik equipment is widely distributed all over the world, its security is a very pressing issue. This is a massive article on how to protect your MikroTik devices.
Caster - Lockdown

Genre: Defensive
Label: exploit.org
Release Date: 19 April 2024
Updated: 4 August 2025

Performed by: Caster
Written by: Magama Bazarov
Mastered by: Magama Bazarov
Cover Man: Magama Bazarov (Sony ILCE-7M3, f/2.8, 1/100 sec)
Automatic Audit
To automate the security audit of your equipment, you can use Sara.
This is a RouterOS configuration analyzer that finds security misconfigurations and vulnerabilities.
It works by analyzing your RouterOS configuration and looking for security misconfigurations, as well as potential signs of equipment compromise.
Currently, it has implemented 25 security checks and a mechanism for searching CVEs in the NVD database. All necessary instructions are located in the repository.
You can install Sara directly from Kali Linux:
caster@kali:~$ sudo apt update && sudo apt install sara
caster@kali:~$ sara

    _____
   / ____|
  | (___   __ _ _ __ __ _
   \___ \ / _` | '__/ _` |
   ____) | (_| | | | (_| |
  |_____/ \__,_|_|  \__,_|

    RouterOS Security Inspector. Designed for security engineers
    Author: Magama Bazarov, <[email protected]>
    Alias: Caster
    Version: 1.2
    Documentation & Usage: https://github.com/casterbyte/Sara

    [!] DISCLAIMER: Use this tool only for auditing your own devices.
    [!] Unauthorized use on third-party systems is ILLEGAL.
    [!] The author is not responsible for misuse.

[!] ERROR: Missing required arguments
[!] Use 'sara --help' for more information
CVE searching for example:
[+] Detected RouterOS Version: 7.1.1
[!] routeros_cves.json not found.
[*] Fetching CVEs from NVD...
[+] Saved 74 CVEs to routeros_cves.json
[*] Total matching CVEs: 4
[*] CRITICAL: 1
[*] HIGH: 1
[*] MEDIUM: 2
[*] Vulnerability details:

→ CVE-2022-45313 [HIGH]
    Mikrotik RouterOs before stable v7.5 was discovered to contain an out-of-bounds read in the hotspot process. This vulnerability allows attackers to execute arbitrary code via a crafted nova message.
    CVSS Score: 8.8

→ CVE-2022-45315 [CRITICAL]
    Mikrotik RouterOs before stable v7.6 was discovered to contain an out-of-bounds read in the snmp process. This vulnerability allows attackers to execute arbitrary code via a crafted packet.
    CVSS Score: 9.8

→ CVE-2023-41570 [MEDIUM]
    MikroTik RouterOS v7.1 to 7.11 was discovered to contain incorrect access control mechanisms in place for the Rest API.
    CVSS Score: 5.3

→ CVE-2024-54772 [MEDIUM]
    An issue was discovered in the Winbox service of MikroTik RouterOS long-term release v6.43.13 through v6.49.13 and stable v6.43 through v7.17.2. A patch is available in the stable release v6.49.18. A discrepancy in response size between connection attempts made with a valid username and those with an invalid username allows attackers to enumerate for valid accounts.
    CVSS Score: 5.4
Wi-Fi
Wi-Fi is often deployed on MikroTik, but in most cases, PMKID is active by default.
PMKID (Pairwise Master Key Identifier) - is an identifier that is used in the Wi-Fi security protocol known as WPA/WPA2 (Wi-Fi Protected Access). PMKID helps in authenticating devices when connecting to a Wi-Fi network.
In the context of security, PMKID can be used in attacks on Wi-Fi networks. The most well-known type of attack is extracting the PMKID from the key exchange and then brute force or dictionary-based password mining. This attack is possible because the PMKID includes a hashed version of the PMK (Pairwise Master Key) that is used to generate the session encryption keys.
By the way, in my device Wi-Fi is implemented as Wi-Fi Wave 2 (MikroTik hap AX2), but the basic approach does not change: you need to turn off PMKID and WPS
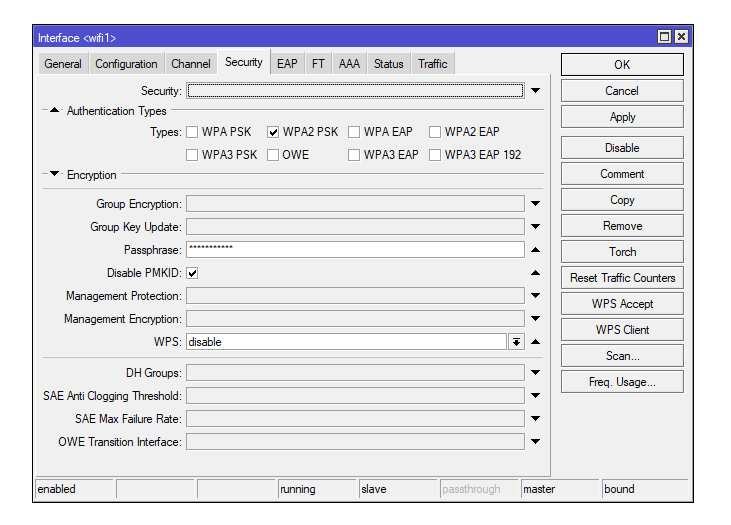
Disabling PMKID:
/interface/wifiwave2/set wif1 security.disable-pmkid=yesDisabling WPS:
/interface/wifiwave2/set wif1 security.wps=disable WPA-E
WPA-E, or WPA-Enterprise, is a more complex and secure variant of the Wi-Fi Protected Access (WPA) protocol, intended for use in corporate networks. Unlike WPA-Personal, which uses a pre-shared key (PSK), WPA-Enterprise employs centralized user authentication, enabling individual access control and a higher level of security.
WPA-Enterprise utilizes the IEEE 802.1X authentication standard, which provides a framework for user authentication, authorization, and accounting (AAA). The authentication process typically includes the following stages:
- Authentication: The client attempts to connect to the network and identify themselves through an authentication server (usually a RADIUS server).
- Negotiation: The authentication server requests proof of the client's identity, such as a username and password, certificates, or other credentials.
- Authorization: After successful authentication, the server can apply policies that determine which resources are available to the user.
- Accounting: The server may keep logs of authentication events for auditing and monitoring purposes.
Using WPA-E greatly enhances Wi-Fi security in general. If it is possible to use WPA-E, don't waste your time.
LCD
The use of a physical LCD display on MikroTik equipment, as with any other network device, can present potential security risks or lead to undesirable consequences if used improperly.
If an attacker gains physical access to the device and LCD display, they can use it to observe the active information that is displayed on the display. This could include seeing current connections, signal strengths, or IP addresses, which may already be sensitive information. However, in order to collect a wider range of data or launch full-fledged attacks, an attacker would need access to the administrative interfaces of the device.

This command will disable the LCD display, which can be useful to reduce power consumption or to increase security if the device is in a public location:
/lcd/set enabled=noLCD PIN
You can set a PIN code on MikroTik routers with LCD:
/lcd/pin/set pin-number=1337 hide-pin-number=yesUnusable Interfaces
Unused interfaces on RouterOS devices, like any other router or network device, can pose significant security risks if they are not properly configured or provisioned. Here are a few specific risks associated with unused interfaces. Unused interfaces that are active and not secured can serve as entry points for unauthorized access to the network.
One of the most effective ways to protect yourself is to completely disable unused interfaces. This can be done through the RouterOS command line:
/interface disable <interface name>Changing the MAC on the Uplink
By checking the MAC address, the ISP can know that you are using MikroTik equipment at the edge of their network. If you want, you can change the MAC address:
/interface ethernet set <uplink_interface> mac-address=DF:20:B2:02:FC:B4Change the MAC address on the interface that is an uplink on your network
Encrypted Backups
Encrypting backup files is a critical practice in data management and cybersecurity. This process involves using encryption algorithms to convert backup data into a form that can only be read with the appropriate encryption key.
RouterOS from MikroTik provides the ability to encrypt backup files using AES with SHA256 hash function. This provides a good level of security for encrypted backup files, protecting them from unauthorized access.
You can use the following command to create an encrypted backup through the RouterOS command line:
/system backup save name="backupname" password="your-password" encryption=aes-sha256However, storing encrypted backup files on the device itself may not provide complete data security. If the device is physically accessed or compromised, the backup files may be lost or compromised. Therefore, it is recommended to store backups in a remote and secure location.
Bandwidth Server
This is a service that allows you to measure the network bandwidth between two points in the network using the Bandwidth Test Client and Server utilities. This service can be used to diagnose the network and determine the data transfer rate between devices.
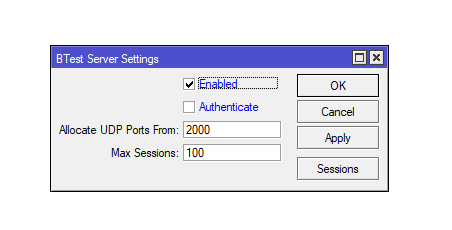
Although Bandwidth Server can be useful, activating it by default in RouterOS can pose a risk: If attackers or unauthorized users gain access to Bandwidth Server, they can run intensive bandwidth tests, which will overload the network and may disrupt its operation.
If you are not using Bandwidth Server, it is best to turn it off:
/tool bandwidth-server set enabled=noUPnP
UPnP (Universal Plug and Play) - is a protocol that allows devices to automatically discover other devices on the network and set up network connections without the need for manual configuration. UPnP can be used to automatically open ports on a router and set up network settings without user intervention. However, there are several risks associated with UPnP:
- Uncontrolled port opening: UPnP can automatically open ports on the router to allow external access to devices on the network. This increases the risk of external attacks such as open port attacks or buffer overflows. Automatic port opening can happen through custom injections, even Rapid7 did research on this topic
- Lack of authentication: UPnP typically does not provide a mechanism to authenticate or authorize devices, making the network more vulnerable to unauthorized access and attacks.
Based on these risks, many security experts recommend disabling UPnP in routers and other network devices, especially if it is not used for specific applications. Instead, ports and network settings are best configured manually based on security requirements and network needs
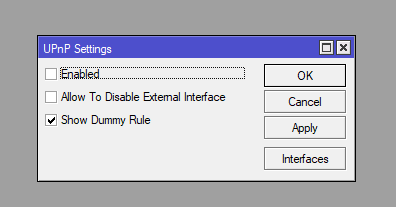
To disable UPnP:
/ip upnp set enabled=noIf you don't use proxy, SOCKS, turn it off:
/ip proxy set enabled=no/ip socks set enabled=no
Avoid CVE-2018-14847
CVE-2018-14847 is a critical vulnerability found in the MikroTik RouterOS operating system that affects versions up to 6.42.1 (including versions 6.29 through 6.42), 6.40.8, and 6.41.3. This vulnerability is related to Winbox, a management tool for MikroTik devices that uses port 8291. The problem is that attackers could exploit the vulnerability to gain unauthorized access to device files. Yes, vulnerability is old and has been on the rumor mill. But there are still RouterOS vulnerable to this exploit in practice.
This vulnerability is available up to version 6.42, update above this version and the problem will not occur
/system package update check-for-updatesRouterOS Services & RMI
RouterOS uses various services such as API, Winbox, Telnet, WebFig and SSH to manage devices. To ensure the security of these services it is necessary to use subnet filtering, so that conditionally only the network administrators' network can control the device using these services
/ip service set address=<MGMT Subnet Address/24> <protocol_name>However, even in the administrators subnet, there is a possibility of a bruteforce attack if one of the administrator's computers is infected with a Trojan. In this case, you can further strengthen the defenses as follows:
- add rule chains to prevent bruteforcing to Mangle/Raw tables;
- use only SSH protocol and key authentication;
- change port numbers (of course, this is not a complete security measure, but it may make it harder to find the hardware management port);
- if API/API-SSL are not used, it is better to turn them off, as they can also be used for bruteforcing.
RouterOS uses the following services:
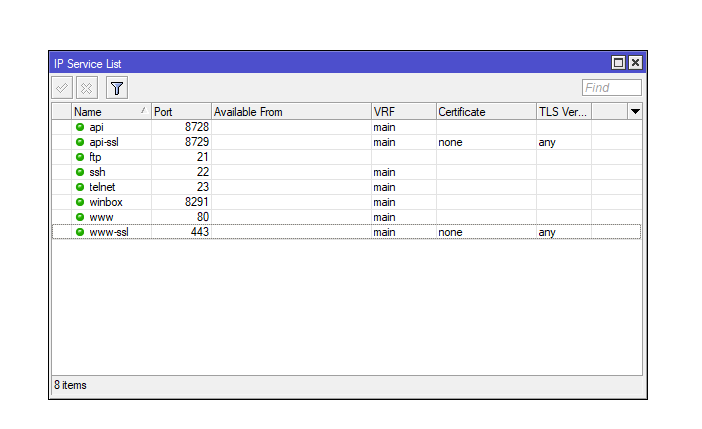
- API (TCP/8728);
- API-SSL (TCP/8729);
- FTP (TCP/21);
- SSH (TCP/22);
- Telnet (TCP/23);
- Winbox (TCP/8291);
- HTTP (TCP/80);
- HTTPS (TCP/443)
You turn off the services you don't need like this:
/ip service set telnet disabled=yes
/ip service set ftp disabled=yes
/ip service set www disabled=yes
/ip service set www-ssl disabled=yes
/ip service set winbox disabled=yes
/ip service set api disabled=yes
/ip service set api-ssl disabled=yes
RBAC
On your RouterOS, stick to the concept of least privilege, don't throw full-counts on the hardware, and keep track of which engineer has what access to the hardware and what customization options are available to them
 user/print
Columns: NAME, GROUP, LAST-LOGGED-IN
# NAME   GROUP  LAST-LOGGED-IN
;;; system default user
0 admin  full   apr/18/2024 19:02:02
Alternatively, to optimize account management, you can bring up a AAA server where accounts are stored centrally and can be easily managed.
SSH
It is possible to enhance SSH security with a command:
/ip ssh set strong-crypto=yesThis parameter implies that:
- Employ stronger encryption and HMAC algorithms, and utilize larger DH primes while excluding weaker ones: opt for 256-bit and 192-bit encryption over 128 bits;
- Eliminate the use of null encryption;
- Implement SHA-256 for hashing in place of SHA-1;
- Adopt a 2048-bit prime for Diffie-Hellman exchanges instead of 1024-bit;
- Discontinue the use of MD5
Also, if you have SSH key login configured, you can disable password login altogether:
/ip ssh set always-allow-password-login=noDNS Flood Risk
Make sure that there is no DNS protocol port sticking out to the outside, where a potential DDoS attack could arrive. It often happens that a DDoS attack on the MikroTik comes via DNS. Very often it happens that in the DNS settings on MikroTik there is a checkbox Allow Remote Requests, which allows RouterOS to be a DNS server. This is usually the case for internal infrastructure, but the port can also be on an external interface facing the Internet

If your RouterOS is used as a DNS server inside the infrastructure, make sure that the TCP & UDP/53 port is not hanging on the Internet
Also, if DDNS is not used, turn it off:
/ip cloud set ddns-enabled=no ddns-update-interval=none update-time=yes/ip cloud advanced set use-local-address=noWinbox Interface
Winbox is a graphical user interface (GUI) provided by MikroTik for administering RouterOS devices. It allows administrators to manage MikroTik RouterOS over TCP and can work over MAC addresses, making it particularly useful for initial configuration of devices without IP configuration.
Winbox can work at the L2 layer, meaning that a network engineer can access RouterOS by bypassing the network layer. This is the responsibility of the Winbox Server MAC, which allows connecting to Winbox without IP addressing.
By default, MAC Winbox Server is available on all interfaces, and this is not good. For better security, it is recommended that you only allow it on specific interfaces.
I only allow MAC Winbox Server on the internal LAN leaf where the LAN bridge is located for intranet work. Allow MAC Winbox Server where you need it based on your infrastructure, the sheets you have created. Also, turn off MAC Ping.
/tool mac-server set allowed-interface-list=LAN
/tool mac-server mac-winbox set allowed-interface-list=LAN
/tool mac-server ping set enabled=no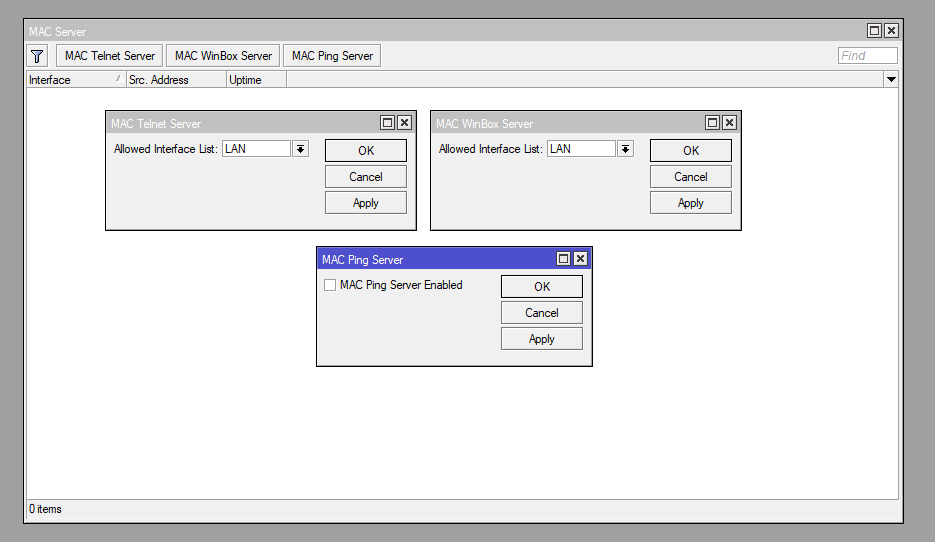
In the previous chapter "RouterOS Services & RMI" I touched on filtering services by IP subnet, in the context of Winbox use the same principle.
Discovery Protocols
Discovery protocols in MikroTik's RouterOS such as MNDP, LLDP, CDP are used to discover other MikroTik devices on the network. They allow administrators to see information about devices such as their IP addresses, MAC addresses, RouterOS versions, and hardware types. While these protocols can be very useful for network management, they can also pose security risks
- Information Disclosure: Discovery protocols, including MNDP, LLDP, CDP, may inadvertently disclose sensitive information about network devices. Attackers can use this information to plan attacks.
- Neighbor Table Overflow: An attacker can flood the airwaves with L2 MCAST frames from these protocols and flood the neighbor table, resulting in CPU overload and DoS
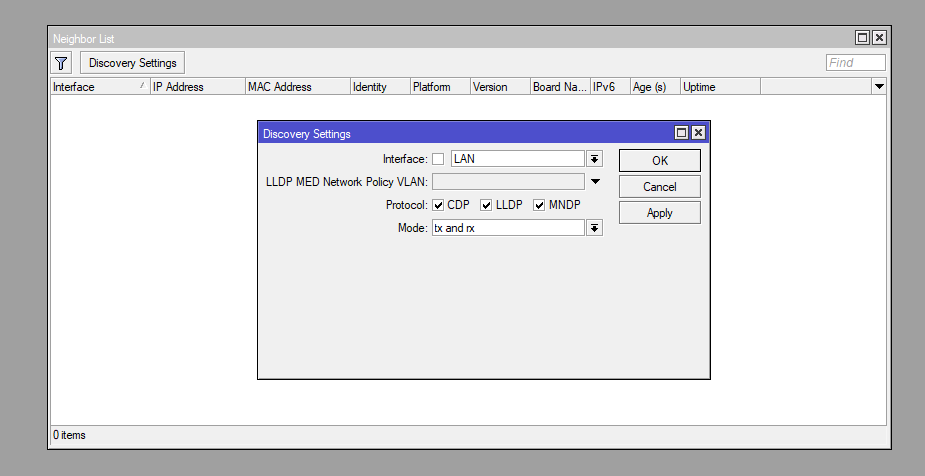
/ip neighbor discovery-settings set discover-interface-list=<interface_list>Be careful though, Discovery protocols can be used to make VoIP work
Discovery protocols should be allowed on specific interfaces, usually connections between switches, routers, because Discovery protocols help in troubleshooting. Understand the risk of Discovery protocols and disable them wisely.
DHCP Snooping
DHCP Snooping is a security feature that prevents a DHCP Spoofing attack. The attack works as follows: an attacker inside the network raises a false DHCP server for a subsequent MITM attack. A default gateway address can be transmitted over DHCP, and this address can be the attacker's host.
DHCP Snooping works on the principle of trusted and untrusted ports. On untrusted ports, all DHCP messages will be monitored. The goal is to see if they are generated by the DHCP server. After all, if we see messages like DHCPLEASEQUERY, DHCPOFFER and DHCPACK on the user segment, then this is definitely an anomaly and there is a DHCP server on the user network. On trusted ports, all DHCP messages will be considered legitimate. Typically, trusted ports are configured on connections between switches and routers, and untrusted ports are configured on ports where end stations (e.g., computer, printer, access points, VoIP) connect to the network.
In RouterOS, DHCP Snooping is enabled on the bridge, where all ports on the device are already considered untrusted. But to switch the desired port, you need to go to the interface settings. DHCP Snooping requires thoughtful configuration, which should be based on the specifics of the infrastructure.
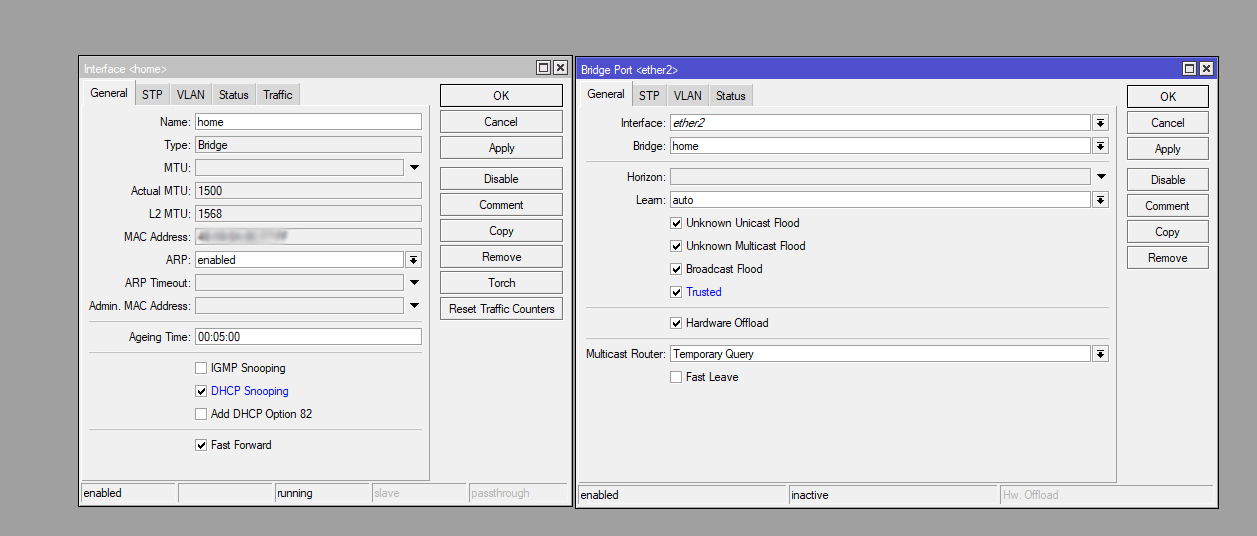
Setting up DHCP Snooping is basically assigning trusted and untrusted ports. On untrusted ports, all DHCP messages will be monitored. The goal is to see if they are generated by the DHCP server. After all, if we see messages like DHCPLEASEQUERY, DHCPOFFER and DHCPACK on the user segment, it is definitely an anomaly and there is a DHCP server on the user network.
DHCP Snooping is enabled on the bridge:
/interface/bridge/set dhcp-snooping=yes <your bridge name>Assign a trusted port in the context of DHCP Snooping:
/interface/bridge/port set trusted=yes interface=<interface_name> bridge=<your bridge name> numbers=<interface number on bridge>This completes the DHCP Snooping configuration and will cut off DHCP service messages on untrusted ports that are normally used by the DHCP server. Since the attacker must impose his address as the gateway with a DHCPOFFER message, these settings help prevent the attack altogether. However, be careful with the settings so as not to cause an unintended DoS.
In fact, the configuration of DHCP Snooping is highly dependent on the individualities of your network infrastructure. Before integrating this protection system, you must understand the whole network picture, where which host is which, where is which VLAN segment and everything else.
DAI Issue
You might think that the "Add ARP for Leases" option in the DHCP server settings would help protect your network from ARP Spoofing, but this method is overkill and not very effective, especially in large networks.
Yes, you can use a static ARP table, but if we are talking about large segments with hundreds of machines, it will be very hard to administer the structure.
Unfortunately at the moment RouterOS/SwitchOS does not support Dynamic ARP Inspection, although it does support DHCP Snooping.
Port Forwarding
Port forwarding at first glance seems to be a very convenient solution if you need to quickly forward a device to the Internet. However, it has a negative impact on network security, as a port forwarded port is easy to detect, given the speed of modern port scanners. If such a device is compromised, an attacker can move into the infrastructure and increase their presence on the compromised network.
It is recommended that you avoid port forwarding and instead use a VPN server that allows you to log into the internal infrastructure and utilize your services.
Firewall
Is a subsystem that is responsible for processing and filtering all packets. In my opinion, the firewall configuration should be treated with special attention, because both the device performance and security level depend on it.
Initial traffic processing
RouterOS routes all traffic: it uses the concept of "anything is allowed that is not forbidden". Traffic is processed from top to bottom according to rules. The best practice is to set rules in the INPUT/Forward chains at the beginning of firewall settings that allow Established/Related connections and reject Invalid connections. By the way, it is the Connection Tracking mechanism that makes it possible to track connections by their state.
/ip/firewall/filter add chain=input action=accept connection-state=established,related log=no log-prefix=""
/ip/firewall/filter add chain=input action=drop connection-state=invalid log=no log-prefix=""
/ip/firewall/filter add chain=forward action=accept connection-state=established,related log=no log-prefix=""
/ip/firewall/filter add chain=forward action=drop connection-state=invalid log=no log-prefix=""
Try to stick to the concept of minimum rules on Firewall, this will help to reduce the load on the hardware. The device configuration will be cleaner and the CPU will be less busy.
If the equipment is used as a transit device, Connection Tracking can be turned off altogether:
/ip firewall connection tracking set enabled=noHiding Router with TTL Shifting
If there is a need to hide the device on the internal network side, you can shift the TTL with increment +1:
/ip/firewall/mangle add chain=prerouting action=change-ttl new-ttl=increment:1 passthrough=yes in-interface=<interface_name> log=no log-prefix=""Mangle Table
If you are setting up rules to protect against bruteforce, it is better to use the mangle table, as it is in the PREROUTING chain, which decides what happens to the packet before it is processed
ICMP Filtering
It is also a good idea to allow the ICMP protocol to work with a small limit on the number of packets per second to avoid potential DDoS over ICMP. ICMP will allow you to verify the availability of the device, no matter how trivial it may sound
/ip/firewall/filter add chain=input action=accept protocol=icmp icmp-options=8:0 in-interface=<interface_name> limit=50/5s,2:packet log=no log-prefix=""Also ICMP cannot be blocked completely!
There is ICMP Type 3, which is responsible for PMTUD (Path MTU Discovery), it avoids excessive fragmentation and it uses ICMP protocol in its operation
/ip/firewall/filter add chain=input action=accept protocol=icmp icmp-options=3:4 in-interface=<interface_name> limit=50/5s,2:packet log=no log-prefix=""
Drop All Other
The final Firewall rule, without it the rest of the security settings in the FW will just be useless. This is a very important rule that should be in every FW configuration. It will reject all packets on the external interface. However, consider your infrastructure and allow what you need (i.e. protocol and port number) above in advance
/ip/firewall/filter add chain=input action=drop in-interface=<interface_name> log=no log-prefix=""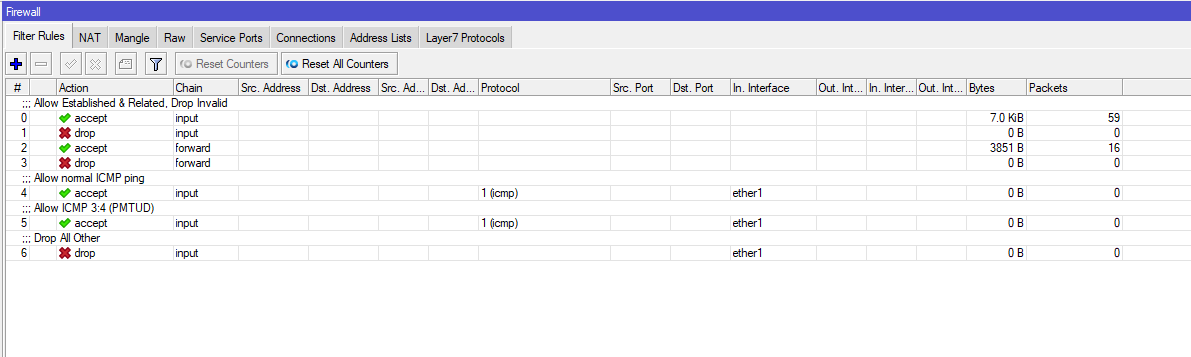
STP
STP (Spanning Tree Protocol) - is a protocol used to prevent loops in Ethernet networks. It allows devices to find and disconnect redundant paths in the network to avoid infinite data loops. Despite its usefulness, STP can also be the target of various attacks and security threats.
The point is that Ethernet frames have no TTL field, and broadcast traffic will run endlessly over link links if a switching loop occurs. The protocol operates solely at the link layer, and uses 802.3 BPDU frames to communicate. STP is usually enabled by default on managed switches.
However, an attacker can send a BPDU frame with the lowest priority value towards the STP switch, which gives him a chance to hijack the role of the root switch. This course of events leads to either a partial MITM attack or a DoS.
BPDU Guard
You can protect against spoofing in the STP tree by using BPDU Guard. This mechanism will block a port if it receives a BPDU frame, which is normally only used to negotiate between switches in an STP domain. It is by sending BPDUs with the lowest priority value that an attacker can hijack the role of the root switch, thereby performing a partial MITM attack.
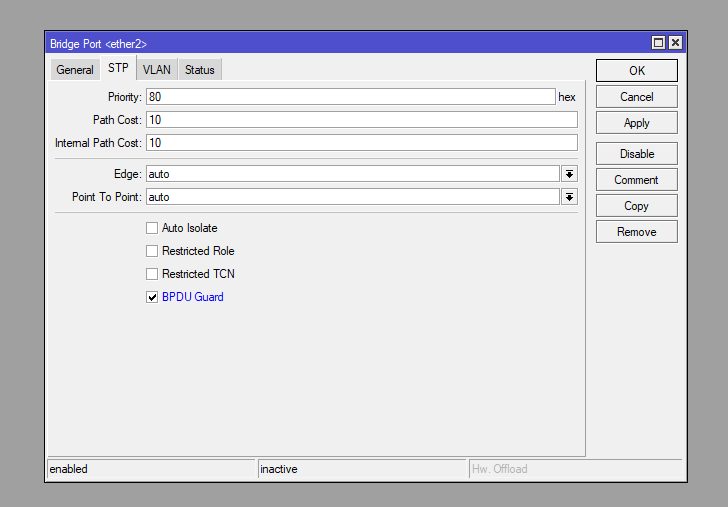
BPDU Guard is configured specifically on ports that are under the bridge:
/interface/bridge/port set bpdu-guard=yes interface=<interface_name> bridge=<bridge_name> numbers=XDynamic Routing
Dynamic routing is used in every large corporate network. Routers in the network exchange routing information with each other automatically so that the network administrator does not bypass them and manually prescribe routes. In most cases, he doesn't touch the settings of the security mechanisms either. And that opens the door for exploitation.
In this article, I will show an example of securing an OSPF routing domain.
Passive Interfaces
Configuring passive interfaces for dynamic routing allows the router to prevent the router from sending advertisements on some interfaces. By default, without configuring passive interfaces, it sends advertisements to all interfaces, and this puts the routing domain at great risk.
The passive parameter below indicates a passive interface:
/routing/ospf/interface-template add interfaces=<interface_name> passive area=<area_name>Authentication
The use of authentication in routing domains ensures that only authorized routers can connect to them. However, authentication is configured using passwords. So it is imperative to make sure that these passwords are strong enough. If an attacker gets the hash value from the traffic dump, he can try to crack the password by brute force. And with the password, he can easily connect to the routing domain. However, don't hurry to rejoice, an attacker listening to OSPF packets can get hashes from them and brute force them. This applies to MD5 and SHA-1 as well.
The configuration below uses SHA-384. Speaking of which, Ettercap will be able to pull any MD5/SHA hash, giving the attacker the ability to try to brute force the password from the OSPF domain. Again, keep an eye on the strength of the passphrase:
/routing/ospf/interface-template set auth=sha384 auth-key=<auth_key> auth-id=<auth_id> numbers=XFirst Hop Redundancy
There are many ways to improve fault tolerance and reliability in enterprise networks. Often, special FHRP first hop protocols are used for this purpose.
FHRP (First Hop Redundancy Protocol) - is a family of protocols that provide network gateway redundancy. The general idea is to combine multiple physical routers into one logical router with a common IP address. This virtual router address will be assigned to the interface of the router with the master role, which in turn will forward the traffic. RouterOS has only one protocol from the FHRP class - VRRP.
Pseudo Balance
The problem is that the VRRP protocol in RouterOS has no load balancing mechanism. When using VRRP, only one device is actually running while the others are resting and idle. However, you can simply spread your VLANs across the logical /VRRP process at the RouterOS device level when logical VLAN interfaces are created (802.1Q)
For example, you have multiple RouterOS devices on your network and multiple VLAN segments, you can leverage all RouterOS on your network, for example:
- R1 will be
MASTERfor VLAN140and VLAN200, and it will beBACKUPfor VLAN120and VLAN280; - R2 will be
MASTERfor VLAN120and VLAN280, and for VLAN140and VLAN200it will beBACKUP. That is, the configuration mirrors that of R1:
This technique is called pseudo-balancing. Of course, it does not have the same round robin, but at least all routers in the VRRP domain will work. For MASTER - priority 200, for BACKUP - 90. I took the numbers and VLAN IDs out of my head to simulate this scenario:
R1 VRRP Pseudo Balance Configuration:
/interface/vrrp add interface=vlan140 name=vrrp140 priority=254 vrid=140
/interface/vrrp add interface=vlan200 name=vrrp200 priority=254 vrid=200
/interface/vrrp add interface=vlan120 name=vrrp120 preemption-mode=no priority=90 vrid=120
/interface/vrrp add interface=vlan280 name=vrrp280 preemption-mode=no priority=90 vrid=280
R2 VRRP Pseudo Balance Configuration:
/interface/vrrp add interface=vlan120 name=vrrp120 priority=254 vrid=120
/interface/vrrp add interface=vlan280 name=vrrp280 priority=254 vrid=280
/interface/vrrp add interface=vlan140 name=vrrp140 preemption-mode=no priority=90 vrid=140
/interface/vrrp add interface=vlan200 name=vrrp200 preemption-mode=no priority=90 vrid=200
In this way, a pseudo-balancing occurs. The two RouterOS are configured in a mirrored fashion, and both are ready to replace a failed MASTER router. In this case, all capacities within the segment are utilized, secondary equipment will not be idle. Also consider that in RouterOS PREEMPT-mode is enabled by default, it allows a previously downed MASTER router to regain its role when it is replaced by one of the BACKUP routers. For backup routers, PREEMPT is disabled accordingly.
By the way, you'd think you could use priority 255, but VRRP doesn't allow you to use that value, only 254
Authentication
Authentication protects the VRRP domain with a special passphrase that an attacker cannot spoof without knowing. Again, care must be taken to ensure that the authentication key is brute force resistant. RouterOS uses a protocol from the IPSec repertoire - AH - to protect VRRP. After checking with RouterOS developers, I found out that AH implementation in RouterOS is based on HMAC-MD5.
/interface/vrrp add interface=<interface> priority=<priority_value> version=2 vrid=<group_id_number> authentication=ah password=<your_password>VRRPv3 Security Issue
Authentication is no longer supported for VRRPv3, but something needs to be done about that too. Using the Mangle and Raw tables, you can pre-allow VRRP from legitimate VRRP routers and then block the rest of the VRRP packets. This option will give the least load on the CPU. The resolved rules will not contain the address of the attacking host, so any attempt to attack the VRRP domain will be futile. In fact, we use the concept of ACL lists
/ip/firewall/mangle add chain=prerouting action=accept protocol=vrrp src-address=<first_vrrp_speaker_ip> in-interface=<interface_name> log=no log-prefix=""
/ip/firewall/mangle add chain=prerouting action=accept protocol=vrrp src-address=<second_vrrp_speaker_ip> in-interface=<interface_name> log=no log-prefix=""
/ip/firewall/raw add chain=prerouting action=drop in-interface=<interface_name> log=no log-prefix="" protocol=vrrp
Updates Issue
MikroTik periodically releases updates for RouterOS, but don't rush to update right away. Wait for a while, as unpleasant bugs may pop up and network operation may be disrupted. Update wisely and focus on security updates.
Outro
In this article, I have described most of the security aspects of RouterOS, covering the theoretical and practical part of security configurations. This article is intended to improve the security of MikroTik equipment that is used all over the world.